In-Depth Post #6

Blog Post #6

In the last two weeks, I didn’t practice any new skills however spent time trying to refine the skills I learned in previous weeks, so I don’t have as much to say, just go over what I practiced and what went well. I went out with my friend Greg to get some photos of the trail he built and of him riding the jumps. This was the first time that I tried taking photos of jumps because they’re much harder to time and require a much faster shutter speed to capture. On top of that, I tried taking a few still shots to show off the trail which I’ll include even though they aren’t action photography. I went into the shoot with no expectations but came out pleasantly surprised with the turnouts. I also focused on trying to include as much greenery as possible to add more depth of field to the photo and make it more interesting. Finally, the day we went was brighter than previous days and in a more open area which let me use a much faster shutter speed.

This first photo I took was simply of the trail sign with the trees and sky in the background, and again, the blog site significantly reduces the image quality. I like the colours in the photo and how everything in the background is out of focus, making the focal point on the trail sign and the center tree. Also, because there was no moving subject, I ran a much slower shutter speed around 1/40 of a second, which let much more light into the camera. It’s hard to tell from the blog but that made a noticeable difference with the graininess of the photo after photoshop.

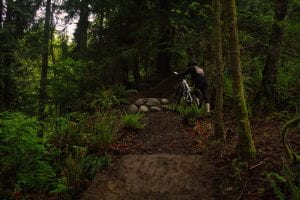
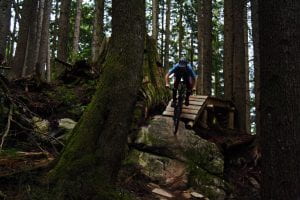
With this second photo, it was supposed to be more of a lifestyle/behind-the-scenes type of photo while showing off the jump at the same time. As with the first shot, there was no moving subject, so I ran the shutter speed slow for more light. I also used a deeper depth of field so that the takeoff and landing would be in focus as well as Greg and the trees. Finally, in photoshop I gave the photo a warmer tone to bring some more attention to Greg and the jump as opposed to the trees.

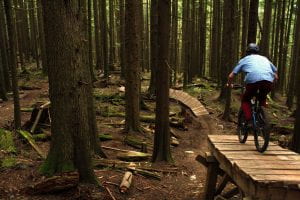
In the third photo, I wanted to bring more attention to the forest than to the subject. I did this by using a deeper depth of field on the camera and increasing the vibrance and using a green filter in photoshop. Because he was moving in this photo, I had to run a much faster shutter speed, because of how open it was I was able to do 1/700 of a second which completely froze him. This also made the photo a little grainier because I had to use ISO and photoshop to compensate for the lack of light.

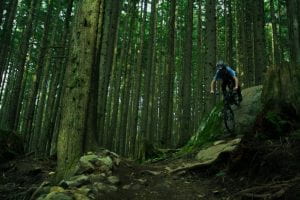
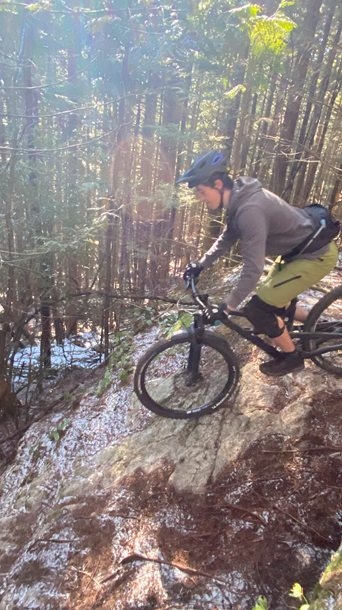
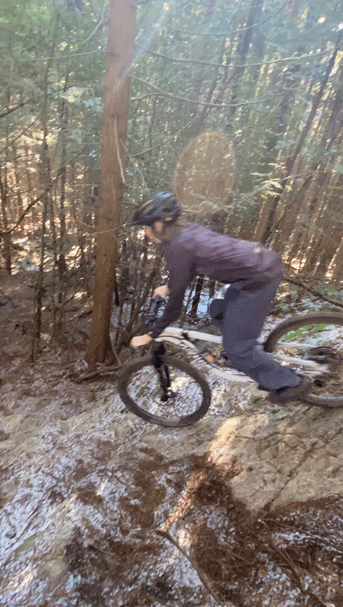
In the fourth and fifth photos, I wanted to make the attention more on Greg as it was a bigger jump, and he was putting more style into it. For both, I got as low to the ground as possible to make the jump look more like its real size and keep trying until I got the perfect timing. This was difficult because my camera doesn’t have a good burst mode, so I was trying to time it perfectly with a single shot. I also learned that 1/700 was faster than needed so I did a 1/500 shutter speed so that I could get more light and have the photo come out more clearly. In photoshop I brightened both photos and increased the vibrance to make the whole photo stand out more.

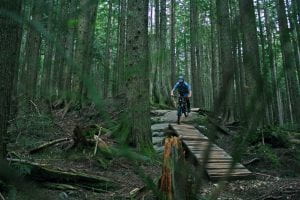
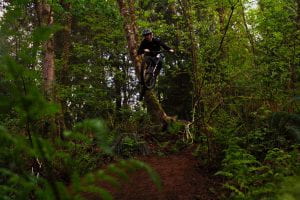
Finally, this was my favorite photo from the day, I find that it does a good job of focusing on the rider while also telling a story of the surroundings. I followed the rule of thirds to divide the photo into 1/3 is the subject and 2/3 is the surroundings. I also love how you can only see the takeoff of the jump and it almost looks like he’s jumping into the forest. I spent a while trying to find an angle where I could pull that off and hide the dirt as my mentor told me in our last meeting. For shutter speed, I used 1/400 of a second but I wish I used a faster one as the freeze isn’t perfect however it’s not noticeable without looking really closely. In photoshop I zoomed in on the photo more for the rule of thirds, increased the brightness, and vibrance, and gave it a green filter to make the forest stand out more. With this photo, I just wish the shutter speed was slightly faster and the photo was a little brighter.

For my in-depth night presentation, I want to present on stage and show a few photos, and talk about them. What I was thinking was showing a couple of photos on the projector from the very start of the project then a couple of my favorite photos from the end. I’ll talk about what it took to get from the first photos to the end. I’ll say why they’re better, what’s different about them and how I achieved the progression. I will try and take some more photos before my presentation so it’s hard to say exactly what will be better about the newer photos but some of the main points will be, shutter speed, depth of field, angle, and color filter. To prepare for the night, I will take some more photos probably similar to the ones included in this post, and prepare a tentative script of what to say.

Overall, In-Depth this year has been great, there were some hurdles to get over at the start however throughout the project everything started to work out. I progressed at my topic a lot faster than I thought I think mainly due to photography class in the first semester and having strong ideas of what I wanted to shoot thanks to my love for the sport. Even though the project is technically over, I will have a few more meetings to wrap up with my mentor. I will also for sure be continuing to take photos as I find it relaxing, and enjoyable and it’s awesome to see people happy with the photos I get of them. There’s also a few more skills I want to work on in my own time that I didn’t get the chance to yet.

-Ronan

In-Depth Post 5

In-Depth Post #5


Two weeks ago, I went out to play around with my camera and try some of what my mentor told me but without much knowledge. I wasn’t expecting much but I came back with a lot more knowledge, and some decent photos and I had fun taking them. I also got some experience using photoshop for the first time in a while to try and enhance the photos by making them brighter and more vibrant. I then showed the photos to my mentor, and we talked about what I could do to make the photos better the next time. This included adding more greenery, more leading objects such as out-of-focus plants and trees, and faster shutter speeds.

On top of that, he said to try taking the photos earlier in the day to get more light, he told me that based on where the sun is in the sky plays a huge factor in the amount of light the camera lets in. When I took my first photos it was around sunset, and they came out very dark even though it wasn’t dark to my eyes and I couldn’t figure out why. We talked about the camera angle and how I should try not to go for the obvious shot, this means to get low and angle the camera up or find somewhere creative to take the shot. Another major point he mentioned was that I should focus the shot on the landscape instead of the rider if the rider wasn’t showing off. This means taking a step back and shooting a wider photo so that the forest, the landscape and the trail can tell the story. On the other hand, if the rider is doing something impressive then it’s ok to zoom in and make them the focus and not worry so much about the landscape. Finally, he talked about not showing any dirt in the photo, he said to try angling the camera up or making hiding it with greenery to make the photo more appealing and intriguing.

Finally, there was a day when I could get out again when it was cloudy, not raining and I was free around three so perfect conditions for the photos. I got out to eagle mountain with my friend Bryson and we were going up to one of the best trails, Manhandler with many photo opportunities. Right away, I snapped a spoke on my wheel which meant I wasn’t riding anyway so there were more chances for me to take pictures. The first challenge I had was when I got up there, I quickly realized there was very little greenery just trees and dirt. It also ended up being very cloudy which meant there was still a lack of light.

Here are the first two photos that I took after photoshop. Firstly, another reminder that there isn’t much I can do to format the photos in the blog post, and they sort of just go where they want as well as the quality is greatly reduced in the blog site. With these two, I tried to think about making the feature look bigger which meant getting below it to make it look taller and steeper. I also tried to find somewhere where I could hide as much of the dirt as possible which ended up working quite well. Next, I thought about the rule of thirds which is where the rider and the feature take up around a third of the shot. Once I chose my angle, I then played with the settings firstly the shutter speed. I went as high as I could before it got dark which ended up being 1/150 of a second which is decent but not ideal. In the photos, you can see the slightest bit of movement however it isn’t very noticeable unless you look closely. To compensate for the light, I made the f-stop as small as possible and put the ISO at 1600.

In the third photo, I tried to incorporate a plant as a leading object into the subject. I think it did add a little however it could have been better with a little deeper depth of field because the plant almost isn’t noticeable. There’s also a lot more dirt visible although that is mostly due to the terrain, and I couldn’t find an angle to hide the dirt. As this was a slower feature I only used 1/70 of a second for the shutter speed which meant I got more light and didn’t need as high ISO so the photo was of higher quality. Finally, I tried to capture Bryson on the rock between the two rolls because the rock is what stands out the most to me.

In the fourth photo, I tried to make the trail the focus of the photo. I did this by showing both wood features as well as making Bryson smaller and on the side of the photo. Because of this, the trail acts as a leading line that takes your eyes all the way across the photo to where the trail leaves the frame. I also made the tone warmer in photoshop to make the two wood features stand out more as they were what I wanted to show off. I went with 1/200 of a second shutter speed this time as there was more available light and Bryson was going faster for the drop. There was no chance of hiding the dirt in this photo however I think the forest background sort of distracts the viewer and I don’t really notice all the brown dirt that you don’t want to see.

This was the final decent photo that I got from that day, I like it because of how green the forest looks. The feature isn’t anything too special however the moss on the rock stands out and I made the tone greener so that the forest looks greener and more vibrant. I wish I had chosen a different angle however as this one doesn’t show too much, and it would have been nice if the photo was brighter which I probably could’ve fixed in photoshop or a slower shutter speed.

Mainly what I noticed was how much of a difference the time of day made, I was able to shoot with shutter speeds up to 1/250 of a second whereas the first time I couldn’t go faster than 1/100 which made a big difference. I also found it easier to choose an angle to shoot from this time as I knew what to look for and what I wanted to capture. On top of that, I spent less time trying different camera settings as I had more experience with what each function did. Finally, the consistent cloudy sky made for a nicer picture as nothing was overexposed or underexposed like last time.

Something that I like about the way my mentor teaches is that he talks from personal experience with brands and what they are looking for with his photos. This allows me to learn how to take photos in a way that would be appealing to a wide audience instead of just what I like or what he likes. This is also beneficial if I ever wanted to go deeper into photography as a career or side hustle later in life. The best opportunity that I must reinforce new learning and accelerate learning is simply to get out and practice. I have many friends that I can take pictures of at a moment’s notice, and I learn best hands-on. This way I am also able to learn from my mistakes as well as find personal preferences and strengths.

As I mentioned, when I talk with my mentor, he is always talking about the perspectives of the people buying the photos which is a different perspective from last year. I also like how he speaks from the consumer’s perspective because when I am taking my photos that isn’t much of consideration, so I sort of get to see both views. So far, the method of progression has been going well where I take my photos and discuss them with my mentor. I’ve found it’s been working well to learn from my mistakes as well as continue to build from my strengths. My mentor has been very open about his professional life to me and exactly what goes into making his career work and he’s giving me as much information as possible about what I need to know. We have also had an easy time making connections about the places we’ve been and the trails we ride for example. Because we got to know each other a little I’ve found it’s easier to trust him and learn from him and I would think he has an easier time mentoring me because he knows me.

Blog Post #3

The past two weeks of In-Depth didn’t quite go as I had hoped. In my meeting with my mentor two weeks ago, we talked about what I could try between meetings, we ended up deciding that I could try taking pictures with my cell phone, and then we would look at them and discuss what worked well and what didn’t. Neither of us had ever tried taking action photos on a cell phone so we didn’t know how well it would work. I only managed to get out and take some photos twice over the two weeks and here are a few of the photos that I got:

As you can see, none of them turned out well, all of them were blurry and they didn’t capture any action. I had a very short meeting with my mentor just to talk about the photos and what I liked and what I didn’t as well as what caused the issue. As they all have similar issues, I will just talk about them all together rather than talking about each one and what went wrong. The main issue was that none of them were in focus. For the most part, this was due to the shutter speed being too slow. This means that the camera is letting in too much light which makes the movement visible and makes it nearly impossible to get the subject in focus. On top of that, there’s no way to adjust the focus on the phone which means that I can’t choose the area of focus. A couple of the photos are a little on the bright side as well, this could have been improved with a faster shutter speed and tweaked to perfection by adjusting the iso. The iso makes the photo brighter however makes the photo grainier so it could also make the focus slightly better by lowering it. It also would have been nice to be able to adjust the aperture. This gives the double effect of being able to choose the depth of field of the photo as well as letting more or less light into the photo. Finally, I didn’t know what angle to take the photos from, and even after trying a few different ones, I wasn’t overly happy with the result.
So based on the result of the photos my mentor and I decided that it wasn’t worth trying to continue with the cell phone photos. The issue is that they are in an automatic setting and a good one at that. This means that still photos they’re great, it chooses all the settings for you. Once you take a moving subject into play then this is a major downfall as it doesn’t know that. There’s no way to make the shutter speed faster which as I mentioned means that you can’t get the subject in focus. I think there are apps you can buy that let you change some of the settings however neither of us thinks that it’s worth it and it makes more sense to move onto the camera where I can shoot in full manual or even shutter speed priority. Shutter priority is where I select the shutter speed however the camera does the rest of the work. This makes learning how to take action photos much easier to start and is most likely how I will start. We are having another longer meeting this week so that I can start looking at taking pictures with a camera and getting better results from it.

For reference, here is a photo I took the same day as the others of my bike on my cell phone. This shows how strong the automatic settings on the phone can be when it is on a still subject.

So far, I’ve enjoyed the mentoring sessions with my mentor, I like how you can tell he enjoys the project and wants to be a part of it. I also like that he goes in-depth when answering my questions and gives me as much detail as he can. One challenge I’ve had so far is getting the paperwork from my mentor, he did the volunteer paperwork right away however I still haven’t gotten the crim check. I’ve been pushing him a bit to get it however I don’t want to push too hard as at the end of the day, he is doing so much for me to make this project work. At the end of the day, I am the one that needs the crim check not him so I will continue to try and get it from him, and I will try to set a deadline for it by our next meeting. It has also been sort of frustrating trying to take photos with the cell phone because I put time into trying to find the right angle and the right features but wasn’t able to get a decent shot from all the photos I took.
One strategy I could use to enhance my learning would be to communicate more with my mentor in between meetings. This could be implemented by sending him an email if I have a problem or if was wondering something about a photo I took. This could be beneficial to me because I could get more practice done in between meetings and get more from the practice. Secondly, trying to ask my mentor more questions in our meetings. This could be done by preparing a few questions before we talk as well as coming up with a few on the spot. This shows my mentor that I am engaged with what he is saying, that I am interested and passionate about the project, and could help me gain more from each meeting. Finally, try to take as many photos as possible between meetings as practice. This way, I can see what works well and what doesn’t as well as give me better results which also shows my mentor that I am passionate about the project and able to learn and implement what he is teaching me. To me, my mentor must know I want to learn about this and it isn’t just for school which is why I chose those three strategies to improve my mentoring interactions.

This week, my mentor and I will have a longer meeting where we will start to look at taking photos with a camera most likely in shutter priority mode. This will allow for a lot more control over the photos I take and produce a much better result than what was taken with my phone. We will also talk about how to select an angle and a location for the shot.

-Ronan


In-Depth Blog Post #2

I want to start my second In-Depth blog post by saying that my first meeting did not go the way I expected. First of all, it was challenging to line up a meeting with my mentor (Sterling) because of how busy he is and conflicting schedules. I had tried to line up a meeting with him a week ago, but he didn’t see the message. I sent him another one on Tuesday to which he replied quickly, and I found out that email was the best way to reach him. We had planned to meet on Thursday, but something came up for him at the last minute and the same happened on Friday night. We ended up having our meeting Saturday after a few more schedule conflicts between the two of us. This is the tradeoff for having a mentor who is the best of the best in his field and it’s well worth it for the skills and experience that he has to offer. I also learned from this that I should try and line up the meeting well in advance with him, so we are already starting to come up with a date for our next meeting over a week from now.

My plan for the first meeting had been to spend ten or fifteen minutes getting to know my mentor and introducing myself to him then spend twenty minutes to half an hour learning how to take action photos with my cell phone then go practice and meet again in two weeks. Instead, we talked at the start of our meeting about what I wanted to get from this project, and we ended up deciding it was best to spend this meeting learning about him, how he turned photography into his career, what exactly he does and what his skills are. Our logic was that after learning a lot about him it would be easier to figure out how he could help me and what knowledge I could gain from him. We also talked about how we might be able to relate the project to leadership. On that note, he thought that if we looked at photography as a career that would relate to leadership because there is much more to it than just taking good photos.

From our meeting, I learned that the two of us are very similar. He grew up on the North Shore and was one of the first people to be mountain biking out here even before it was popular because of how much he loved it. He also spent the winter snowboarding the local mountains and Whistler. He loved to capture the moment of him and his friends riding or snowboarding so that he could look back at the memory later. At first, he played around taking videos of his friends but later realized that he preferred photography. He later took photography classes in school but most of his learning came from hands-on experience. For the next few years, he went to university and worked a full-time job with photography as a side hustle and passion. Finally, after mountain biking essentially blew up in Vancouver and all the bike companies started coming here, he was able to make being a “Professional Photographer” a full-time job. He was able to consistently get jobs with big bike brands such as Specialized, Trek, and Fox which all paid him very well. He said this was the turning point for him where he went from wanting to be a professional to jumping right into it even though he was worried. He said that it is a well-paying job and is his dream job, but it comes in waves of not being busy and being very busy. On top of that, it is also a freelance job so there is no one company that he works for. He takes the jobs that he can get and has companies that constantly reach out to him, but a marketing manager can always change which could end his relationship with the company. So his job isn’t just taking nice photos but also involves a lot of communication, forming relationships and adapting to changes constantly.

Learning about his story and how he became a photographer gave me a new perspective of how I wanted to do In-Depth this year. It made me realize that any of the photography skills can be learned from YouTube not to say it wouldn’t be easier to learn from my mentor but there’s more he can teach me which can’t be learned from Youtube. In the meetings, I want to try and keep learning technical skills to a minimum because we both agreed that the best way to learn was a hands-on experience but be guided by him. So, in every meeting look back at photos between the meetings and talk about what went well and what didn’t and what we can do to make them look better whether that is through photoshop, faster shutter speed, etc… Then for the rest of the time in the meetings, I would be learning about other important parts of his job such as identifying trends in the industry and adapting to them which is something that couldn’t be taught from Youtube. This way I can make the most out of the five months I have with him.

Finally, what I thought that I should do between now and our next meeting was to take as many photos as I can with my phone. After taking them, I will look at them, figure out what I like about the photos, what I don’t like, and what caused the photo to look like that for example, the subject was blurry, or the depth of field was too shallow. I would then identify what caused the rider to be blurry which would be the shutter speed being too long or why the depth of field was too shallow. My mentor agreed that this was a good idea and that we could look back at some of the ones I liked in our next meeting. The nice feature of the cell phone camera, especially newer ones is that they have a really strong automatic setting which makes them especially effective for this activity because there are no settings for you to change. I wasn’t able to get out for a ride yet due to weather and work so I have no photos to show but there will be plenty in time for the next blog post.

In-Depth Post #1

For my In-Depth project this year I have decided to pursue Action-Photography. I chose this topic because I like to mess around with cameras and take photos and I like sports such as mountain biking and skiing, this topic lets me combine the two interests. I took Photography 10 in semester one, so I have a few months of experience using a camera and I know how all the settings work. However, I have never tried capturing a moving subject with a manual camera. I also have a camera that is suitable for the project although it is fairly old, and I have access to Adobe Photoshop throughout the whole project. For In-Depth last year, I made skiing and mountain biking videos which was another way to capture the sports that I love so this topic builds nicely from last year’s topic. A bonus to this topic is that progress is very easily measurable by comparing photos from the start of the project to photos taken later.

In terms of progression, I will be looking at camera setting choices, lighting, subject positioning, and the work that I did in photoshop. I will also be looking at comfortability with camera settings and location choices which I will be talking about in my bi-weekly posts as they are harder to measure. In my bi-weekly blog posts, I will also be sharing at least three photos that I have taken since the last post. I will describe my choices when taking the photos and while editing them as well as talk about my improvements and what I could improve on. This way, it will be very easy to keep track of my progress over the project.

My mentor this year, Sterling, is the best of the best in the field. I heard about him in a research project in photography class and his work immediately stood out to me, I discovered him off the Redbull website as one of their favorite mountain biking photographers to give a follow on Instagram. He lives in Vancouver and is an avid mountain biker and was the first person to come to mind for this project and I am incredibly grateful he agreed to help me with this project. He has won many “Pinkbike Photo of the Year” awards and has placed in the top three contestants in “Redbull Illume” as well as many more awards so I genuinely believe I could not have found a better mentor.

Here is a link to his website if you would like to learn more about him or see some of his stunning photos:

http://www.sterlinglorence.com/

So far, In-Depth has been off to a great start for me. I haven’t had any obstacles to overcome or any frustrations. I knew exactly what I wanted to pursue, got my top choice for a mentor, and got access to Adobe Creative Suite thanks to Mr. Findley. I look forward to starting meetings with my mentor and taking some photos in the coming weeks, to see the progress I make along the way and be able to critique the photos I take at the start of the project by the time it is over.

Eminent Person Learning Centre

Here is the link to my learning centre websitehttps://diggerlearningcentre.weebly.com

Interview reflection:

This year, I was lucky enough to get an interview from my eminent person himself, I messaged him and got an interview a week later. I got a lot of valuable information that I wouldn’t have been able to find online as well as information that I missed or misunderstood from the websites I used. For example, I had seen somewhere that he had been influenced by Dan Cowan and that Dan had brought features to his trails but in my interview, he said that wasn’t the case.

So, what else did I learn from the interview which I wouldn’t have been able to find from research? Like I said, I learned that Dan Cowan wasn’t an influence of his and neither was anyone else. He was the first person to be building trails in BC and he was the first person to be putting features on trails in the world like a ladder bridge and a teeter-totter. People like Dan Cowan and other trail builders in the area took inspiration from his work and built similar trails and put features like his on their trails. I learned that he also had to adapt the way that he built trails over the years. Originally, it was only a few people riding the trails, so sustainability wasn’t an issue. Nowadays, however, Thousands of people are riding them so he must armor them and make them sustainable so they will last a long time.

Something else I was curious about which I couldn’t find online was why he wanted to make his first North Shore Extreme movie. I couldn’t find any answers to this question online, so I had assumed it was either to show off the riders or the trails or just to make money. It turns out that he had just been filming his buddies riding his trails for fun and compiled the clips into a movie over two hours. He had no intention of selling the movie or publishing it, it was just for his friends to see. Eventually, a local bike shop started to play the film for the customers to see and one of them liked it so much they bought it off him. After he realized people would want to buy it, he started to sell more copies of the movie and eventually made nine more of them, the riding getting better in each one as well as the editing. He had no editing experience, but it was the first mountain biking movie, and the riding was good enough that lots of people wanted to buy the movies. This worked well as he had to take up to six months off work to make each one, so they had to be successful for him to keep making them.

Other than what I mentioned, I had a few things clarified for me like how he created the NSMBA where some information was available online but not all of it. The information that I got from him was helpful for me, especially with the speech where most of the information came from this interview. The information has also taught me more about the history of mountain biking and the North Shore as well as helped me get along with my learning center. I left the interview with all my questions and more answered and I am very grateful I was able to talk with my eminent person and that he was willing to help me.

Thank you Todd Fiander!


Annotated Bibliography (Excluding Interview):

  1. “North Shore History.” North Shore Mountain Bike Association, https://nsmba.ca/history/.

This article talks about the history of the NSMBA, how it was created and who created it. This information is important as Todd Fiander is the co-creator of the NSMBA and it is one of the most important things he has worked on. From this article one can learn a little about Todd Fiander as well as learn about the evolution of mountain biking on the North Shore. The information from the article is valuable because the information comes from an association that he started. It has lots of accurate information about Todd and the trails which wouldn’t be here without the work of the NSMBA.

2. Lau, Lee. “Trailbuilders of the Shore – Part 3 – Digger.” Pinkbike, 1 Dec. 2010, https://www.pinkbike.com/news/shore-trailbuilders-part-3-digger-2010.html.

This article is an in-depth interview with Todd Fiander done by Pinkbike which is a prominent mountain biking news platform and website. The interview has much more detail and questions than mine did and a lot of the questions I asked were based on what I thought they missed. This was probably my most helpful resource alongside the interview I did. It went in-depth about every point of his eminence and provided further information which benefited me in the speech and the learning centre.


        3. Todd Fiander’s Website. https://diggerknowfear.com/.

This is my eminent person’s personal website which is mostly used as a store however has articles and information about him. It talks about the NSMBA, trail building, and the North Shore Extreme movies which are the three main points of his eminence. It doesn’t go too far in-depth however it gives information that more research can be done off of and it’s guaranteed that all of the information on the website is accurate.

4. Vendetti, Marc. “North Shore Trail Builders.” Marin Museum of Bicycling and Mountain Bike Hall of Fame, 5 Mar. 2016, https://mmbhof.org/north-shore-trail-builders/.

This article is on the Mountain Biking Hall of Fame website, and it talks about the contributions of Todd Fiander and Dan Cowan. Essentially, it tells us about the eminence of the two because to be put in the hall of fame you must have some massive contributions to the evolution of the sport. It goes in-depth about their early trail work and trail building contributions as well as a brief look at Todd’s North Shore Extreme movies and their contributions.


Thanks for taking the time to look at my learning centre. I’m glad that I could share a bit about Todd Fiander and the evolution of mountain biking. Feel free to leave any comments on my blog!

John C. Maxwell Reflection

In this assignment, I chose three nuggets of wisdom from John C. Maxwell’s book “Developing the Leaders Around You”. I chose the three that stood out the most to me whether it was because it’s something that I relate to or something that I must work on as a leader.

The first nugget of wisdom that was mentioned in the book which stood out to me was “The Law of the Chain”. Essentially, the law of the chain means that the strength of a team is directly related to the strength of the team’s weakest member. This means that a leader shouldn’t focus on making two people on the team good, they should try and divide their focus between everyone.
Once the whole team starts working together if one person isn’t operating at the same level it can completely ruin the momentum of the group and provide a worse outcome or a longer time to get a result. I’ve experienced this firsthand mainly in group projects at school, sometimes there will be one person who doesn’t care about the project or doesn’t want to help. Often, they will end up distracting everyone else and making other people go off task whereas if they were focused and on task that could be one more person on task and contributing to the efficiency of the group. For the adventure trips, this is important in both the planning of the trip as well as in the trip itself. If the same amount of attention is given to everyone in the planning of the trips, then the group can work together effectively and efficiently as opposed to two people doing all the planning. The same idea applies while we are on the trip whether we are solving a problem or trying to set up camp, etc…

Here is a website if you are interested in learning more about the law of the chain:  https://experienceleadership.com/blog/2019/3/28/the-law-of-the-chain

The second nugget of wisdom I want to focus on is “Leaders are big picture thinkers”, they see before others see and leaders see more than others see. Big picture thinking means that the leader can keep the result in mind. They can see further ahead than most people and even be able to see more details than most people can. This trait is valuable because it means the leader can be more calculated and more precise with their plans which gives less space for small things to go wrong which many other people would miss. This skill is important as missing small details could result in money loss in a workplace or even injury or harm in some situations. This statement is important for me because big picture thinking is something that I should try and work on. Often, I like to just get a vague idea of the end goal then jump into the deep end and try and make it work out. I often do the thinking as I am going instead of planning every little detail out beforehand. In TALONS on the other hand, we are very much a big picture thinking group. For the adventure trips, we plan out every single detail far beforehand, make changes when necessary, and follow the plan almost exactly when we are on the trips. Because of this, nothing goes wrong often which is well worth the extra time it takes to plan the trips.

Finally, I will talk about “The law of explosive growth”. What this law means is that if you are training followers, you will ad to the growth of your organization but if you train leaders, you will multiply the growth of the organization. This is the case because if you train the people of your organization to be leaders, they will help each other to grow and help new people to grow as well. On the other hand, if you train people to be followers and to do as you tell them, sure they’ll be valuable, but everyone will still be dependant on you at the end of the day instead of each other. This was something I learned at Taekwondo; the goal was to teach the students, so they were able to teach each other. There were only so many instructors, so it made it much easier if you taught the higher belts to teach the lower belts instead of taking on twenty kids with three instructors. This is also a prominent law in TALONS because we are taught to help and teach each other. For example, while planning the adventure trips the grade 10’s will be showing the grade 9’s how to plan so they can do the same next year and so on. This is also something we learn from the Autonomous Learner Model where we can take charge of ourselves and be able to help each other instead of following exactly what a teacher says.

In conclusion, I chose to look at the rule of the chain and the law of explosive growth as I found I could relate to both of them. I also looked at big picture thinking which is something I would like to work on in the near future. Those were the three nuggets of wisdom I found which stood out the most to me in the book. Finally, here is a quote that I feel is fitting with the book, “Before you are a leader, success is all about growing yourself. When you become a leader, success is all about growing others.” -Jack Welch.

Citations:

  • Cox, D., & Hoover, J. (2019, April 23). The law of the chain. Business Coaching & Leadership Training Minneapolis MN. Retrieved November 24, 2021, from https://experienceleadership.com/blog/2019/3/28/the-law-of-the-chain.
  • Maxwell, J. C. (2014) Developing the Leaders Around You. The John Maxwell Company.

Blog Post #6

In the last four weeks, I got lots done. First of all, I did a ton of mountain biking and skiing and from that, got a ton of footage. Over spring break I only made two videos but I now have footage for a few more soon. The first video that I made was a ski video, I hadn’t done one in a while so I decided it was a good idea and I also decided to try using background music. I took some footage I got of a double-black ski run I did where it was nearly minus 40. I also spent some time browsing YouTube for a non-copyrighted song that I could use for the background music. I was looking for a song that had a good beat and flow to it and eventually, I came across a channel that makes background music for other people to use and chose one of the songs they had.

Here’s the ski video: https://youtu.be/qqIjbvLN99E

As I said, this was my first time using music in the background of the video. I have based a video off of the music plenty of times but never tried putting music behind a video. I was happy with the result, it made the video more engaging and the music fits well into the video. The only thing I wasn’t happy with was that I got the camera angle too low but it was still worth making the video. It was frustrating because a lot of my footage from spring break was too low because it is hard to check but I’ll start checking more often now. One more thing I tried doing was an intro to the video as well as lowering the volume of the music when I’m talking which took a while to figure out but I got it. When I showed the video to my mentor she said that she liked the intro to the video and that the music was very good. The one thing that she said was that it went on for a little too long because it was interesting for the first couple of minutes but then not much changed. A few ways I could fix that would have been more camera angles, switch up the music, or make the video shorter.

The next video I did was a mountain biking video. I went to Burke with my friend, and I filmed him again on a few of the trails. I didn’t get as much footage as I was hoping from that day, but I still wanted to make something. I decided that this time I would base the video around a song, so I chose Song 2 by Blur because it isn’t too much to ruin the riding, but it was fast enough to keep it interesting. I wanted t try something new in the video, so I put the same video from two different angles right after one another a few times. I also cut out half the song and put in the ending which went well and watching it back I can’t find where I cut it which I’m really happy about considering it was my second time.

Here’s the biking video:https://youtu.be/4JDzmxagUc8

So far this is definitely my best video, it’s a little short but I had no more videos to use. One thing that I got was a few people commented “thanks for this” instead of just “nice video bro” and that felt great. My mentor also really liked the video, she said I nailed it and that I’m definitely on the right track. Even my friend who was in it said that it was way better than any of my other ones. I asked my mentor if she noticed where I cut the song and she didn’t. I also asked her what she thought about putting the same videos in different angles and she said that she didn’t even notice them which is great. The only issue that she brought up was that there were two longer clips at the end that got a little boring because they were similar. Looking at YouTube Analytics you can see the average view duration which was 45 seconds which is exactly where the two long clips started. Next time we go out I’ll try and go earlier so that we have more time to film so that I can make the video more entertaining.

In my meeting, I asked about colour grading which would be helpful if I need to use a clip from another day to make it fit in. She wasn’t sure how to do it on the software that I use so she sent me a few videos to watch. She also said that the software I use has one of the best colour grading systems which is neat, especially considering it’s free. I also asked about making a voice-over which is something that I’ve wanted to try from the start of this project. The main things she said were important were; intro, good mic, and an outro at the end and she explained how I could do all of them for the video I want to do. In the coming two weeks I’m going to try making a voice-over with some footage I got from Thornhill last weekend.

The other thing that we talked about in the meeting was the final project. First of all, we changed the 4 videos that I was going to do to 3 and decided that they didn’t have to be three minutes each. Before this project, I thought that time was everything but I quickly learned that it wasn’t. My original idea for the final test was that my mentor would give me a bunch of clips and I would have to make a video out of them. She suggested that I do a documentary instead of that, at first I was confused because it didn’t seem to fit with what I’d been working on. She explained that I could start with an interview then go into some riding where I can use background music and do a voice-over. The video will be between three and five minutes and I’ll start working on it after our next meeting until the end of the project. Between now and the next meeting I’ll work on the final of my three videos then in the meeting we’ll discuss more about the documentary.

Concepts:

  1. Colour Grading – A way to change the colours in a clip to make it look more desirable. Use; make a clip fit into a film shot with different lighting.
  2. Voice-over – A way of making a video more engaging by speaking over the original audio. Use; describing what I’m doing in the video and walk them through what is happening as it goes on.
  3. Background Music – A way of making a video more engaging by playing music over the clips. Use; while riding or skiing I can put music in the background to make the video flow better, feel faster or slower and keep it interesting.

Alternatives:

The most recent alternative my mentor gave me was when she gave me the idea of doing a documentary for my final project. I think that most other mentors would have just gone with the plan and given me some clips to work with however she suggested that I try a documentary and then thoroughly explained how to do it and next session she’ll talk more about it. Thinking about it now, this option is much better because I get to apply every single thing that I’ve learned into one video which should be very challenging but also very fun. I also really like how sometimes she’ll offer to teach me more things even if I just ask about one thing. For example, a while ago I asked how to speed up a small section of a video to make the riding seem faster but not noticeable. She showed me how to do that then also asked if I wanted to learn the same for slow motion and of course, I wanted to. I think that another mentor would have also taught me the same thing as it was pretty similar and it kind of makes sense to teach them both at the same time At first I was just doing video editing but she has also offered to teach me other things like filming, and audio work, which is great. I think that with another mentor if I said that I was doing video editing they’d probably just teach me how to edit videos. My mentor has offered to teach me how to film which she wasn’t too experienced with so she had to put in a lot of extra work.

Learning Centre:

For my learning centre, I am going to be doing a website. I’m thinking of doing it very similar to my eminent learning centre with a few pictures at the top that have some information about my project under them. Under the pictures, I will put four or five notable videos and a description about them and I will show my progress from my first video to the last. I will also answer the questions from the Learning Contract and talk about meeting my goals from the contract. I think that for the interactive part it will just be the videos that I made unless I can come up with something else closer to the presentation.

In-Depth Blog Post #5

Blog Post#5
Compared to the last two weeks, these went great. Nothing went wrong and I feel like I really progressed, possibly more than any other weeks. I pretty much spent the whole time working on one project, the redo of In My Backyard (IMBY for short). The original IMBY video just fell short of being four minutes long and featured every single clip that I took when I was filming at Eagle Mountain. In my last blog post I talked about everything my mentor wanted me to change in it but here is a summary. Too long, too repetitive, not enough story, not enough engagement, needs music and it needs to be faster-paced. Anyways, that’s what I was working on between meetings.

Here is the redo of IMBY: https://youtu.be/REU_0T09xcI

It’s funny, a 90-second video can take so many hours to make. This one took me even longer to make than the original IMBY just I didn’t have to film again. When I met with my mentor, she first started talking about the video I did just with the chest mount. As I explained in the last post it was mainly just to try out the chest mount and practice a few other skills that she taught me. As I expected she was ok with it, it wasn’t supposed to be great. I put no effort to add story to it or make the video amazing as that wasn’t what I was focusing on and it wasn’t a big project. The one part that she did really like about it though was how there was some dialogue between me and my friend Joseph who I was riding with. She said it could replace music in a way because it creates story and makes the video more engaging.

We then moved on to talk about my redo of IMBY. Here’s what she had to say about that, “It was perfect, it followed everything that we had been talking about and the music worked great with the video.” She also said that the video was very engaging and left her wanting to see more which is a good thing. There was a couple of parts in my video that I wasn’t sure about even though she didn’t bring them up. The first one was the dynamic zoom, he said that she hadn’t even noticed it until I brought it up. That means that it is subtle enough not to notice however it is still making a small difference to the video even if you aren’t aware of it. The second was the ending; it was annoying to me because I couldn’t get a clean ending and I didn’t have any more good clips to use to get to the good part of the song. When I brought it up, she said that was her one issue with the video, but it was very minor and fixable.

One feature that I love in YouTube is the analytics app called YouTube Studio. My mentor’s opinion is one thing, but I can use YouTube to find out what 100 people think. For example, it shows the average percentage of the video that is watched. In the second IMBY, the engagement rate was right under 90% which is good for any channel but for mine that is a record by a landslide. For the first IMBY, the engagement rate was a little over 50% so that was a massive leap, and I would say that shows a lot of progression. I also got a couple of comments on that video with tips on how to make it better which I appreciate. The first one was to shoot the video in 1440 resolution to make the quality better which I have already changed on my GoPro. The second person said that the music was too much, and it made the riding seem lame and that I should have used Jazz. Looking back at the video I would agree the music was overkill, I didn’t have to use death metal, but I also really don’t think jazz will work. If I used Jazz it would go against everything that my mentor said about the song choice, but I think for my next video I will do hard rock and scale it down a bit. I also wanted to mention that this video did well on YouTube, it got 140 views, 11 likes and I gained 2 subscribers and that was all from people I don’t know.

I also spent a lot of time with my mentor learning how to make the music fit my video better. What she wanted me to learn how to do was to be able to cut a song. She showed me how to cut the song in two spots to make the song shorter or it can also be looped to make it longer. I don’t think I’m going to be able to explain it, but it made sense to me watching her do it. She said that I should try to do it twice, once with one song and another time combining two songs that uses the same method. Right after the meeting, I tried cutting a song. It came out way better than I expected being almost flawless and I sent it to my mentor, and she agreed. She said if I hadn’t told her beforehand where I cut it, she wouldn’t have been able to tell.

Here’s what I did (You can’t export just audio, hence the random picture.): https://youtu.be/Mc7TvMCQHWo

As for combining two songs, it has proved to be much harder, and I am not finished with that yet. Just today started filming for my next video which is going to be marked. This time I am filming at Burke Mountain and it will be a little more of a variety of trails. In this video, I am going to be filming the same friend in IMBY and I am going to try and make it similar to the second IMBY but better with everything I’ve learned from it. The plan was to do all the filming in one day but due to some difficulties we only got there at 4:30 so we did a little less than half of the filming. So now we have to find another day to film, but it will be challenging because of the lighting and weather.

Here’s where she was showing me how to cut a song and she was having a hard time doing it with the song I used for IMBY:

Me: So, this would work better using another song because of all the screaming, right? (Black)

Mentor: Yeah, what happened is that I chose a spot where he is talking but he is basically screaming through the whole song so it’s tricky. If you try cutting with a song that has a good beat to it, it will be much easier. (White)

Me: Oh, ok. Do you have any songs in mind that could work well? I’m guessing that a slow song without much dialogue would work well because you can find a good spot where the beat matches. (Yellow)

Mentor: I don’t have any songs in mind, I have a feeling that dance songs would work well though. I think I’ll keep working on this song after the meeting then I will send it to you. Your homework will be to try cutting out a part of a song, but it doesn’t have to be a song that you use, just any easy song, and send it to me once you are finished. (Green)

In the next few weeks between now and my next meeting, I am going to finish filming at Burke and make a video out of it. Coming up is spring break and I think that I will be able to get a ton of footage that I will be able to use in future projects and for In-Depth. One final thing that I wanted to mention is that I’ve started posting videos on Reddit and I am finding that I get a lot more feedback from that than just posting on YouTube.