Crossy Road Tips and Tricks from a Master Ranked Top Ten Worldwide.

Tip#1: “Just take a step” Don’t wait just go through the road or river.

The more you wait the closer the eagle gets to you and lose.

Tip#2: “Ignore the coins” Don’t keep going for the coins they distract you,

and you might lose earlier than you planned for.

Tip#3: “Practice makes perfect” Just practice and you will be blown away how far you have gotten.

I have been doing Crossy Road since beginning of 2017.

It has taken me 3 1/2 years to get over 2,000 points.

Tip#4: “Practice going backwards” Example: What if a Police car comes and your trapped.

and you can only go back a step but you don’t react quick enough and lose.

Tip#5: “Look for Patterns” There are always patterns you just need to look closer to find it.

My Current Record:

My YouTube video 1700+ on Crossy Road

Posted in Uncategorized

7 tips to improve your Photography

  1. Know Your Camera: (Exposure delay, Where to focus, long exposure, exposure bracketing.)

2.  Experimenting: (For fun, and tests.)

3. Keep it simple: (For Composition.)

4. Time of Day: (Go out in sunset and sunrise fore the best possible photos.)

5. Improve your editing: (To change light, color, and crop.)

6. Get out often; (Even if you think the view or weather is not good for photography the fact is there is always a good shot.)

7. Get Feedback: (Share photos to friends, and family to get feedback.)

*Friends you trust*

Posted in Uncategorized

Photography Tips

Perfect mirror image-Golf course

Top 7 Photography Mistakes

SadFace

1. Unbalanced Images:

       Everything should fit nicely.

2. Random Foreground:

       The foreground should be exciting and tell a story.

3. Foreground Drop-Off:

       The foreground should fit and connect with the rest of the image.

4. No Compelling Subject:

       Interesting Subjects should be picked and the eyes need to rest on the photo.

5. Wrong Light:

       Light is quite important and should not be flat.

6. Too Complicated:

        Too much detail is not good, can be messy.

7. Untidy Edges:

         The edges of the photo may need adjusting or correcting.


Posted in Uncategorized

Photography Album – Under Construction!

Hazy SunMy recent Photos..

Posted in Uncategorized

Digital Footprint Assignment

1. How might your digital footprint affect your future opportunities? Give at least two examples.

My digital footprint can be positive for my future and help me share my ideas and my interests with others.

It can also affect me negatively by posting unsuitable material or commenting inappropriate on someone’s post.

2. Describe at least three strategies that you can use to keep your digital footprint appropriate and safe.

Keeping my laptop anti-virus  up-to-date to make sure it stays virus free.

Apply THINK before posting anything.

Double check the privacy settings.

3. If you could go back in time, is there anything you would do differently online? Think of what type of advice you would pass on to your younger self or other students. How could you go about explaining it to them?

Yes I would not post a certain video I did years ago!  It was a good lesson.

I would say be careful of what you post or say on social media. Do not be like Trump!

Training Post

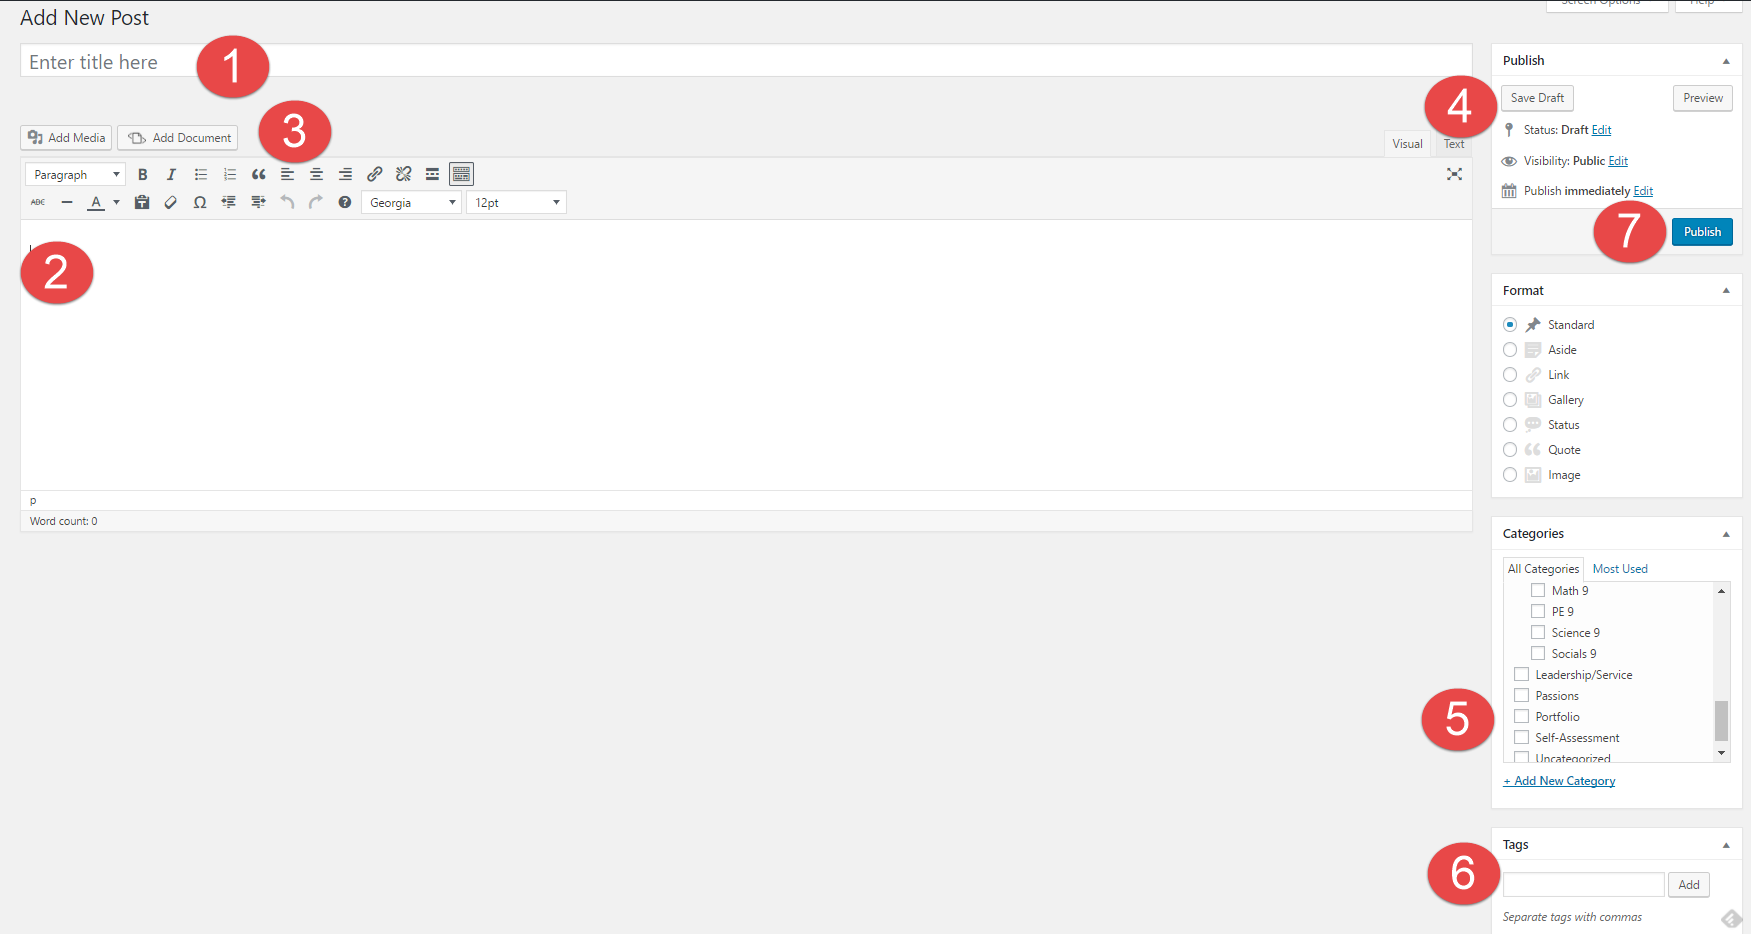
You are now going to create your very first post. In a separate tab or browser window, go to your Dashboard on the left and go to  Posts -> Add New.

1) Title – Create a title for your blog post. Your title will be: Digital Footprint Assignment

2) Body – This is where you place your content of the post – text, videos, pictures, etc. Follow the instructions on the Digital Footprint Assignment page to see what questions you need to answer here.

3) Tool Bar – In your toolbar you can “Add Media” and “Add Documents” into your posts, this is the best way to create visual representations. You can also change fonts, hyperlink, etc.

4) Publish – Here is where you control what items are public and private. You can also control when they are published to your website.

5) Categories – Here is where you choose where you want your post to go. This is your digital binder with all of your subjects. Make sure to categorize each post with the relevant subject. E.g. Categories -> English

6) Tags –  Here is where you tag posts with one or two of the most readily applicable Core Competencies. These tags can help you find things quicker on your blog and help you stay organised. E.g. Tag -> creativethinking

7) Publish – When you are done, simply “Publish” it. If it has been edited, press “Republish” to update with the latest version of the content.