My Reflection On Remote Learning

My thoughts on remote learning is that it is more flexible in terms of scheduling and homework that is given. My experience with remote learning is it’s very convenient especially under these circumstances. I’ve liked being able to sleep in more and then attend class. I didn’t like that I had to type out my math equations as it took longer than writing them out. I also didn’t like dealing with all the technical difficulties that came up.

Technology has benefited me during remote learning because pretty much all of remote learning is online, so I would need access to a device in order for me to be successful. Since I have my own laptop, I can do my homework and hand it in at my own time. At the same time, technology has impeded me during the remote learning experience because there are 4 people who live in my house, on the same WiFi network, which means when I’m using apps that require internet, it may be slower. My laptop can also be slow at times which makes the homework I’m doing take longer than necessary.

One core competency I was already proficient in that helped me transition into remote learning is positive personal and cultural identity because I knew what I was capable and incapable of during this time.

Core competencies I improved on during remote learning is critical/creative thinking and communication because every time I had something to say during a call, I had to type it out and send it out which was different to me. There was also a lot of discussion sessions in English where we would be discussing different topics with each other.

Reader’s Workshop Discussion Video


Posted in Uncategorized

Digital Footprint Assignment

My digital footprint has impact on my future because everyone can see everything I put online, from now, in the past and moving forward into the future.
For example, when I apply for university, the university can find any traces of me on the internet, no matter when it was from. If something I said on social media was inappropriate in any way, shape or form, I’m most likely not going to get accepted.
If I apply for s job or an internship, they’ll most likely do background checks, and check everything I’ve posted and said online. If my digital footprint is positive, I’m more likely to get accepted, so it’s important to be fully aware of what I’ putting up on the internet

Three strategies we can use to keep our digital footprints safe are:

  • Don’t ever post anything that might seem inappropriate to anyone
  • Always T.H.I.N.K (Is it: True? Hurtful? Illegal? Necessary? Kind?)
  • Consider the fact that it’ll be online forever, and there’s always a possibility that your grandma, dad, university professor, and your future self can see it.

If I went back in time, I would’ve said to my younger self to not worry about having to seem “cool” or fit in with how everyone else is on social media. Always triple check on what you’re about to post and make sure that it’s safe and will not reveal things about your location, your address etc.
Imagine that every single thing you put online is printed onto you and everyone is able to see it, no matter where you go or where you are. That’s how the internet works. Anyone can find anything that is connected to your name.

Posted in Uncategorized

Training Post

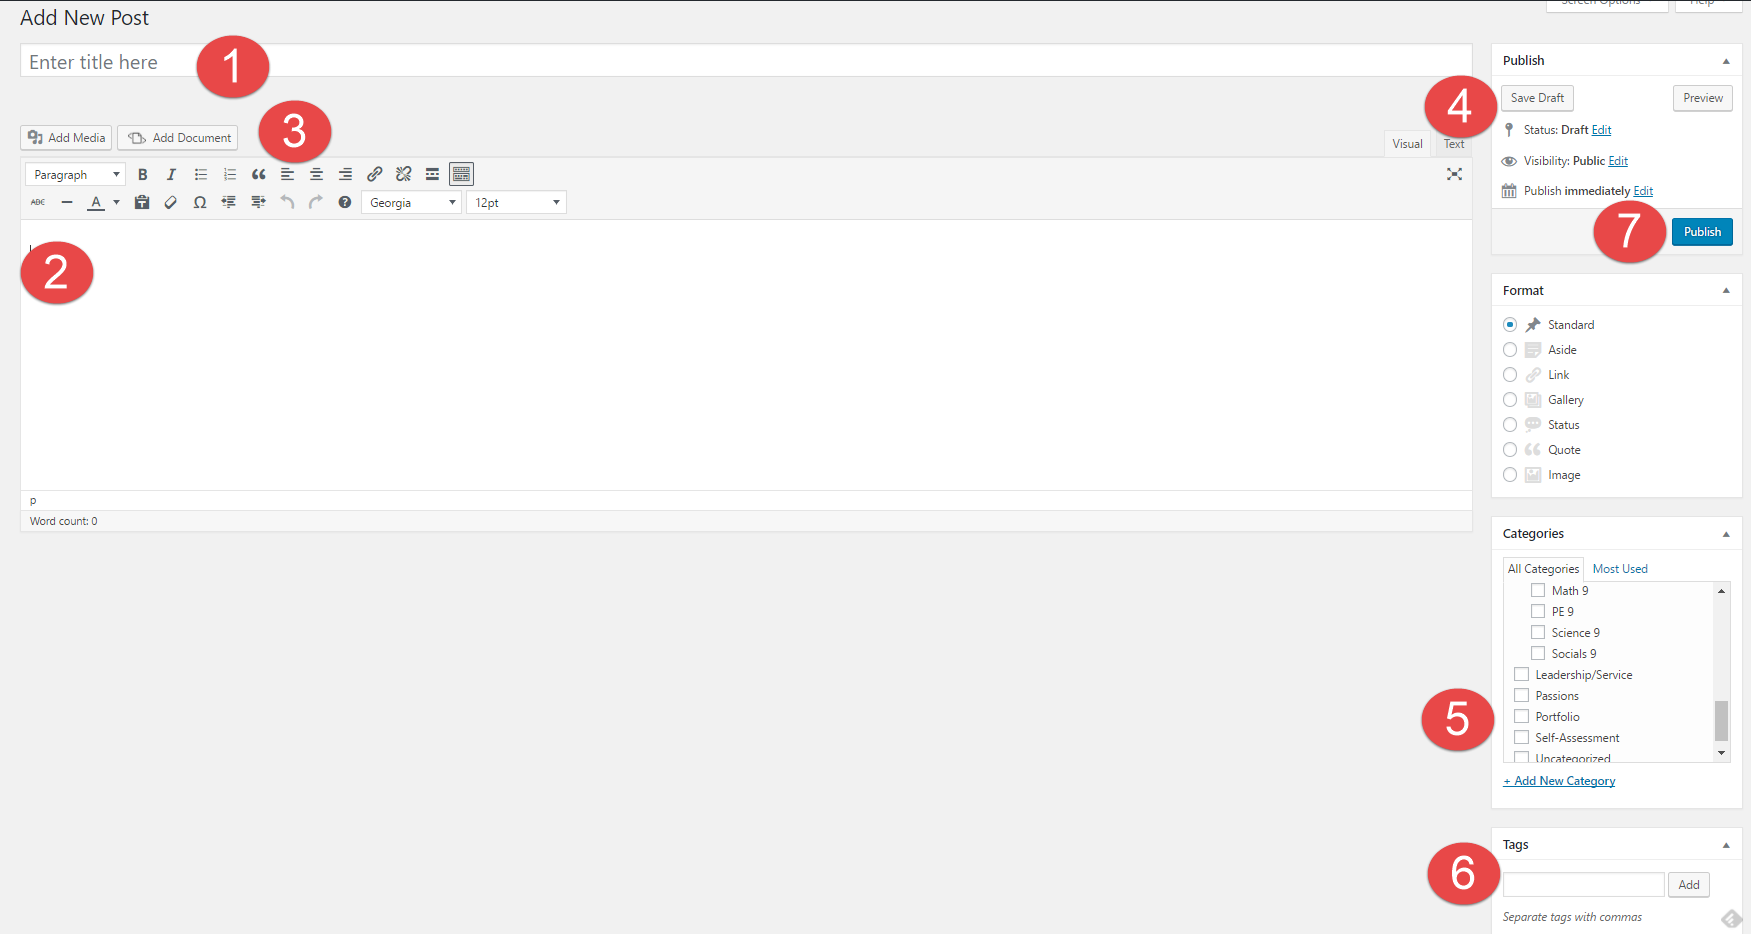
You are now going to create your very first post. In a separate tab or browser window, go to your Dashboard on the left and go to  Posts -> Add New.

1) Title – Create a title for your blog post. Your title will be: Digital Footprint Assignment

2) Body – This is where you place your content of the post – text, videos, pictures, etc. Follow the instructions on the Digital Footprint Assignment page to see what questions you need to answer here.

3) Tool Bar – In your toolbar you can “Add Media” and “Add Documents” into your posts, this is the best way to create visual representations. You can also change fonts, hyperlink, etc.

4) Publish – Here is where you control what items are public and private. You can also control when they are published to your website.

5) Categories – Here is where you choose where you want your post to go. This is your digital binder with all of your subjects. Make sure to categorize each post with the relevant subject. E.g. Categories -> English

6) Tags –  Here is where you tag posts with one or two of the most readily applicable Core Competencies. These tags can help you find things quicker on your blog and help you stay organised. E.g. Tag -> creativethinking

7) Publish – When you are done, simply “Publish” it. If it has been edited, press “Republish” to update with the latest version of the content.