Progress Report
Since last post, I have finished modelling my kendama, and now need to map its UVs, set up lights and a camera, and maybe animate it. I am very happy with my results, as they are smooth, and without artifacts or strange creases. I also made sure to use the technique I learned from my mentor of making sure that the model is able to first bevel properly, and then subdivide if needed, rather than using subdivide and edge loops and creases to bevel and properly harden edges.

One challenge I came across while making the kendama was making concave cups for the sphere to fit into. I first made them by taking a preset sphere, the UV sphere, and then lining the diameter up with the rim of the cup, deleting half the circle, and merging the vertices along the circumference with the vertices along the rim. This caused a few problems. Firstly, very terrible looking artifacts were created due to the fact that I was now displaying the inside of the sphere as the outside edge of the cup, so I needed to flip the faces. Also, the UV sphere makes a pinching effect near it’s poles, due to the way the faces and edges are arranged, and that was not ideal.
In the first picture, you can see all the lines converging to that point.

In the second picture, with a metallic shader, you can hopefully see the creases that creates along the surface.

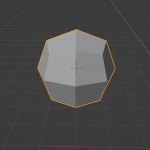
To fix this, I used a different technique of making a sphere, which is to take a square, subdivide so that it has the same number of points along it’s circumference as the rim, apply that subdivision, and then use the “to sphere” tool to make the points more spherical. This created a sphere without poles, which looks nicer when shaded. I then needed to make sure that this more unusual sphere with curvier lines fit properly with the edge.
Here, you can see the cube, subdivided once, twice, three times, and then what it looked like after using the to sphere tool.


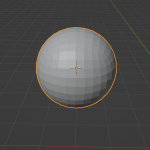
Here’s what it looks like shaded.

Here’s the problematic nature it has when cut in half (It’s lines of circumference are wavy), so I needed to edit it a bit and flatten some of it’s edges.

After doing all of this, I realized I needed to make sure the ball fit in these cups, and was made properly too, so I ended up just making the ball with the subdivide and to sphere technique, then placing it so that it rests on the cup, then cutting off that portion of the ball and using that. This turned out to be a lengthy process, as I had to make each of these changes and updates to each cup each time I made them. Next time, I would make this faster by going through the whole process on one cup, trying to think ahead for each challenge I might run into, and then replicate it for the other cups, rather than problem solving through trial and era with every cup. Moving forward, I am going to watch some more tutorials on UV unwrapping, and try to figure that out so that I can finish up making the kendama.
In-Depth Night
The highlight of trying to learn blender for me was modelling objects. This was probably influenced a bit by who I had as my mentor, as he was a hard surface modeler, and so this was the area of blender that I was most encouraged towards, and had the most support and help in learning. Besides that reason, I like the geometric visual problem solving of editing meshes, and it is a fun challenge to try and get better and faster at modelling by learning the many keyboard shortcuts for using tools and making edits.
For those reasons, I have decided to display the object modeling skills I have learned for my In-Depth night learning center. I plan to do this by setting up a table with my computer and an external monitor, which I can use to display my modelling on a larger screen. I have a few ideas as for how to use the screen. My first idea is to use the monitor as a second screen for my computer, doing my modelling on the monitor and having other notes or information on my laptop. The drawback to this way of doing it is that for the audience to see the computer, and me to face them while talking, I would have to be sort of half turned towards the computer, and half turned away. The solution to this would be to use the monitor as a mirror of my screen. That way, I could face my laptop towards me and my monitor towards the audience, so that I could work on my laptop while still facing them, and they could see the changes on the monitor. I will also have a keyboard, mouse, and charging cable.
At this table, I will sit and model objects. I want to be able to finish a few models during the in depth night so that I can take requests and suggestions from viewers, so I will make sure to practice beforehand and make sure I know the tools that I will need. As I model, I will find points to explain and tools to point out to those at my station. For instance, I might come to a part where I need to move an object precisely, and show how I can lock it to and axis by pressing the letter of that axis (x, y, or z). I could even find a program that shows a virtual keyboard on the monitor as well as blender, so that the audience could really get understand and follow along with the keys that I am pressing to make each edit. By doing it this way, people can stop by and leave when they like, without having to sit through a scripted presentation, but still getting something out of it.