As of tonight, I’ve officially had three meetings with my mentor, and have made significant process in learning more about photography techniques, different camera settings, and also the general feeling and requirements for photographing in nature. In the next few paragraphs, I will detail everything I’ve learned, as well as my own personal opinions on this project so far.
January 10:
This was my first meeting with my mentor. The topic of this meeting was mostly surrounding basic functions of a camera, including what some camera settings were, and situations in which different settings might be used. Here are the settings that I was introduced to:
- Shutter speed
Shutter speed is the length of time in which the film/digital center within the camera is exposed to light, as well as when the camera’s shutter is open whenever a photographer takes their photograph. The reason that shutter speed exists is, as the name would suggest, due to the camera’s shutter: a curtain of sorts in front of the camera sensor that will stay closed until someone takes a picture and the camera fires. In simpler terms, shutter speed is the length of time a camera spends taking a photo.
There are two factors that shutter speed is responsible for controlling: changing the photograph’s brightness and creating interesting effects by either freezing action or blurring motion. Long shutter speed will result in the camera gathering a lot of light and therefore a bright photograph, and a short shutter speed will have the opposite effect. In addition, quicker shutter speeds are used for freezing the motion of the photo’s subject, whereas longer shutter speeds might be utilized for intentionally capturing movement in the subject.
- Aperture
Aperture is the opening of the camera lens through which light is able to pass through in order to enter the camera. It is easier to comprehend aperture if you think about how your pupils work: when you move through light or dark environments, your pupils will enlarge or shrink to accommodate for the amount of light they are exposed to.
The photography factor that aperture is responsible for controlling is the depth of field for any given photograph. Depth of field can be defined as the sharpness of a photograph from front to back. A thin or shallow depth of field would be describing an image in which the subject is the only part of the photo in focus, while the background is completely blurred and out of focus. A deep depth of field explores photographs in which every aspect of the photograph (foreground and background) are sharp.
In addition, aperture can also control the exposure in a photograph. When the aperture is adjusted, the amount of light that is able to reach the camera sensor is hence controlled in one way or another, which will adjust the brightness/exposure of the photograph. A large aperture will result in a brighter photograph, while a smaller aperture would result in a much darker photograph.
- ISO (Sensitivity)
Finally, the sensitivity or ISO is a camera setting that darkens or brightens an image – a higher ISO setting will result in a brighter image. ISO is also used to take photos in darker environments, and to give more freedom into controlling the aperture and shutter speed of your camera. With that being said, setting ISO to a higher level would result in a lot of noise or grain that could interfere with the clarity of a photograph.
Once I learned more about the three main components of photography, my mentor put my knowledge to the test by flipping through a magazine with me and then asking me to comment on the degree in which the photographer might’ve set their shutter speed, aperture, and/or ISO. Overall, seeing the photography settings used on print helped contribute to my understanding of the different roles the settings play in photography. It also promoted identification on where certain settings would be more applicable for stylistic purposes (for example, a lot of photos have a high ISO for a stylized amount of grain rather than just on accident).
January 16:
This session mostly involved applying and further investigating the three main components of a good photograph (shutter speed, aperture, and ISO) through taking several different photos using different settings of specifically shutter speed. Through this, I found that I had a better understanding of how some shutter speeds could work better for still photographs that have more of a technical/informative aspect to them, whereas others help create a more poetic or artistic image. All of the photographs below depict a round crystal.
Below are the four photographs that I took, and their corresponding camera settings:
January 23:
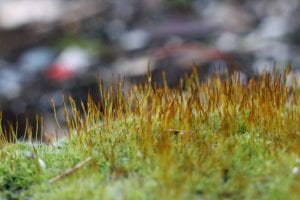
Finally, I’d had enough practice with taking photographs at home that I was able to take a few practice photos out in the field. I started off my practice collection by strolling through Inspiration Garden at Lafarge Lake and taking photos whenever I saw something that seemed unique or intriguing. For this session, my mentor wanted me to specifically focus on the story or mood I was conveying through my images, in addition to how different camera angles will result in a completely different image. Below, I will include a few of my favourite images from this session.
How to Have a Beautiful Mind Questions:
- How to Agree
A lot of what the chapters from this post’s topic focus on finding the right amount of balance between being compliant and argumentative. One extreme or the other would incite feelings of irritation, anger, and even hurt, and certainly won’t make it easy for others to talk with you. If you only provide arguments and problems to everything that someone is talking to you about, then communicating with you will become quite difficult. On the other hand, completely agreeing with every single opinion that someone has will make the relationship very one-sided and unpleasant as well.
For the How to Agree section of How to Have a Beautiful Mind, the main points the author states about agreeing more often include actively trying to find places where you agree with what another person is saying, figuring out where they’re coming from, and acknowledging the value of the person’s individual beliefs, experiences, and knowledge. For the three mentoring sessions I attended, I found lots of places to agree with my mentor. I always acknowledged their expertise and experience in the field, and even if I found a particular tip strange or hard to understand, I would try it out before openly disagreeing or turning the suggestion down.
- How to Disagree
Learning how to voice a different opinion or how to argue with someone is not only a skill that should be learned for this year’s In-Depth, but a skill that can and will apply to real life situations. Knowing how to state your points and advocate for what you need without being overtly hurtful to the other person is something that will help many people throughout their whole life.
Some of How to Have a Beautiful Mind’s points and tips on how to disagree include not disagreeing just to pick out a problem or boost your ego, point out and mentally note any biases, stereotypes, or prejudices that either you or the person you’re disagreeing with might be using, and lastly to note the difference between outright disagreeing and having a different opinion with someone. In my case, for the third meeting with my mentor, we eventually decided on going to Inspiration Garden to take photos. I started to disagree before we left for Inspiration Garden, since I wanted to go to a more forested park, but my mentor used logic to point out that it was getting dark, and the more open space that Inspiration Garden might provide would promote better photographs. I saw my mentor’s point, and ended up having quite a successful first photography session.
- How to Differ
Finally, differing refers to two or more people having different opinions. There are scenarios where only one of the differing opinions is the correct one, and situations in which both opinions are equally correct. Differences can arise from a different base road or personal experience, or simply from forming individual preferences or personalities. When differences arise, it’s best to determine the nature of the nature presented by comparing and contrasting the different opinions, exploring the difference, and reconciling the difference.
Returning to my previous example, when my mentor and I had a differing opinion on the location for my first photography session, the two sides likely stemmed from personal preferences and/or experiences. My mentor had more experience, so it seemed logical for them to pick an easier location for a beginner, and my difference was simply based on a preference, as well as the fact that I thought we wouldn’t be able to find anything too unique to photograph in Inspiration Garden since it is currently winter. Once both opinions were symbolically laid out through a discussion, I was able to see the logic that my mentor was presenting, and ended up agreeing with their opinion and complied to having the photo session at Inspiration Garden.


