CLE Job Interview

For my career interview, I was lucky enough to have the pleasure to interview Adrienne Cossom. Adrienne is a counsellor/social worker, and she provided me not only with information on counselling but also the career world in general. While it might seem obvious, one point Adrienne made that really stuck with me is that the first thing you should consider when choosing a career is yourself – your personal interests, needs, strengths, and weaknesses. While it might seem obvious, there is a lot of pressure to try to go for a career that makes the most money, or that people would find respectable. It’s true that the amount of money you can make is a huge aspect of choosing a career, but what’s the point in substantial amounts of wealth if you aren’t happy? You want to choose a job that interests you, and something that doesn’t stress you out too much. Additionally, the flexibility you have within your career is another huge factor. My second key takeaway is most jobs have many lessons that only come with on-the-job training. No matter how much you study and prep, you’re definitely not going to learn everything in school. For example, Adrienne recalled that at the beginning of her career, she was quite self-conscious about the outcomes of her counselling sessions (how a patient’s mood is at the end of the session). Through experience in her career, Adrienne learned that the success of the outcomes came not from experience but from the connection between her and her patient. Finally, you don’t really need to have a clear, straight path from high school graduation to your career. In fact, the career you end up with is likely going to be very different from what you were aiming for at the end of Grade 12. In Adrienne’s case, she has an undergrad degree in political science and Japanese, and she didn’t really take any courses relating to social work at all. For the first two years of university, she mainly just took what interested her: astronomy, theatre, political science, and a few art courses. Therefore, it’s not a big deal if you don’t have a clear plan of what you want to do. 

In-Depth Post #6: Concepts, Alternatives, and Learning Center Summary

We’re now entering the final stretch of In-Depth 2021! As we approach In-Depth night, I’ve begun to work on my three collections, testing out ideas and concepts for each one. 


March 12, 2021: 

For my second collection, I required a little figurine to photograph, so I made one out of polymer clay. The figurine is supposed to be a Kodama (Japanese tree spirit), inspired by the depiction of Kodama in the film Princess Mononoke. I constructed the figurine out of polymer clay and then painted it. Unfortunately, I forgot to take photos of the design and construction process.


March 14, 2021: 

I took a few concept/practice photos for my second collection. I worked indoors for this set of photos, so I had to be mindful of lighting issues. Something else I found was that I could only take a limited variation of photos. Because my figurine is made of clay, I can’t really move or pose the limbs. This might result in the photos for this collection looking kind of repetitive. For that reason, I might make more figurines of my character in different positions (standing, lying down, expressions, etc). Here are a few of the photos I took:

April 4, 2021: 

I went on a walk with my mentor and took some photos for my forest-themed collection. I was able to capture a lot of the new spring leaves and flowers! I also tried to take pictures of a live subject (a fly) for the first time, but it was too difficult because my subject could probably sense that I was trying to capture it so it kept flying away. Here are some of the photos: 

  • Concepts 

How to Have a Beautiful Mind stresses the relevance that concepts have on our thinking. On page 121, the author Edward de Bono compares concepts to “parents that breed children” and “road junctions that open up several other roads.” When learning new information, it is important to understand the essence or concept behind the narrative. From a concept, ideas are generated, followed by the importance or usefulness of these ideas. Naturally, the average person doesn’t really think to assign or develop concepts to various topics. For that reason, this practice will become a lot easier once the act of spotting concepts is learnt. According to How to Have a Beautiful Mind, one of the key components of concepts is that they “always seem rather vague” [pg. 112]. This is because a concept must travel through the path  (concept to ideas to uses) I mentioned above to be applied. Although most concepts are vague, concepts can range from broad to narrow. In terms of usefulness, look for concepts that are in the middle of the spectrum. 

List some examples of concepts in your most recent sessions with your mentor.

  • Art: photography falls under the broad field of art 
  • Style: how people artistically portray their subject, style, or vision. When creating collections and doing photography in general, developing a personal style is quite important. 
  • Nature: macro photography, which is the specific form of photography that I’m focusing on, often finds its subject matter in nature
  • Subject: what each photo is depicting. 
  • Story: about what each photo has to tell its audience 
  • Interest: what kinds of photos are more likely to garner attention and admiration?

  • Alternatives 

When it comes to learning something new, what most people typically value or look for is growth and development. Growth is a sign of progression and experience. None of these things can occur without some form of movement or fluidity. How can anything be accomplished without some kind of mental or physical movement? Letting go of rigidity is the best way to accomplish this. How can one do this? Through alternatives. Similar to compromise, finding alternatives requires open-mindedness. Just because you’re used to one way of doing something doesn’t mean that other ways or alternatives aren’t just as good (or even better). In How to Have a Beautiful Mind, three main types of alternatives are highlighted: “alternative perceptions or ways of looking at something…alternative sets of values determined by experience, culture and personality…alternatives of action” [pg. 136].  

What alternatives have your mentor offered you throughout this project? What alternatives may another mentor have offered you? Discuss in detail.

Alternatives my mentor’s offered me: 

  • Tripods: when I’m taking photos outdoors and don’t have as much control over the height of my environment, it can be quite tricky to photograph subjects that are drastically above or below my eye level. This is because I have to hold the camera in very awkward positions, so my hands shake quite a bit when I’m taking the photos and as a result, there’s a higher chance of the photos turning out blurry. As an alternative to trying to take photos using myself alone, my mentor has provided a tripod so I don’t have to worry about shaky hands.  
  • Different locations for photography: When we started our sessions, my mentor and I would often look for places to take practice photos. These locations usually had to be outside, as you might recall from earlier posts that indoor lighting is often trickier to work with. I would often suggest one park, and my mentor would come up with a wealth of alternative places to go. This left me with a lot of diversity in locations and I was able to learn to work with many environments. 

Alternatives another mentor might have offered me: 

  • Opinion on style: Each photographer has an individual opinion on what themes are better than others. My mentor prefers more of a natural theme for his photos. With a different mentor, I might learn to appreciate the beauty of different settings. 
  • Photography approach: A different mentor might have alternative angles or positions to take photographs in that could benefit my ability to hold my camera still. 


Also, give us a brief description of your learning centre. How are you going to present your learning during these past few months? What aspects are you going to focus on, knowing that you cannot share everything you have learned? What do you hope the audience will learn from your experiences? What are you going to need to do to make this learning centre interactive?

For my learning center, I’m thinking of creating a mini art gallery where I can display my favourite photos from my three collections. Each collection would have a different section in my learning center, and there would also be descriptions of each collection and the inspiration/story behind them. As mentioned, I’m going to focus on the theme-building and storytelling aspect of photography, since I feel that that part is often overlooked compared to the more technical aspects. To make my learning center interactive, I might bring in little subjects (dried leaves, rocks, interesting pieces of fabric, etc) that my audience can use to put together little compositions for “photographs.” The key takeaway from my learning center is that everything has a story to tell, whether it be the tallest tree or the tiniest ant.

In-Depth Post #4 and 5: Keep it Going and Parallel Thinking

This post is going to be a combination of posts 4 and 5, as I’ve recently had a lot of complications with working on my In-Depth. Specifically, I contracted COVID and was forced to isolate myself at home for two weeks. Between my quarantine and the intense fatigue that comes with COVID, this has made working on my photography nearly impossible for the past few weeks. Recently, my isolation period ended and I’ve thankfully been able to return to school, but I’ve been left with intense fatigue. My mentor, who is my dad, was also impacted by this since he caught COVID from me. 

As mentioned earlier, I’ve accomplished very little during this time, but I’ll do my best to update you on what I’ve been able to do so far. 


Feb 13 and 14:

This was in the last few days before my symptoms started. Taking advantage of the beautiful snowy weather, I went on a walk outside and took some photos. I found that the most challenging photos to take were ones that captured a subject taller than me, as I had to support the camera more to point the lens toward the subject and was, therefore, shakier. During this photoshoot, I also worked with snow for the first time, and I found it quite challenging. I spent a lot of time trying to capture the patterns of individual snowflakes, but they would always melt before I was prepared to take the photo. With that being said, I was able to take a lot of pictures that I’m somewhat proud of. Here are some of the photos I took: 


March 7:

On the first mentoring session since my quarantine, my mentor and I mainly discussed the planning for each of my three photo collections. Specifically, we discussed problems that I could run into with each collection, as well as tips and tricks to solve those problems. Here’s a description of the collections, issues, and solutions:

  • Collection One
  • Theme/idea: forest/moss/nature 
  • Issues: limited lighting in the forest, collection very dependent on weather permitting photography, subjects might be hard to capture as they’d be moving (if I want to photograph insects)
  • Solutions: bringing flash, planning out a collection for weather that would create lots of natural lighting
  • Collection Two
  • Theme/idea: make a little figurine and take pictures of it in different places throughout the city 
  • Issues: people getting in the way of photos
  • Solutions: look for more secluded areas to take photos, wait for less busy times of day
  • Collection Three
  • Theme/idea: nostalgia/little toys/art supplies/childhood 
  • Issues: lighting is tricky inside 
  • Solutions: take photos during the brightest point in the day, set camera settings to accommodate for a darker photography environment 


How to Have a Beautiful Mind Questions: 


  • How to listen 

A key component to having good communication skills is the ability to listen. Not only does listening promote a smooth conversation, but it also allows the participants to pick up on cues on how each person is feeling based on what they’re saying. When practicing listening skills, you should always focus on not only refraining from interruptions but also really focusing on what the other person is saying. Personally, I tend to space out when I’m having conversations with people, especially if I’m more tired. Therefore, whenever I’m having a conversation with my mentor, I try my best to use active listening skills such as really paying attention, not doing anything that might distract me from what my mentor is saying, and asking for clarification if I missed something that he might’ve said. 

Right now, my mentor has been giving me more independence to explore photography on my own, but I do need to ask some further questions about how to properly use flash and different lenses since so far, I’ve only worked with very basic settings. 

Through my meetings with my mentor, I’ve been able to develop new points of view on what makes a good photo. Before I started this project, I tended to only view photos with high clarity and high saturation as a professional, but as I’m learning more with the help of my mentor, I’ve been able to realize that different settings incorporate different tones, moods, and appreciation to photos and that there’s not really one straightforward recipe to follow to take a good picture.

So far, I haven’t found a place in which my mentor values drastically differ from mine. I think the only minor difference that my mentor and I have is our favourite subjects for photography. While we both really enjoy nature photography, I also enjoy taking photos of random objects I find around the house, especially on a macro scale that can capture lots of different angles. My mentor, on the other hand, favours close-up photos of different textures that can be found in nature. 

Here’s a list of some questions that I asked to check on facts and details:

  • “So, you’re saying that the use of a tripod will help with the focus for my photos because it removes the complication of having shaky hands?”
  • “And natural lighting is better than artificial light because it can be less harsh and provide a stronger light source?”

  • How to ask questions 

Speaking of questions, let’s discuss the necessity of including questions in conversations. Adding questions into a conversation has many purposes (clarification, keeping the conversation going, etc). 

**NOTE: I haven’t been able to have as many meetings with my mentor in time for this post, so I will also refer to past conversations to answer the questions.**

  • Ask questions and record them. Why did you ask these questions?
      • “Why did this photo turn out so out of focus?” – this was about my struggle with capturing a clear photo of a snowflake. 
      • “Would you say that this photo conveys a melancholy mood?” – I was discussing one of the photos that I took and wanted to know if I was communicating the right emotion.
  • Ask for an explanation for a certain skill you are learning. Discuss what happened.
  • I asked for an explanation for why ISO is an important part of photography, and my mentor was able to explain how ISO is a great way to control the brightness of the photograph and therefore create more versatility.  
  • Ask a multiple-choice question. Why was this useful? Explain.
      • I asked my mentor whether he thought that mushrooms, moss, or insects should be the focus for my first collection, and he thought that moss should be since it’s the most readily available to photograph. This was useful, because it gave him lots of options, while also letting him know what I was asking for. 
  • Ask the speaker to clarify their underlying values for doing, thinking, feeling the way they do.
    • When I asked this of my mentor, he said that his views on photography are reflective of the classes he took, and also his love for the hobby since it’s a huge stress reliever for him. 

  • Six Hats Conversation

“I had a lot of trouble with the focus for this photo.” – blue hat 

“That does make sense, since you took the photo inside after dark, so you had to rely on artificial lighting.” – white hat 

“So I need to better adjust my settings inside or wait for a more optimal time of day?” – white hat

“Yep!” – blue hat (ending conversation)

In-Depth Post #3: How to Have a Beautiful Mind

These past two sessions have focused on preparing me for my three photo collections. Here’s my progress report:

Monday, February 1:

During this session, my mentor and I focused on experimenting with the impact that different colours of light had on the quality and mood of images. We did this by taking several different photographs of a shell, each under a different color of light. Here are the photos: 

Something else my mentor taught me about the relationship between colour and photographs was the concept of dominant and receding colors. In photography, the dominant colors are the warm colors, e.g. red, yellow, and orange. These colors are considered dominant because they reach our eyes before the cooler colors. The cooler colors are the receding colors, e.g. blue, green and purple.

The warm colors are dominant because they demand your attention first, leaving the receding colors to fade into the background more.

Saturday, February 6:

After the session where we experimented with colour, my mentor left me alone to take photos over the next week for us to look at during the next session. Here is a list of everything that I learned while taking photos on my own over the week:

  • The photos that worked all had good composition (the way that objects are placed in a photograph)
  • A lot of my photos captured household objects indoors at dusk, so I had to rely on artificial light. This was harder to work with than natural light. Therefore, photography works better in daylight
  • For portraits/close-up pictures of faces, make sure the camera’s focus is on the subject’s eyes since this will convey the emotion and tell the best story.
  • In general, focus on what’s most important, and don’t be afraid to let the background blur out.

Here are a few of the photos I took:


How to Have a Beautiful Mind Questions:

  • How to be interesting:

After learning how to compensate for any conflict that might occur during our mentorship, for this post, we will focus on maintaining engaging conversations. The key way to be interesting is to be humble. While one’s accomplishments or cleverness might be somewhat interesting, consistently bragging about everything you’ve done is not. To keep both parties in a conversation engaged and interested, the entire conversation should not be self-centered. There are many ways in which one can make a conversation more interesting, a good example being the sharing of interesting facts or funny stories. But if one doesn’t have heaps of facts or stories memorized, one of the best ways of keeping interest in a conversation would be to use “what if” statements. 

Incorporating “what if” statements into a conversation is a surefire way to explore possible ideas, and to see if those ideas are possible. The session where my mentor and I explored photography under different wavelengths of light started with a “what if” statement. In our case, the “what if” statement was “what if we used different colours of light to take the same photo?” This ended up opening an excellent conversation surrounding how different light conveys different moods and also manipulates the camera’s ability to focus in different ways.  

Another aspect of being interesting is exploring, elaborating, and pulling interest out of the subject. If one finds something that is being discussed to be interesting, they should try to explore the topic further, elaborate on the reasons for which they find the topic interesting, and try to pull more interest out of the topic. In my case, when my mentor and I discussed the different themes I wanted to use for my collections, I had to talk about the specific subjects I wanted to photograph (things in the forest, nature in urban areas, etc), as well as why I might find them interesting (mood, passion for nature, the stories that could be conveyed through different camera angles). This brainstorm is helping me with the design process for my photo collections. 

Finally, to be more interesting, find and make connections that link matters together and generate interest. When connections are made between two separate interesting topics, then there is room to learn more about the topic and delve deeper into understanding and learning. When my mentor and I investigated the use of different colours of light in photographs, we were able to draw a connection between colours and moods (blue light = lower, calm, sad). 


  • How to respond: 

In delving deeper into the aspects of a successful conversation, one must first know how to reply or respond to information that’s being put out. There are many different ways that one could respond in a conversation, but the aspects that I’ll be focusing on today include clarification, support, sharing, and modifying. 

One of the main goals for TALONS this year is to improve our communication. While there are many aspects to good communication, one of such is clarification. To be able to understand what is being communicated to you, you must always clarify your understanding before allowing for the conversation to continue. So far, I’ve never been too confused with any of my mentor’s advice or teachings at any point, but if I didn’t understand something right away, I might double-check my understanding with him. 

Support includes not only agreeing with the person you’re talking to but also putting forth an opinion that strengthens the other person’s claim, proposition, or stance. How to Have a Beautiful Mind goes into more depth. “You may support a proposition from your own experience…you may support a proposition from your feelings or emotions…you may support a proposition from a shared set of values or moral principles…you may offer support from facts, figures, and statistics which you happen to know…you may offer stories, examples, anecdotes all of which support the proposition that’s been put forward.” [pg 56]. When I was talking to my mentor about the various themes for my three collections, he mentioned how he liked taking photos in nature, and I said “I agree with you since I find that there’s a lot more to capture while in nature.‘

In the “support” section of this post, I mentioned that the book said one way in which one could agree could be through stories, examples, or anecdotes, and this section will delve deeper into that. Stories, unlike statistics, cannot disprove a statement, but they can slightly alter a statement. The book gives an example that “the generalization that ‘all teenagers are lazy’ can be reduced to ‘some teenagers are lazy’” through an anecdote [pg 58]. To put it more simply, stories “[do not] prove anything but [illustrate] a possibility.” [pg 58] So far, I haven’t really told my mentor any stories/anecdotes in response to his opinions, but it is a useful strategy that I might implement in the future. 

Finally, someone who doesn’t completely agree with a statement being put forth does have the option to modify that statement. This can include reducing a sweeping generalization into a less absolute statement. Again, I haven’t been in a situation where I’ve had to use this particular strategy, but a scenario in which I might be able to would be if my mentor suggested that make all of my photos black and white since it would create moodier photos. My modification would be suggesting to play with different lighting to make the photos moodier or to experiment with making one of the three collections in black and white.

In-Depth Blog Post #2: How to Agree, Disagree, and Differ

As of tonight, I’ve officially had three meetings with my mentor, and have made significant process in learning more about photography techniques, different camera settings, and also the general feeling and requirements for photographing in nature.  In the next few paragraphs, I will detail everything I’ve learned, as well as my own personal opinions on this project so far. 

January 10:

This was my first meeting with my mentor. The topic of this meeting was mostly surrounding basic functions of a camera, including what some camera settings were, and situations in which different settings might be used. Here are the settings that I was introduced to:

  • Shutter speed

Shutter speed is the length of time in which the film/digital center within the camera is exposed to light, as well as when the camera’s shutter is open whenever a photographer takes their photograph. The reason that shutter speed exists is, as the name would suggest, due to the camera’s shutter: a curtain of sorts in front of the camera sensor that will stay closed until someone takes a picture and the camera fires. In simpler terms, shutter speed is the length of time a camera spends taking a photo. 

There are two factors that shutter speed is responsible for controlling: changing the photograph’s brightness and creating interesting effects by either freezing action or blurring motion. Long shutter speed will result in the camera gathering a lot of light and therefore a bright photograph, and a short shutter speed will have the opposite effect. In addition, quicker shutter speeds are used for freezing the motion of the photo’s subject, whereas longer shutter speeds might be utilized for intentionally capturing movement in the subject. 

  • Aperture 

Aperture is the opening of the camera lens through which light is able to pass through in order to enter the camera. It is easier to comprehend aperture if you think about how your pupils work: when you move through light or dark environments, your pupils will enlarge or shrink to accommodate for the amount of light they are exposed to. 

The photography factor that aperture is responsible for controlling is the depth of field for any given photograph. Depth of field can be defined as the sharpness of a photograph from front to back. A thin or shallow depth of field would be describing an image in which the subject is the only part of the photo in focus, while the background is completely blurred and out of focus. A deep depth of field explores photographs in which every aspect of the photograph (foreground and background) are sharp. 

In addition, aperture can also control the exposure in a photograph. When the aperture is adjusted, the amount of light that is able to reach the camera sensor is hence controlled in one way or another, which will adjust the brightness/exposure of the photograph. A large aperture will result in a brighter photograph, while a smaller aperture would result in a much darker photograph. 

  • ISO (Sensitivity)

Finally, the sensitivity or ISO is a camera setting that darkens or brightens an image – a higher ISO setting will result in a brighter image. ISO is also used to take photos in darker environments, and to give more freedom into controlling the aperture and shutter speed of your camera. With that being said, setting ISO to a higher level would result in a lot of noise or grain that could interfere with the clarity of a photograph. 

Once I learned more about the three main components of photography, my mentor put my knowledge to the test by flipping through a magazine with me and then asking me to comment on the degree in which the photographer might’ve set their shutter speed, aperture, and/or ISO. Overall, seeing the photography settings used on print helped contribute to my understanding of the different roles the settings play in photography. It also promoted identification on where certain settings would be more applicable for stylistic purposes (for example, a lot of photos have a high ISO for a stylized amount of grain rather than just on accident). 

January 16:

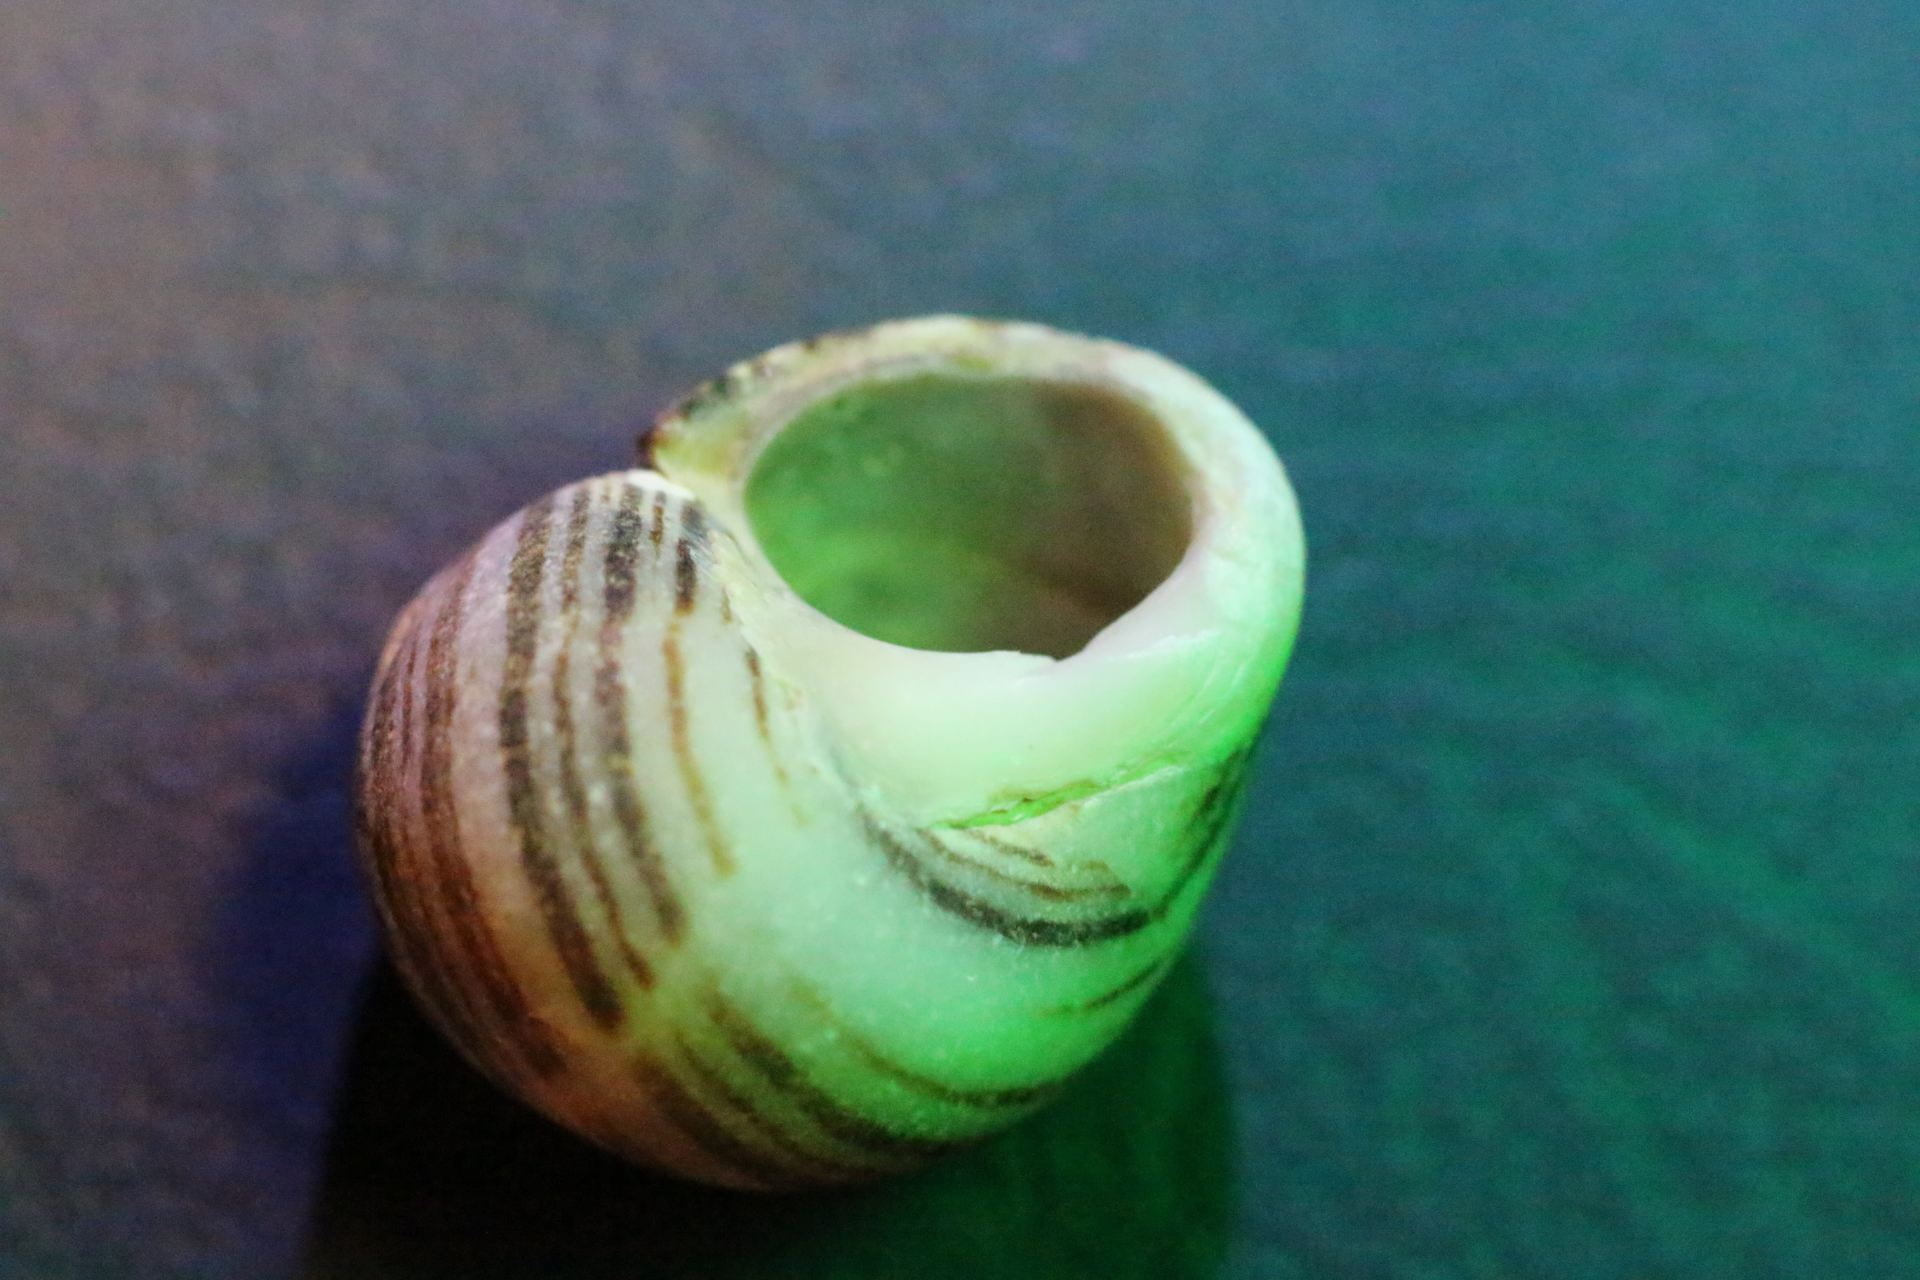
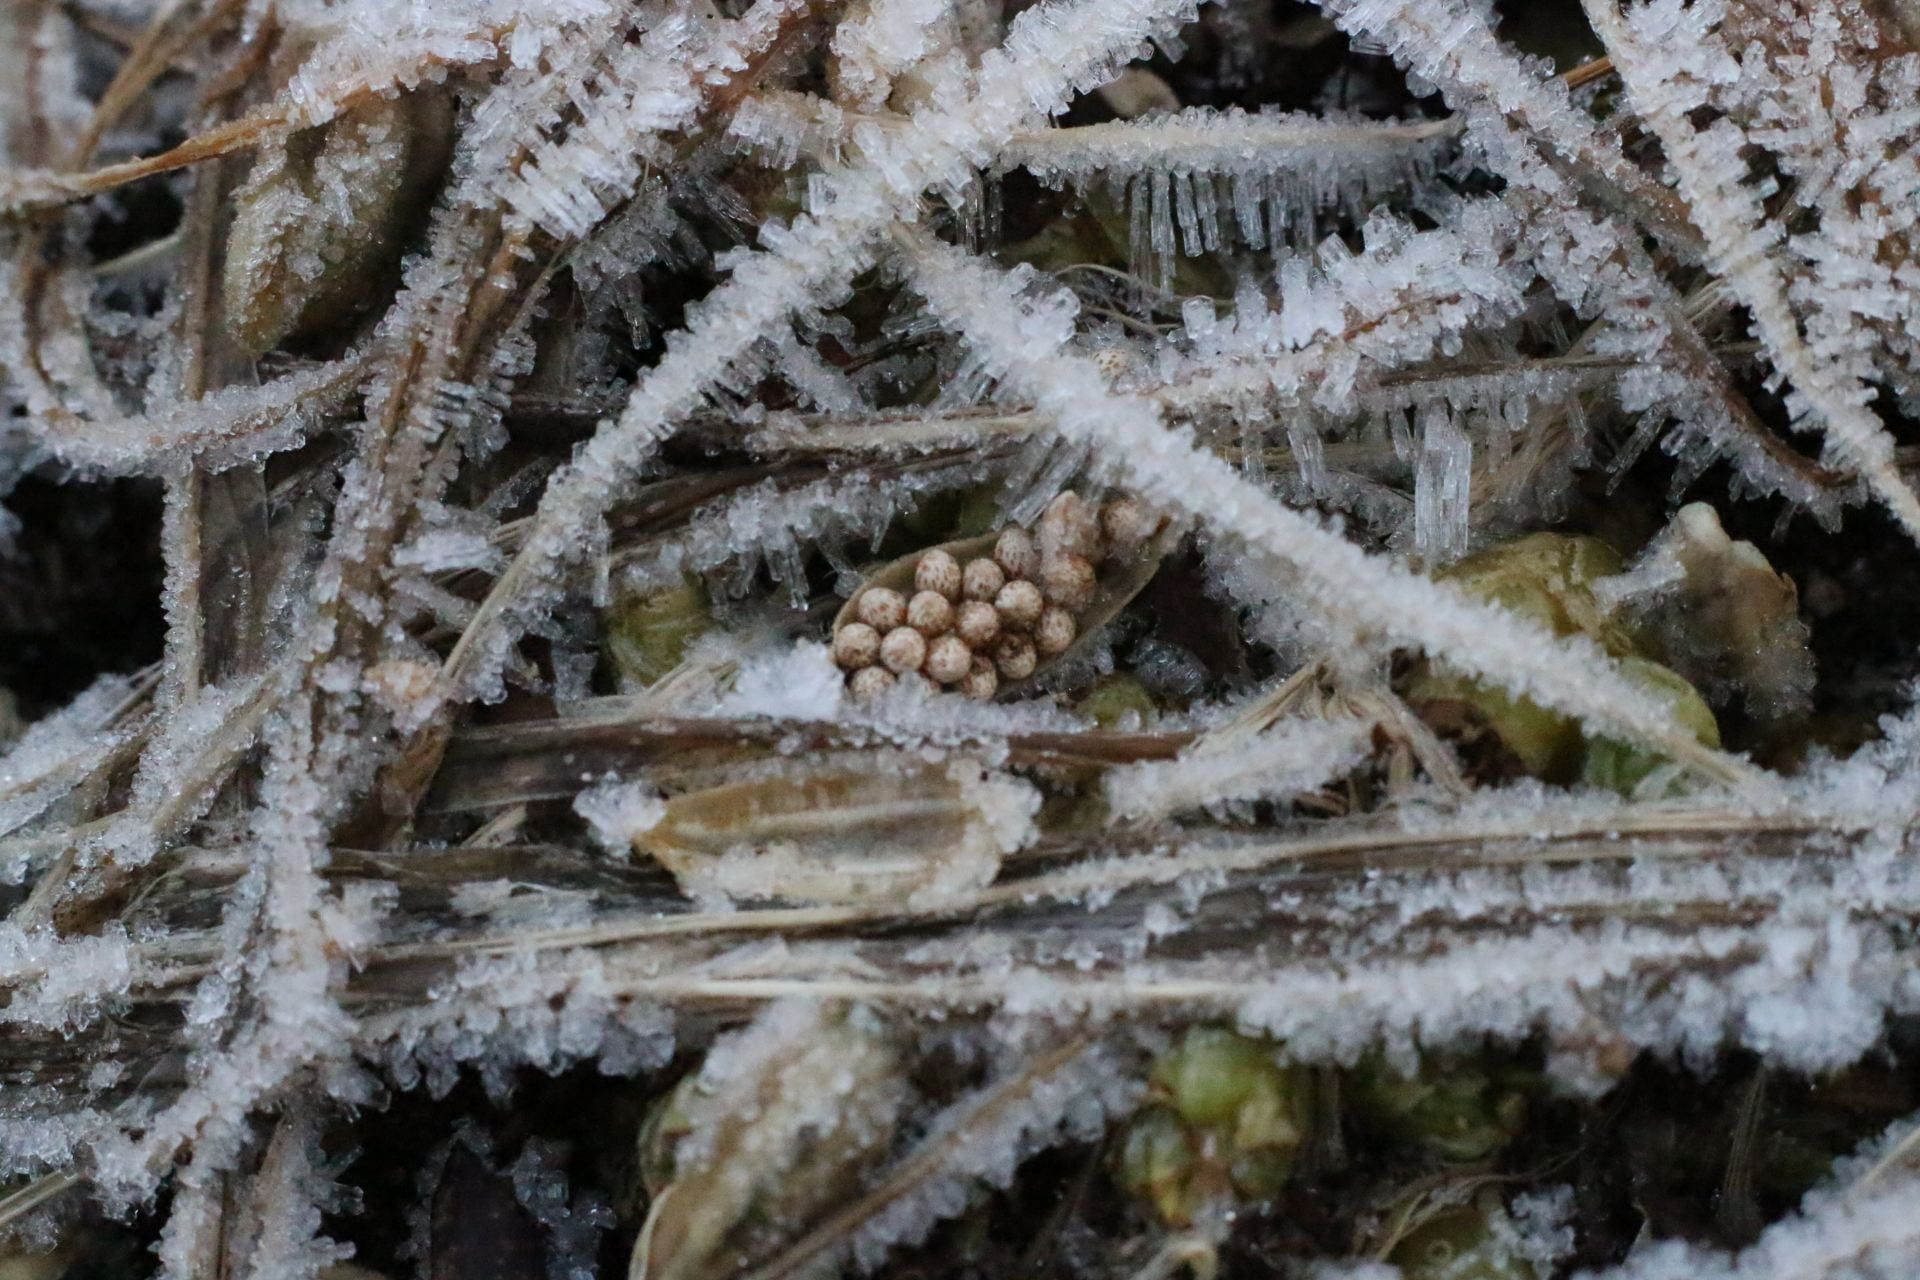
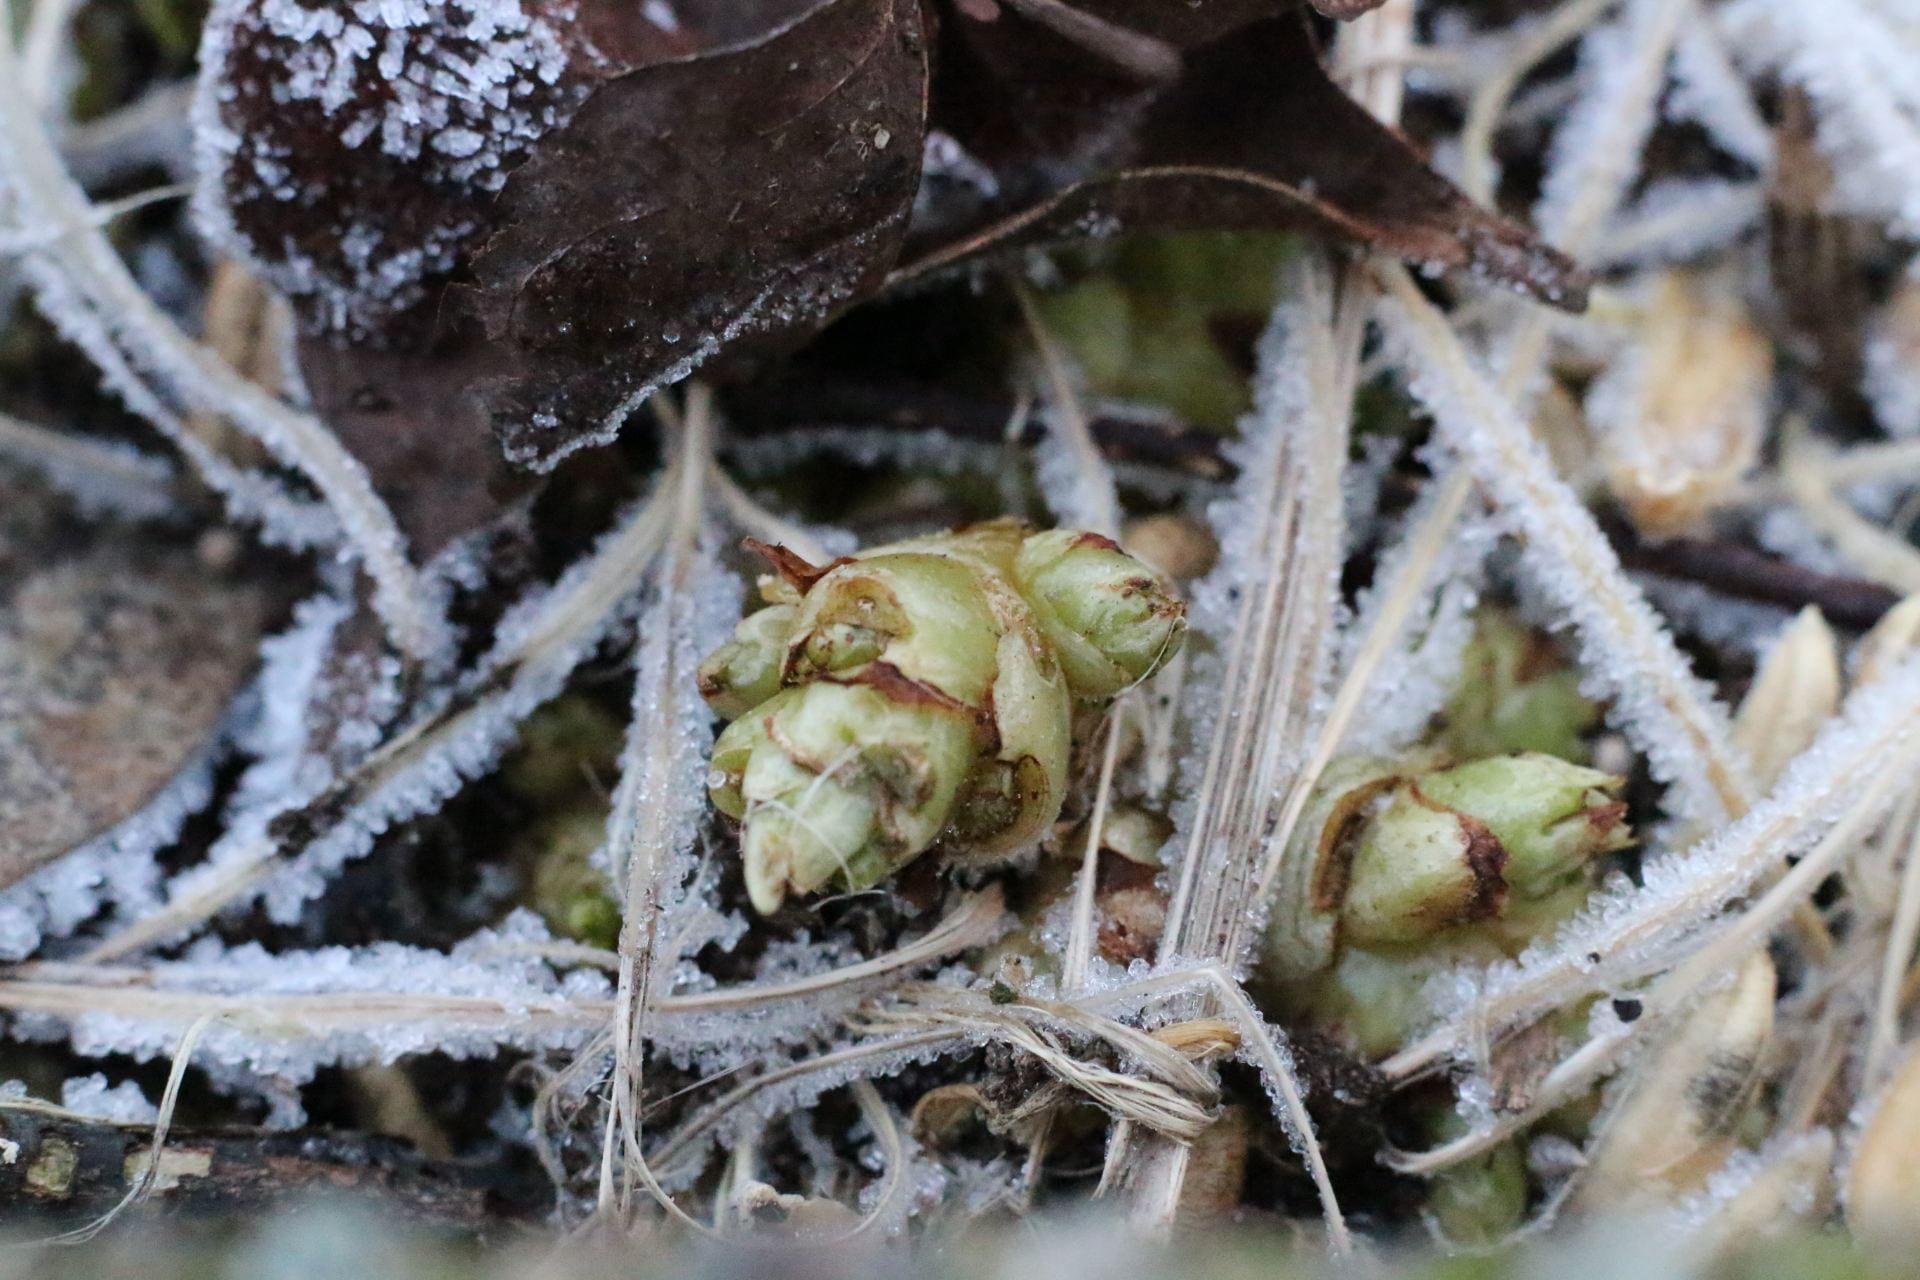
This session mostly involved applying and further investigating the three main components of a good photograph (shutter speed, aperture, and ISO) through taking several different photos using different settings of specifically shutter speed.  Through this, I found that I had a better understanding of how some shutter speeds could work better for still photographs that have more of a technical/informative aspect to them, whereas others help create a more poetic or artistic image. All of the photographs below depict a round crystal.  

Below are the four photographs that I took, and their corresponding camera settings:

Shutter Speed 1/125, Aperture 5.6, ISO 400

Shutter Speed 1/80, Aperture 4.5, ISO 400

Shutter Speed 1/100, Aperture 5.0, ISO 400

Shutter Speed 1/100, Aperture 5.0, ISO 400

January 23:

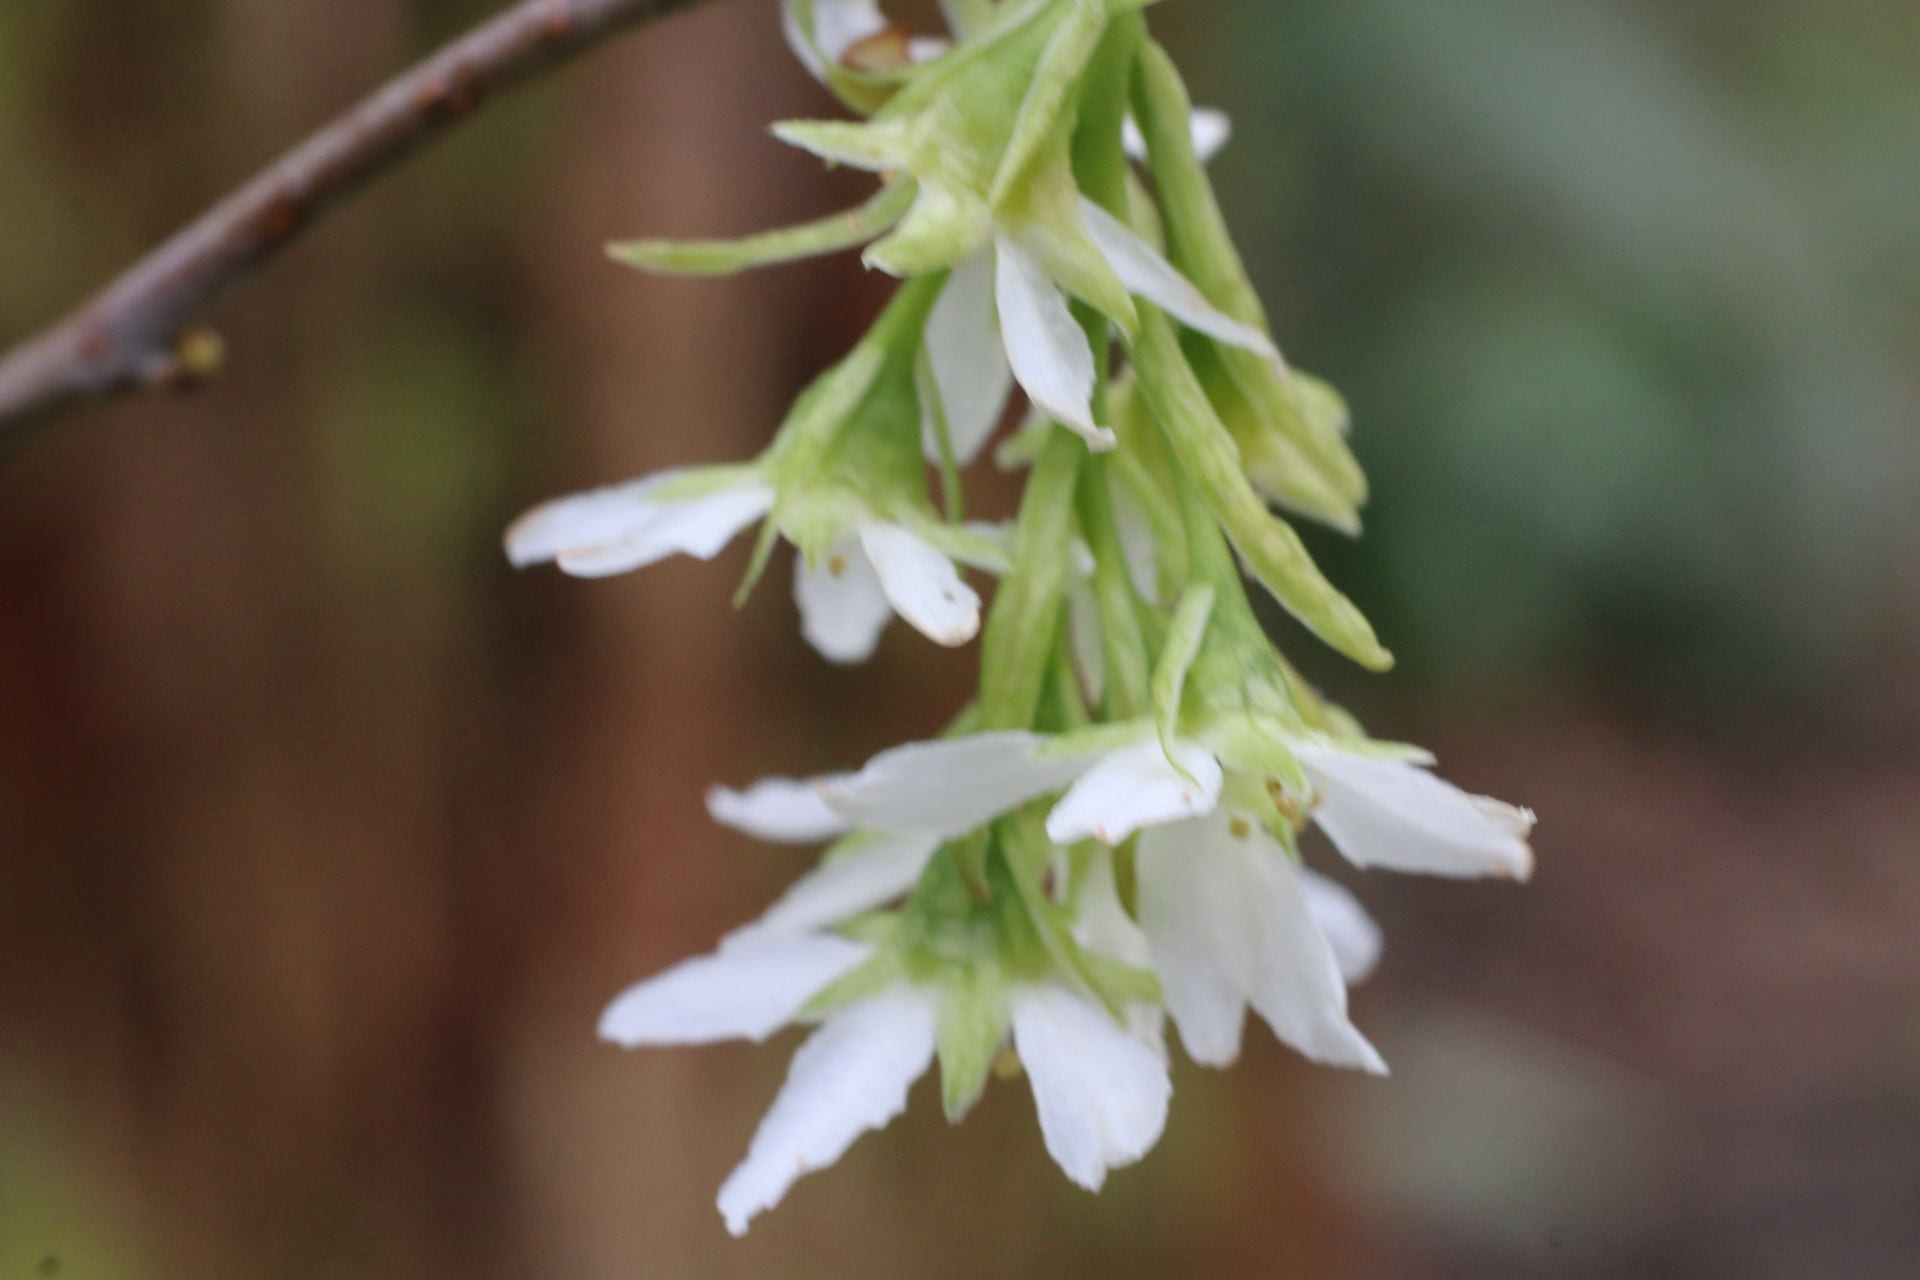
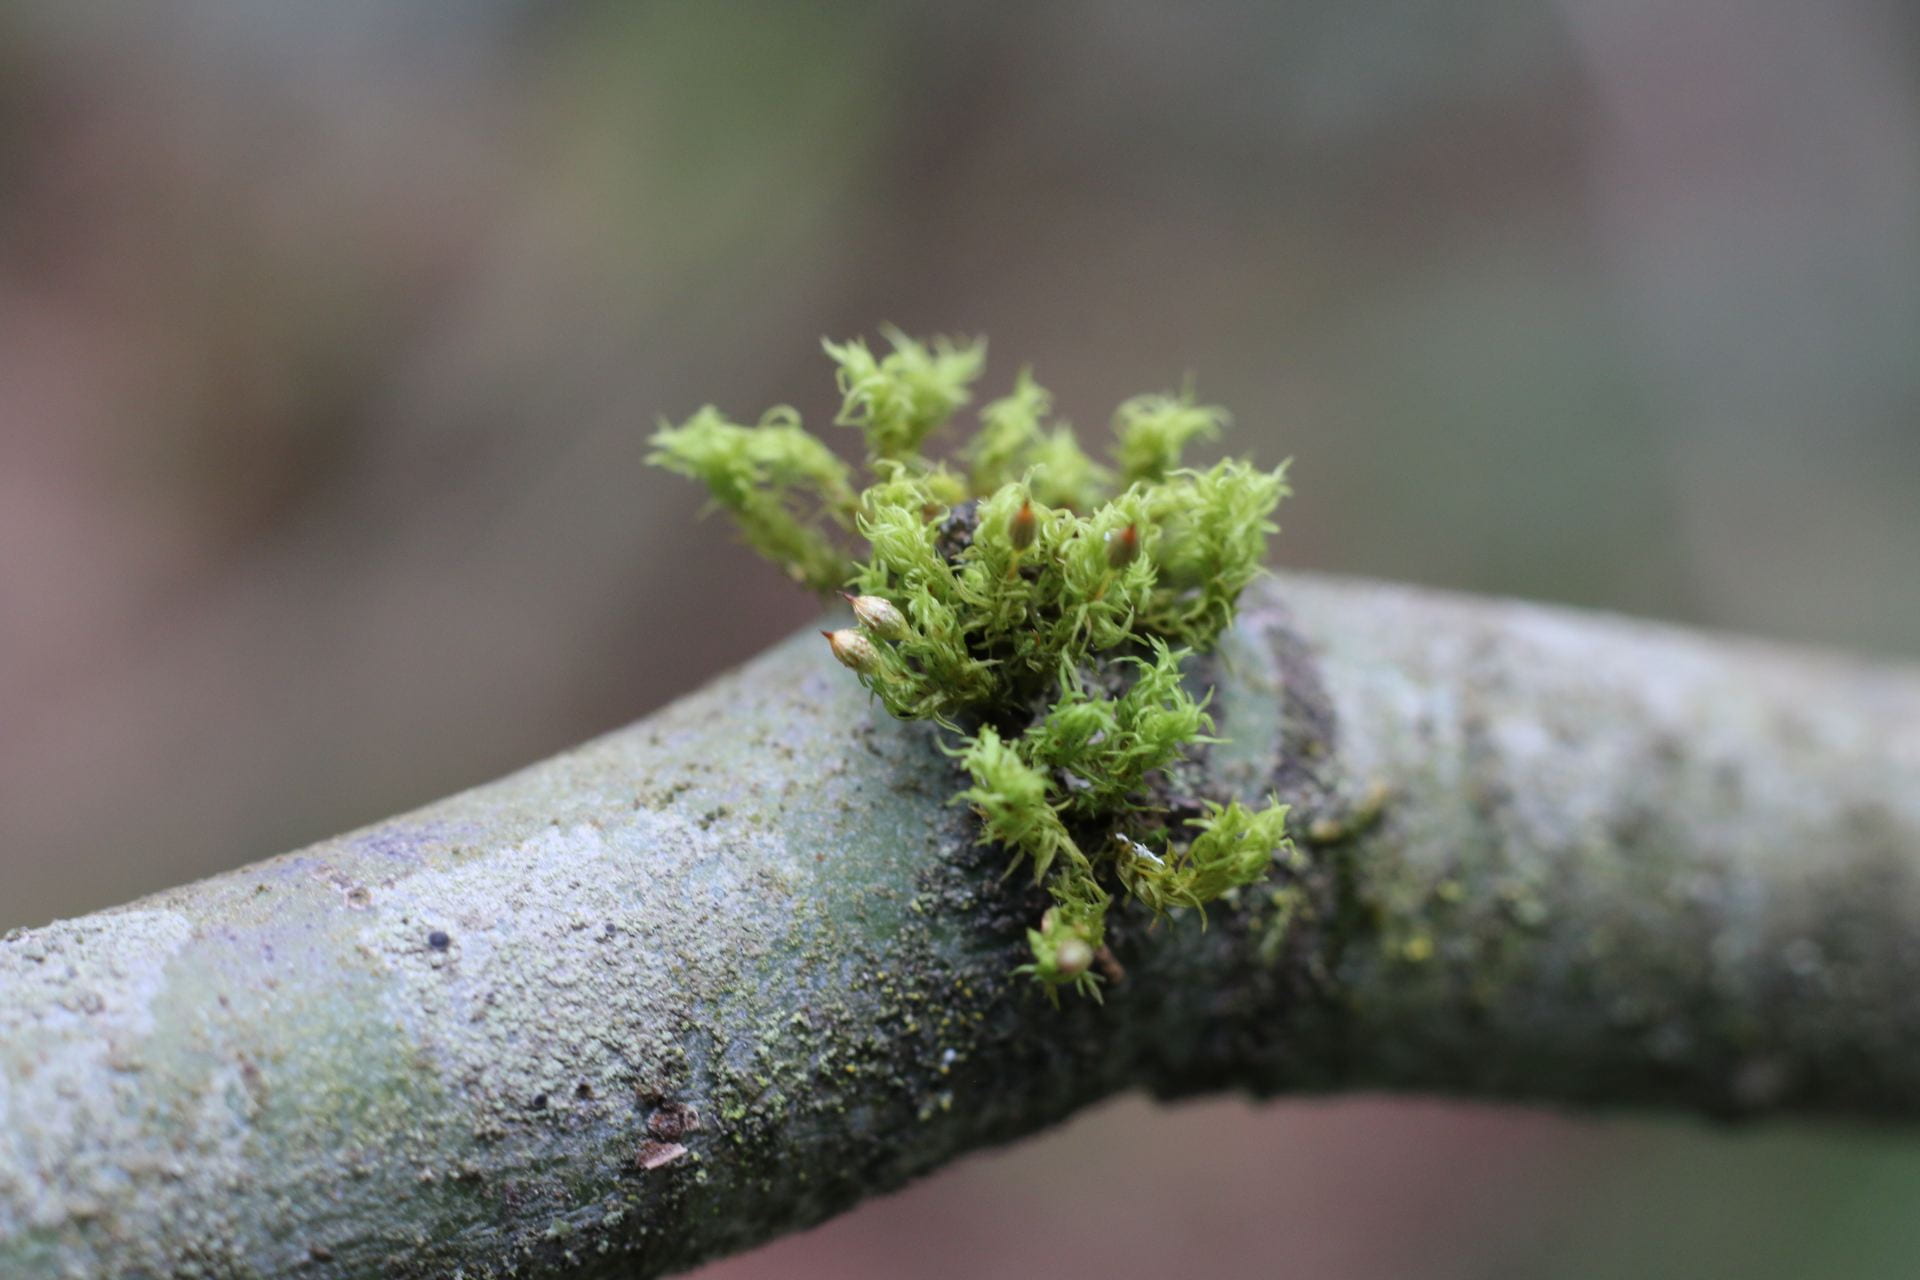
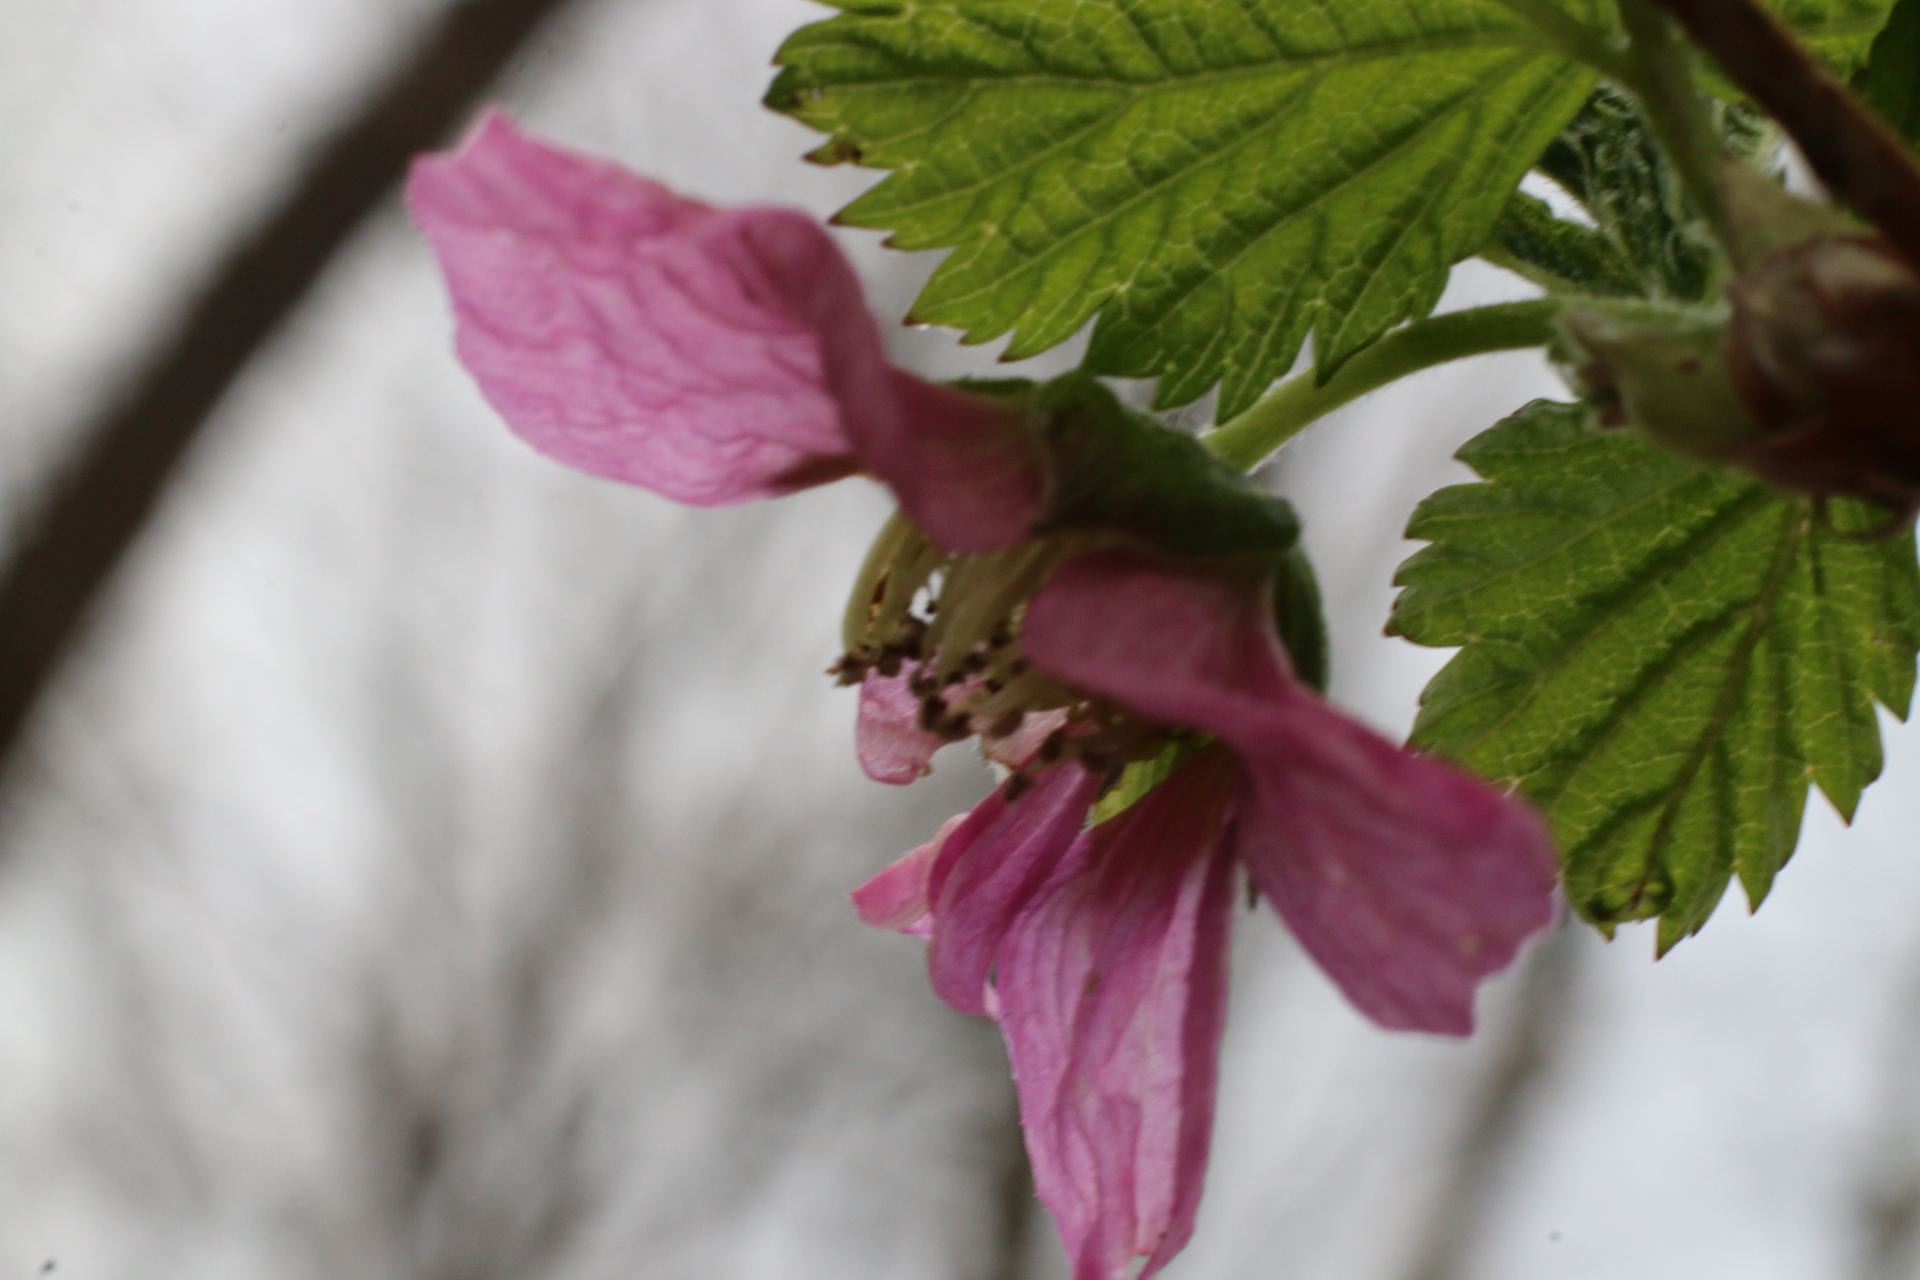
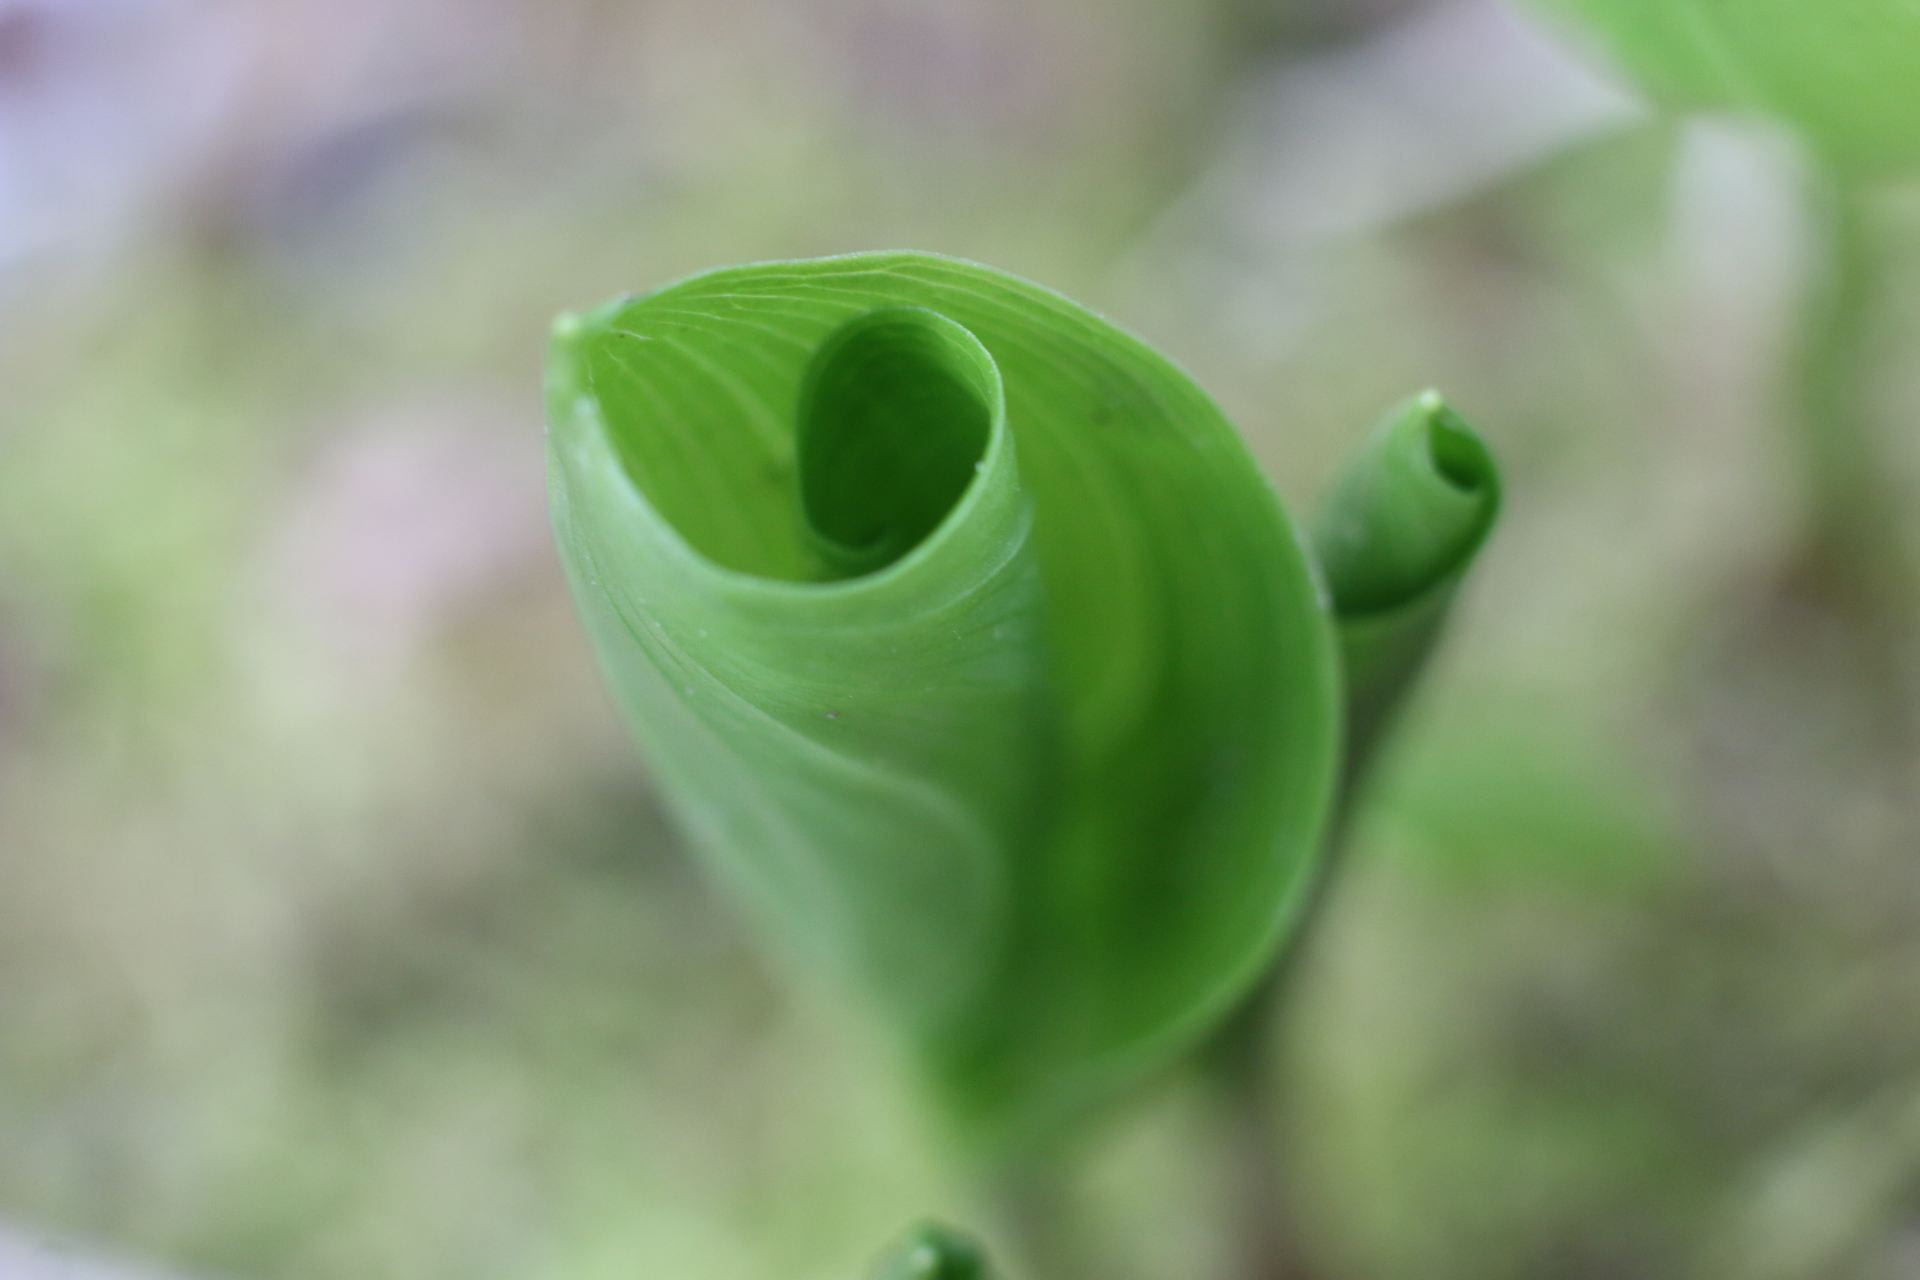
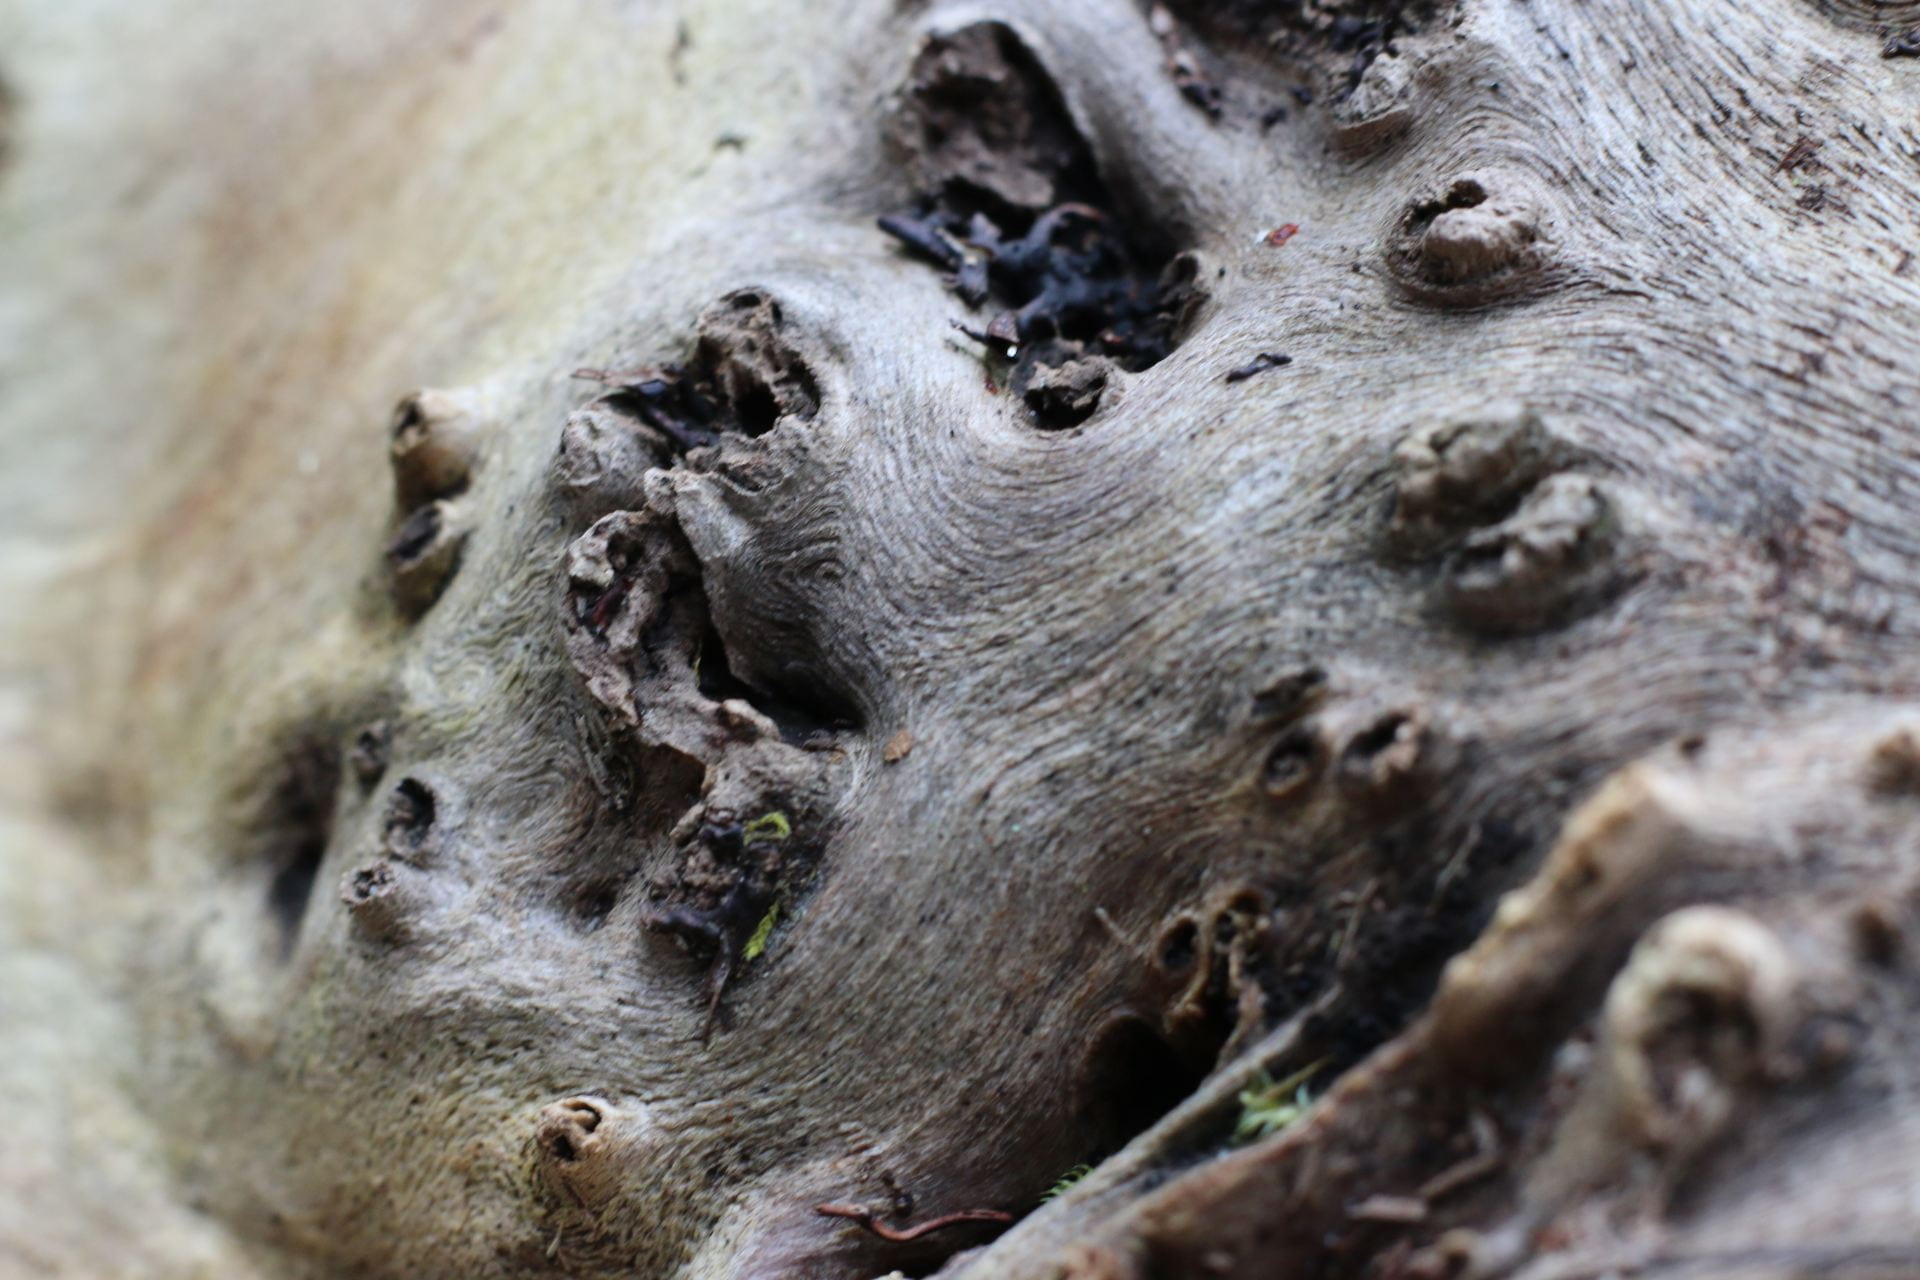
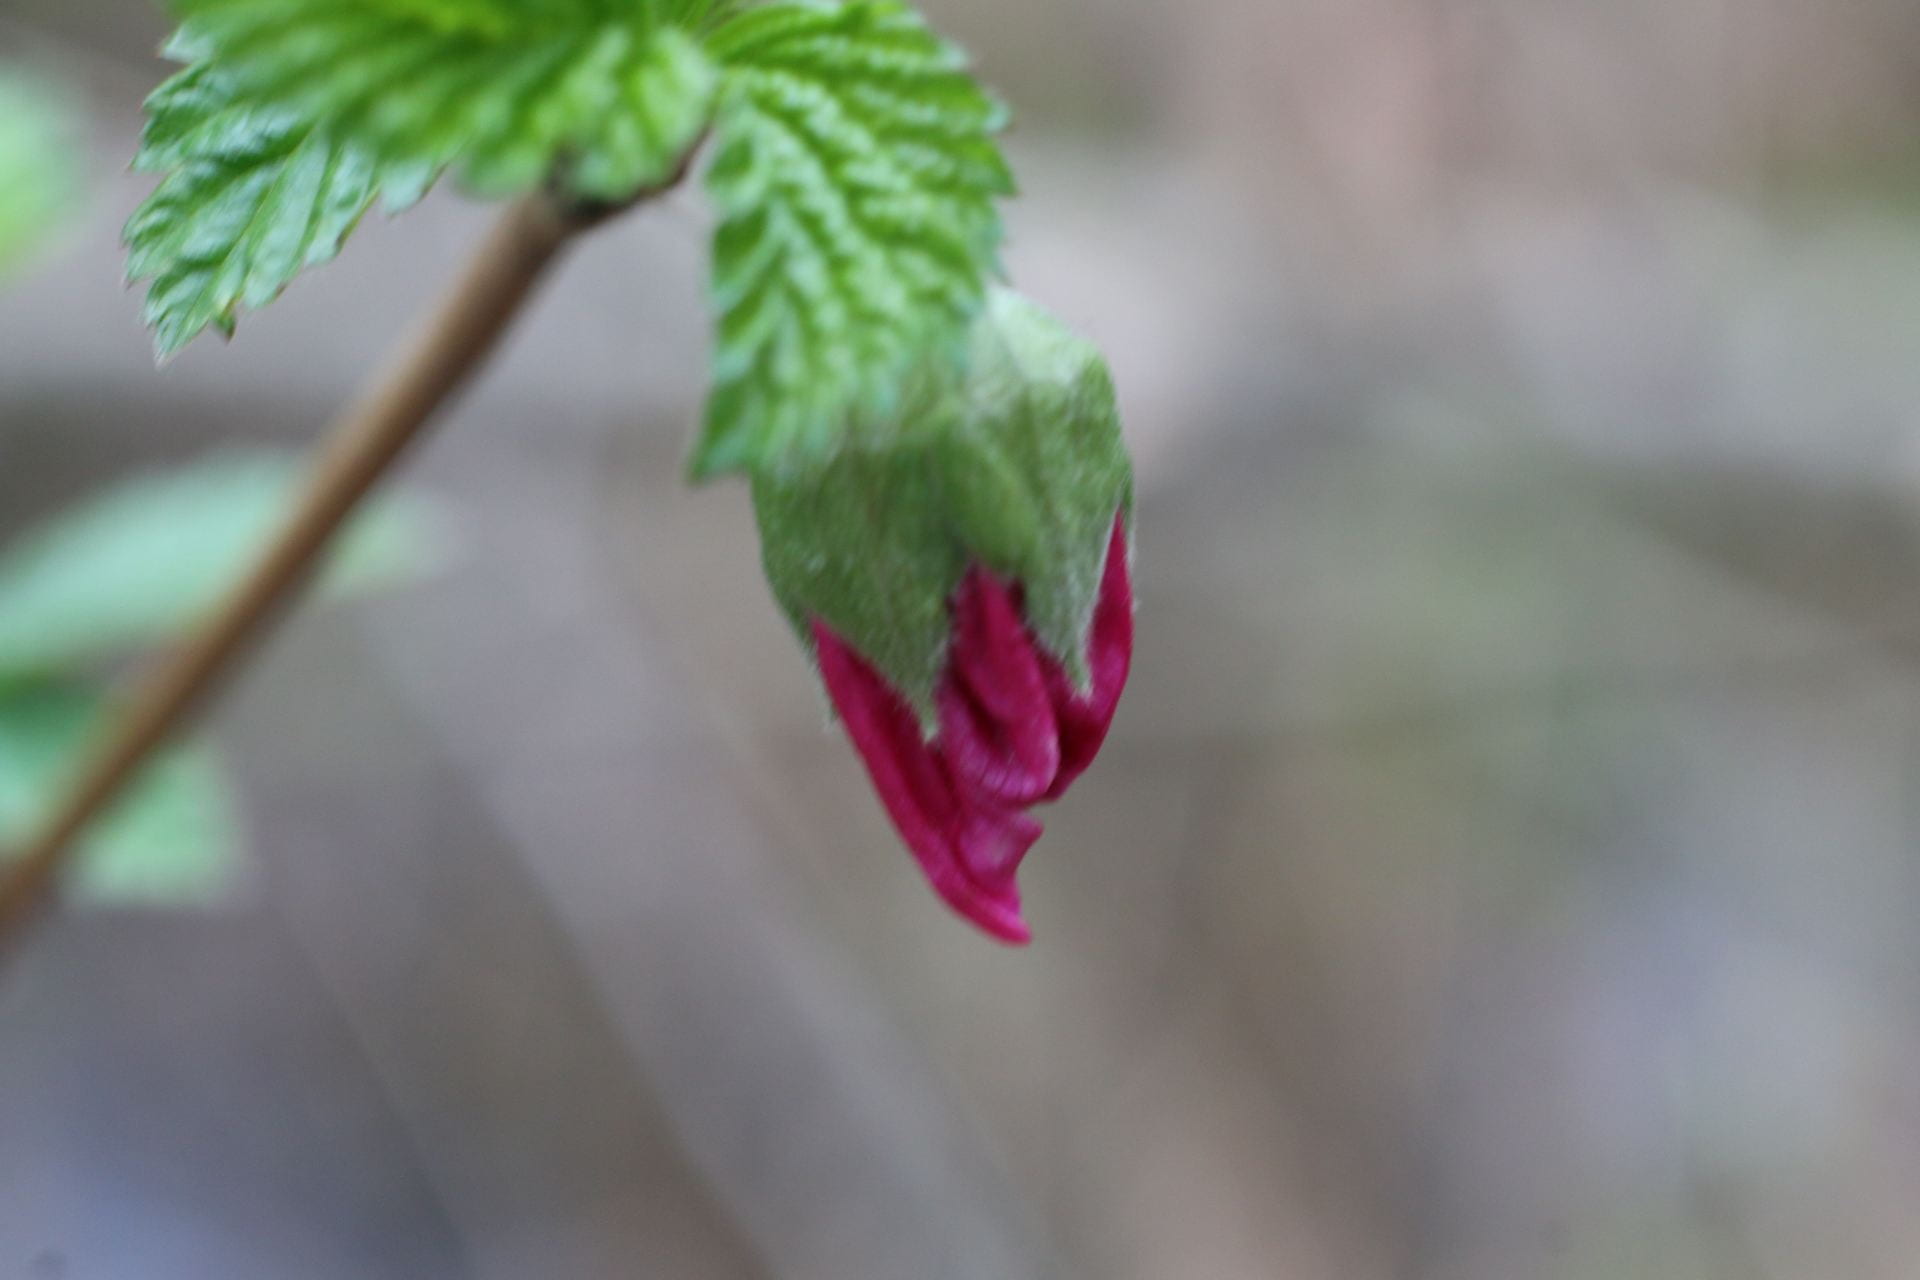
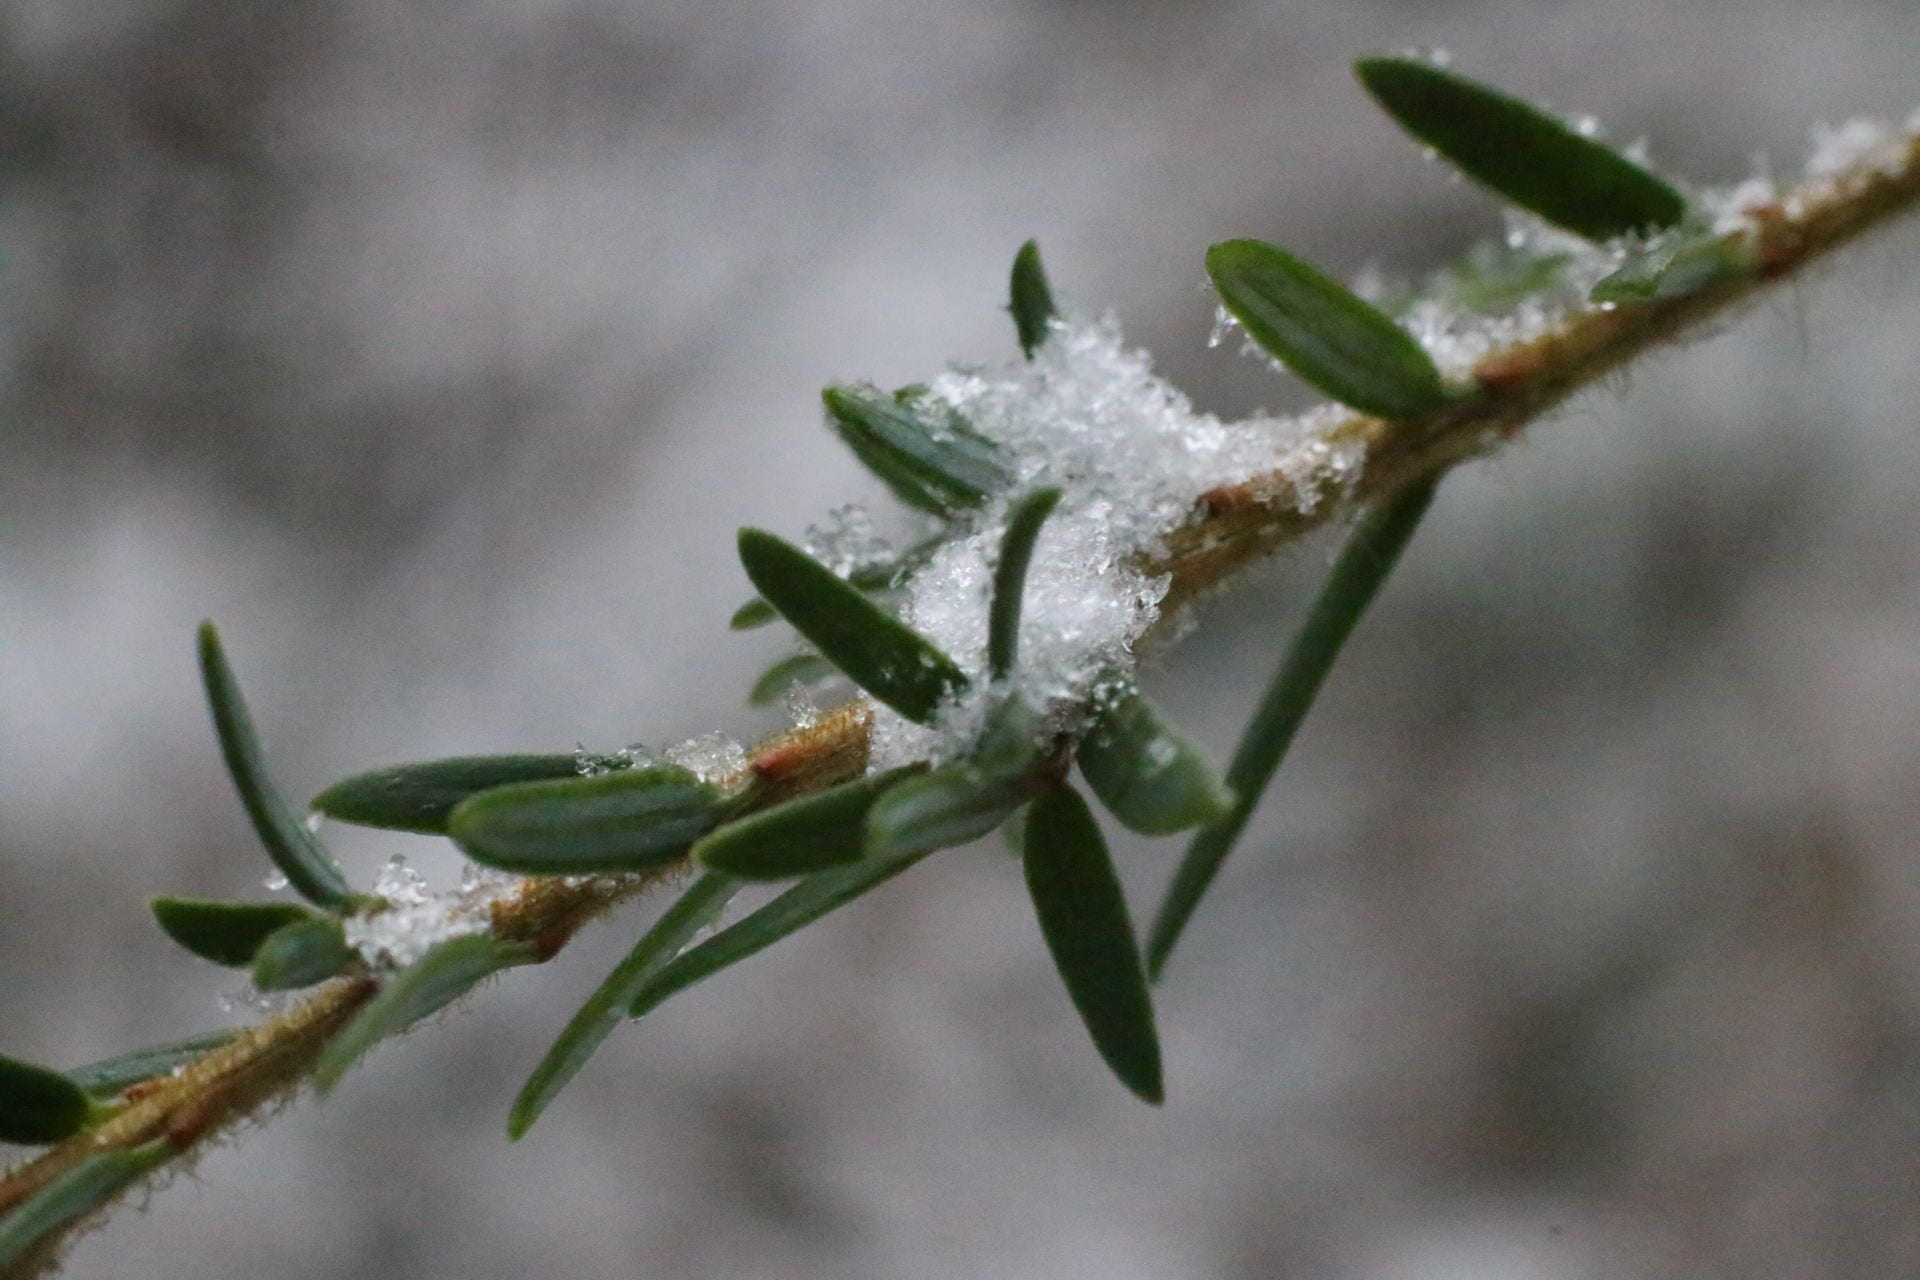
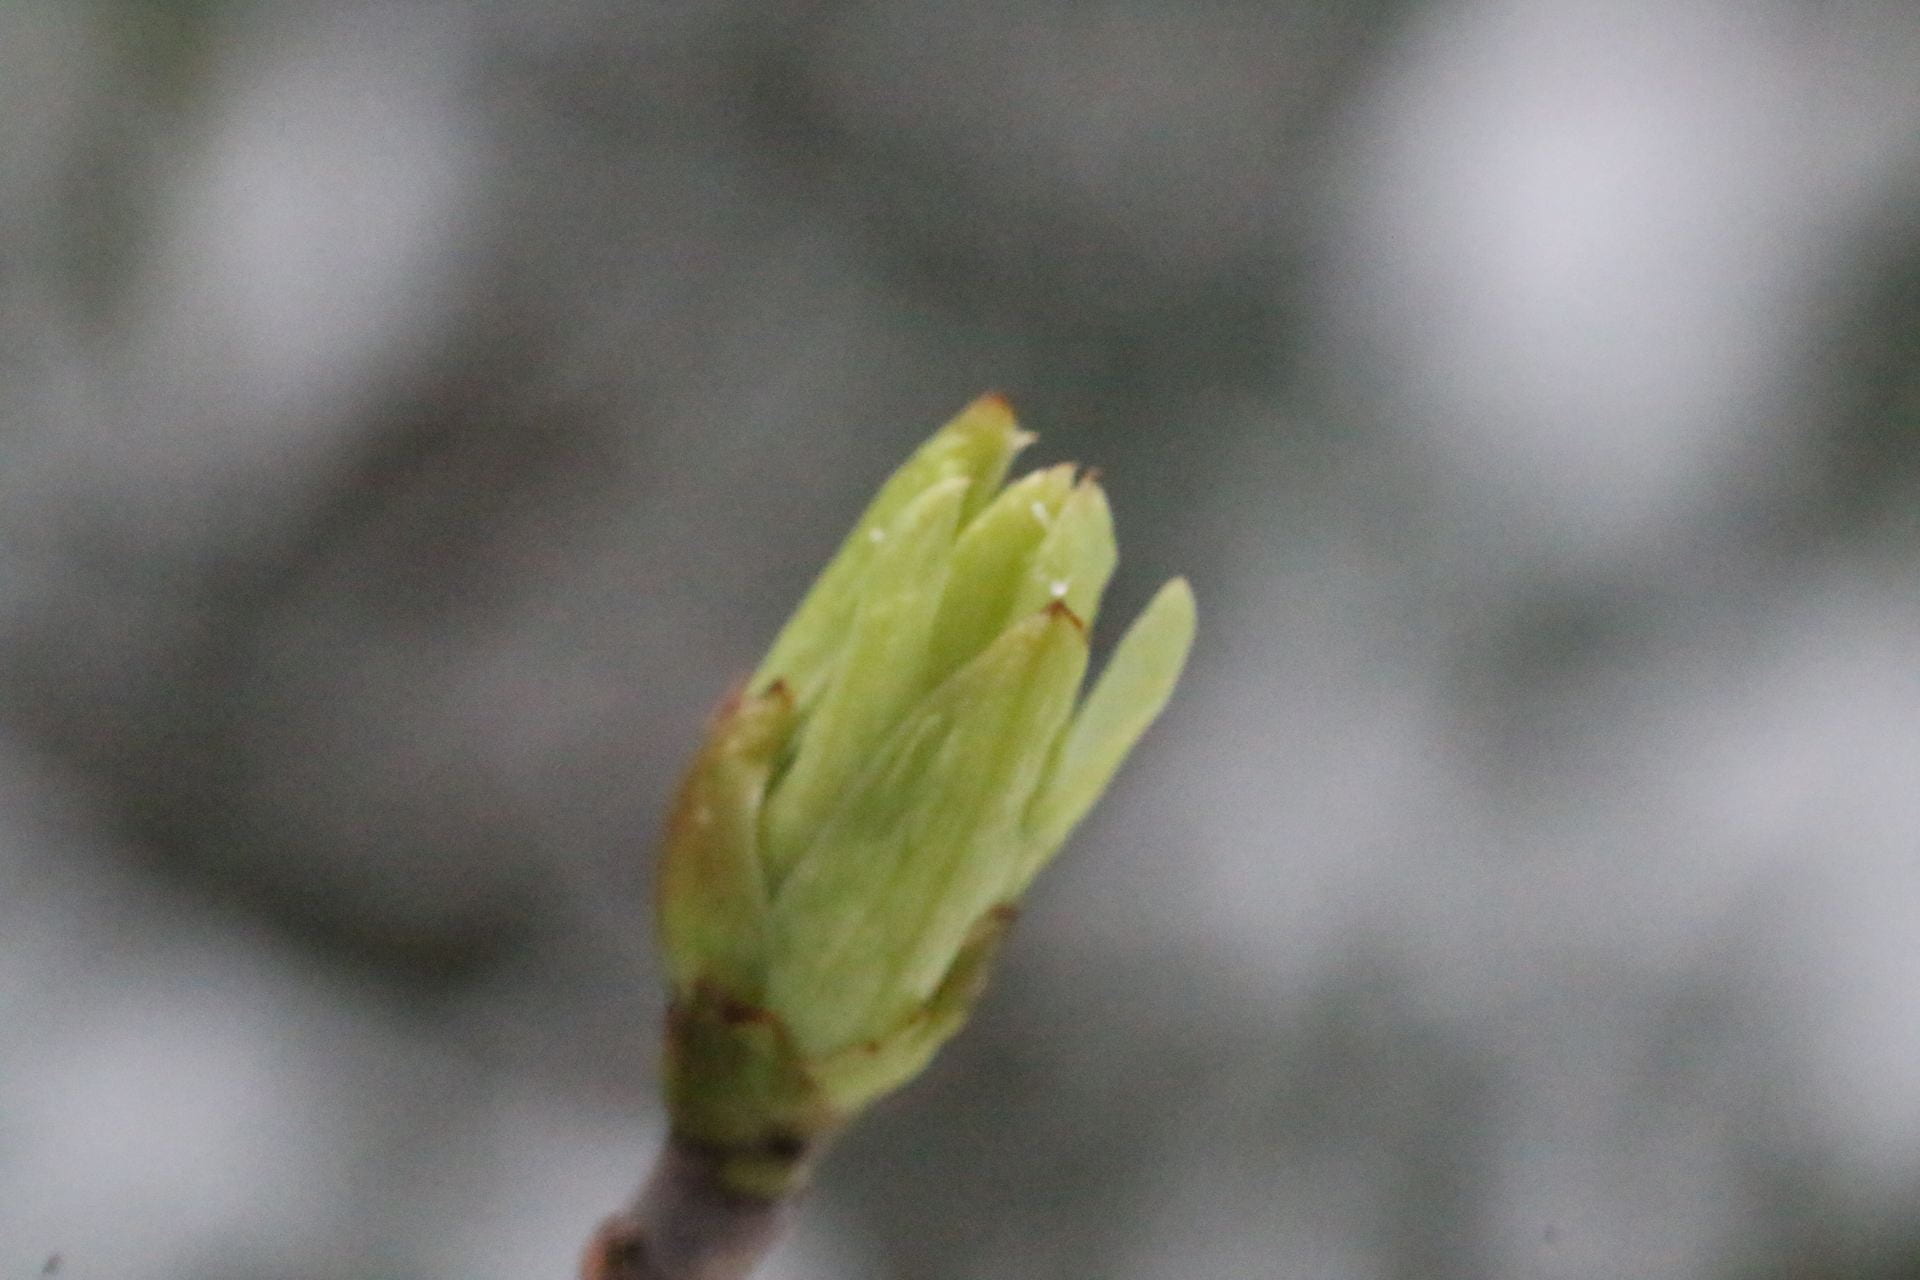
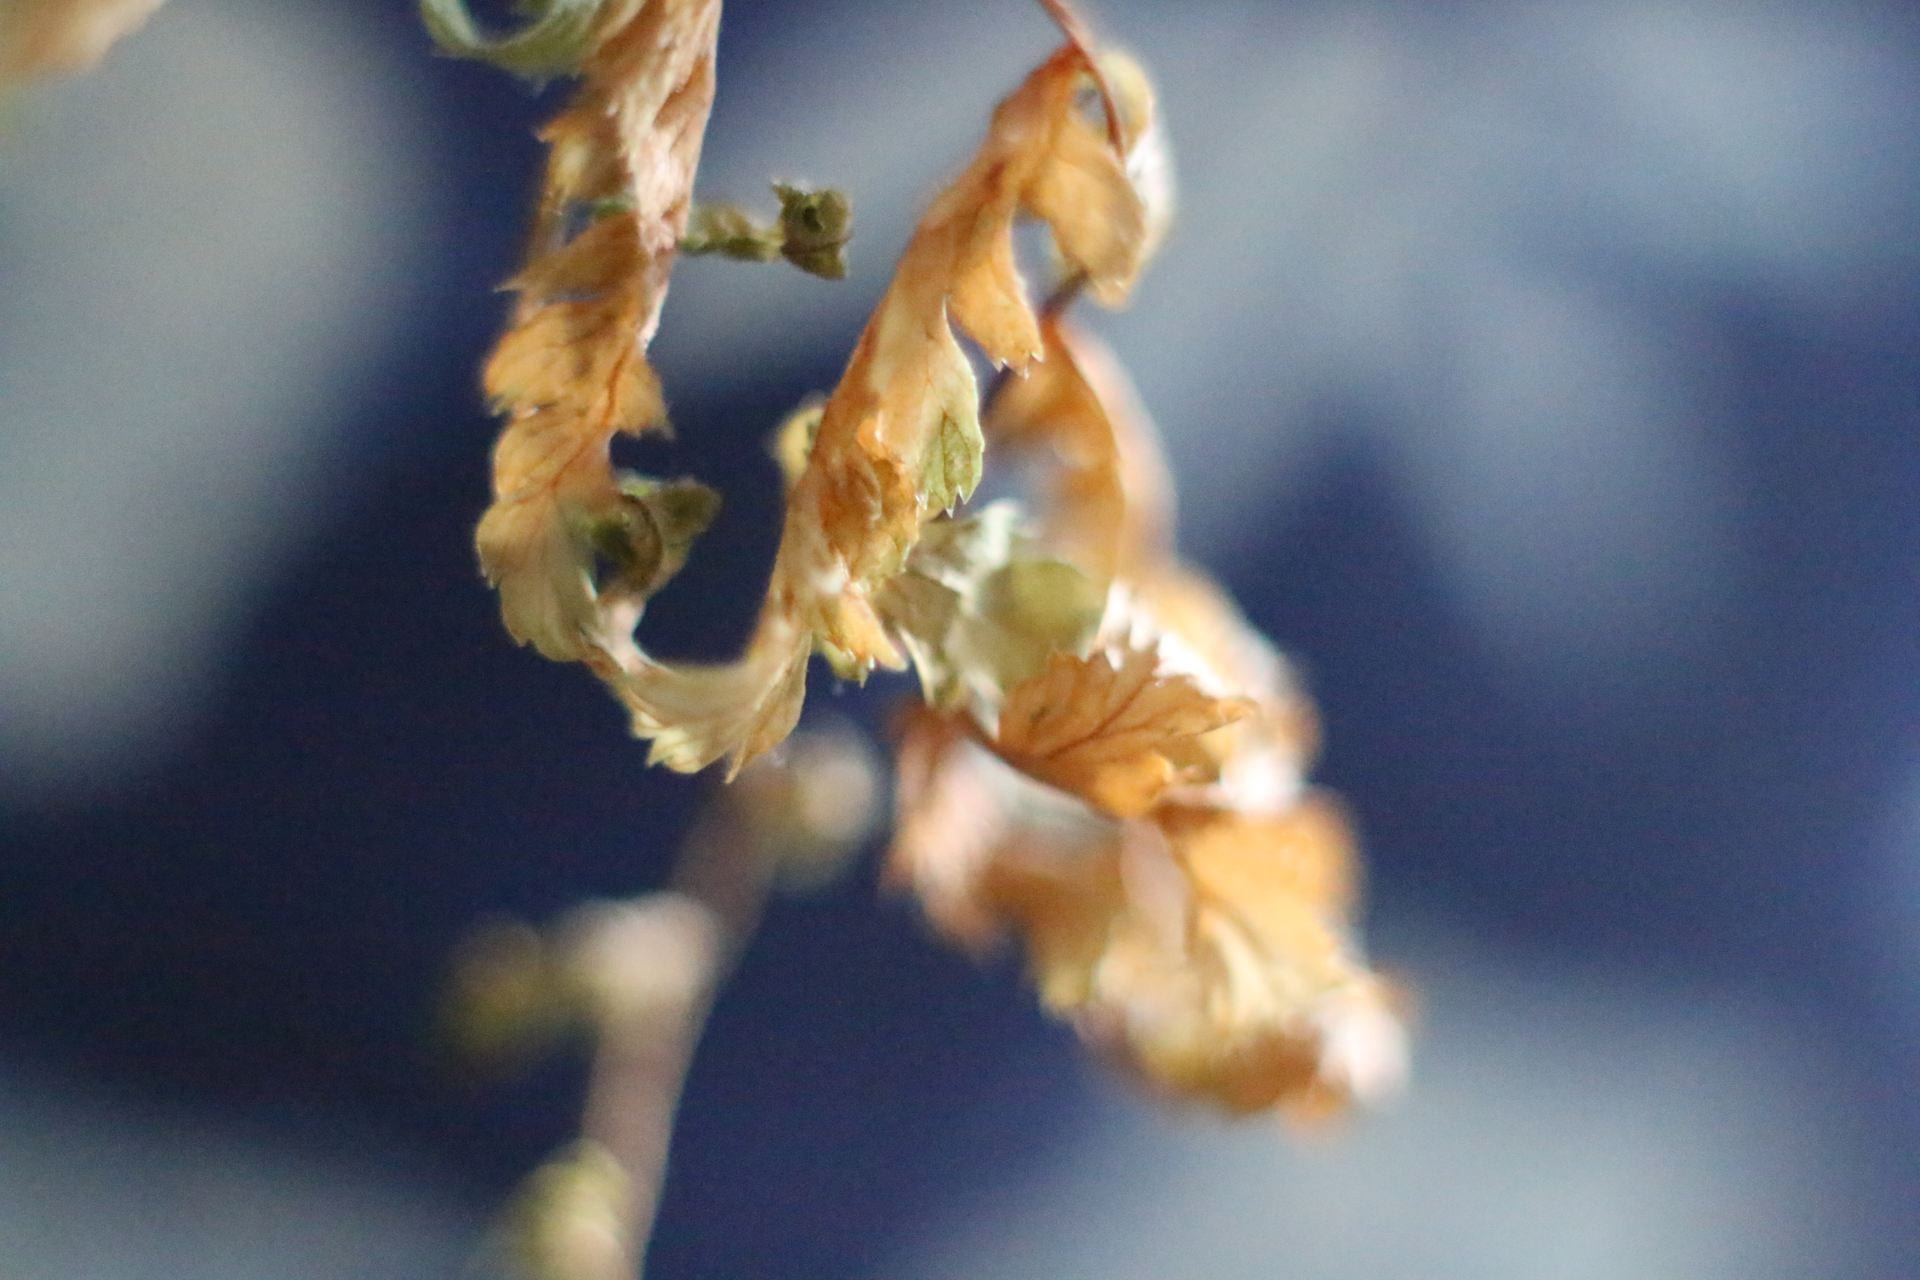
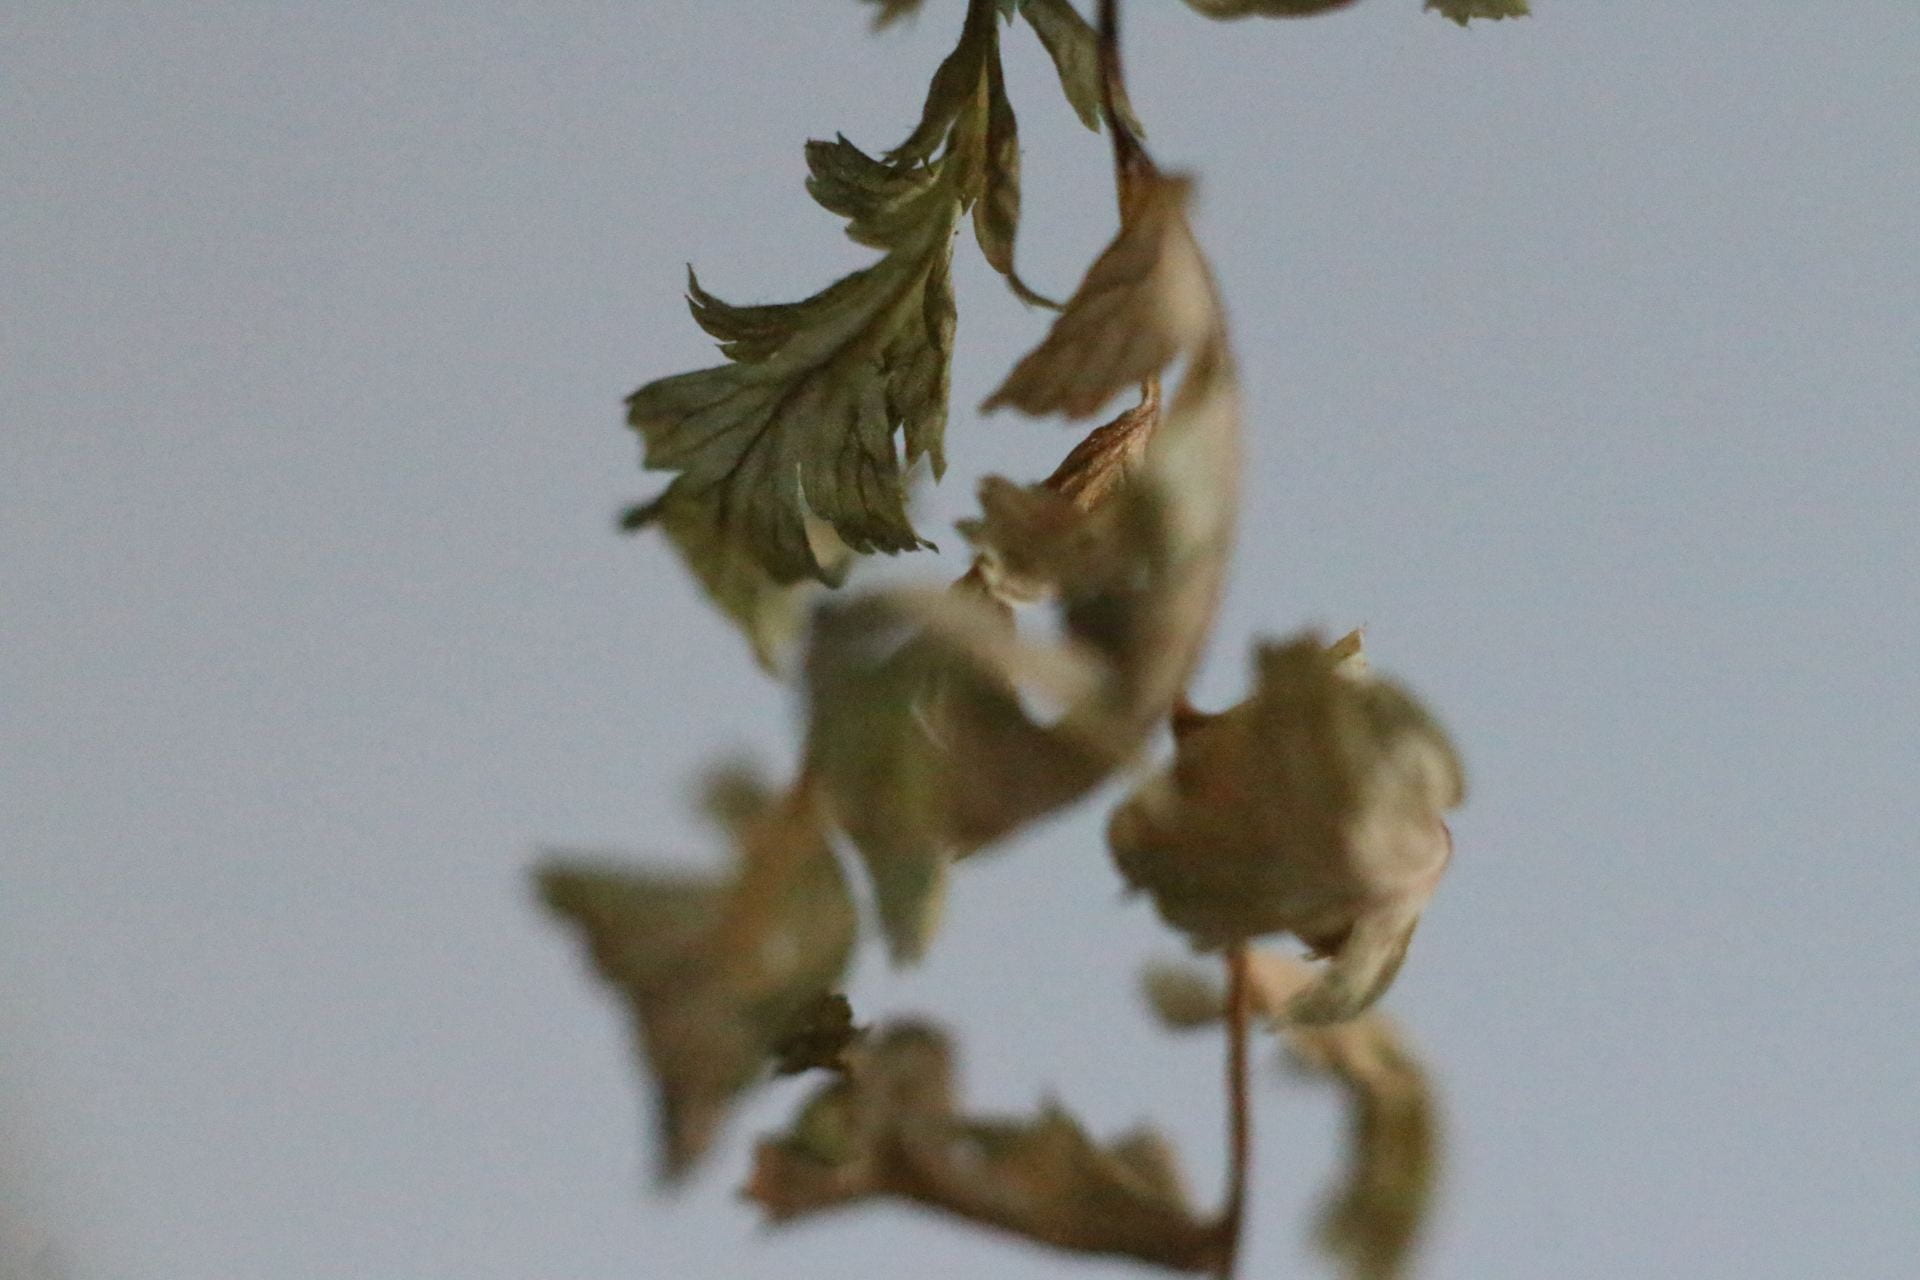
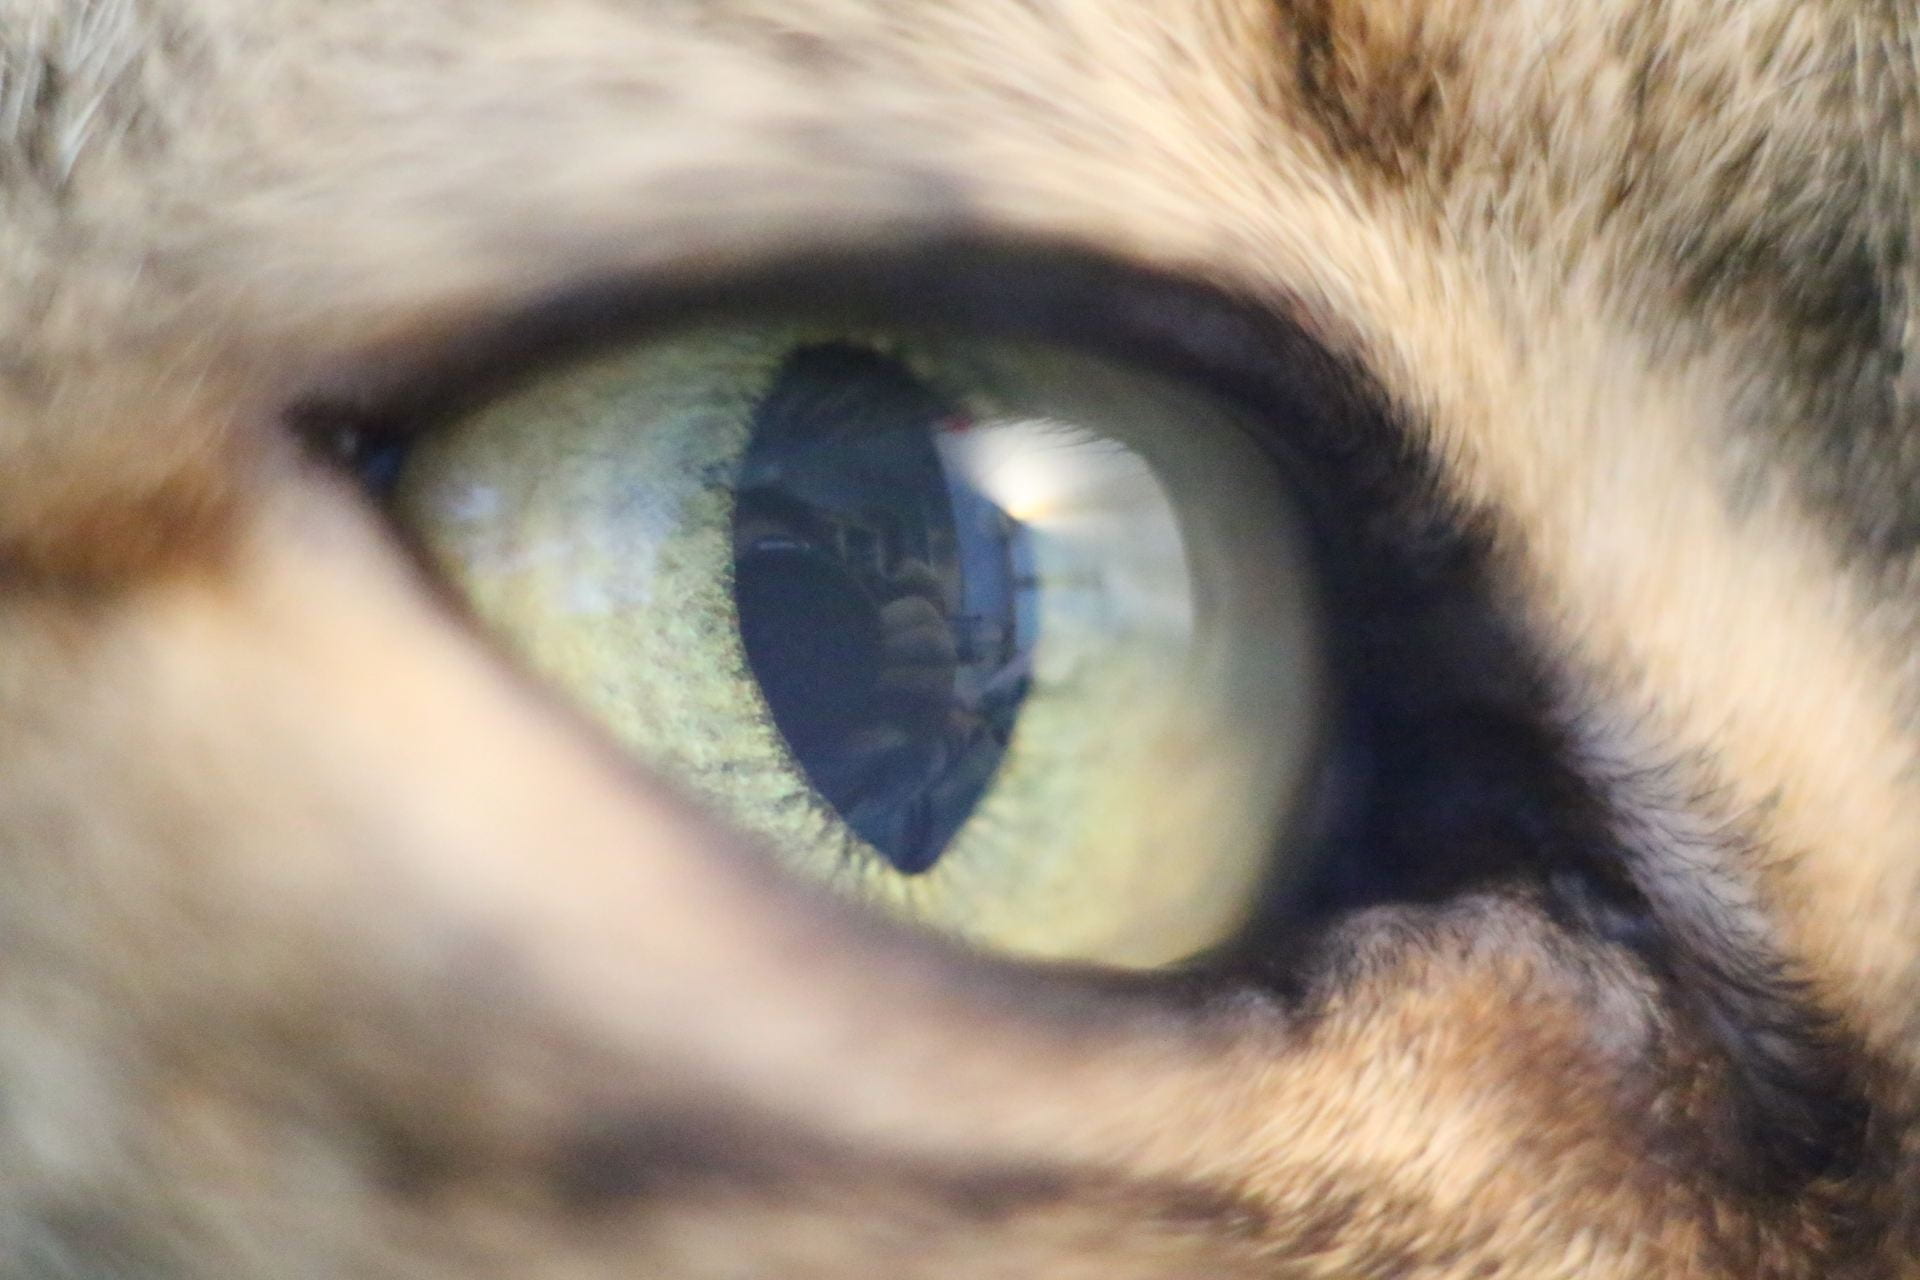
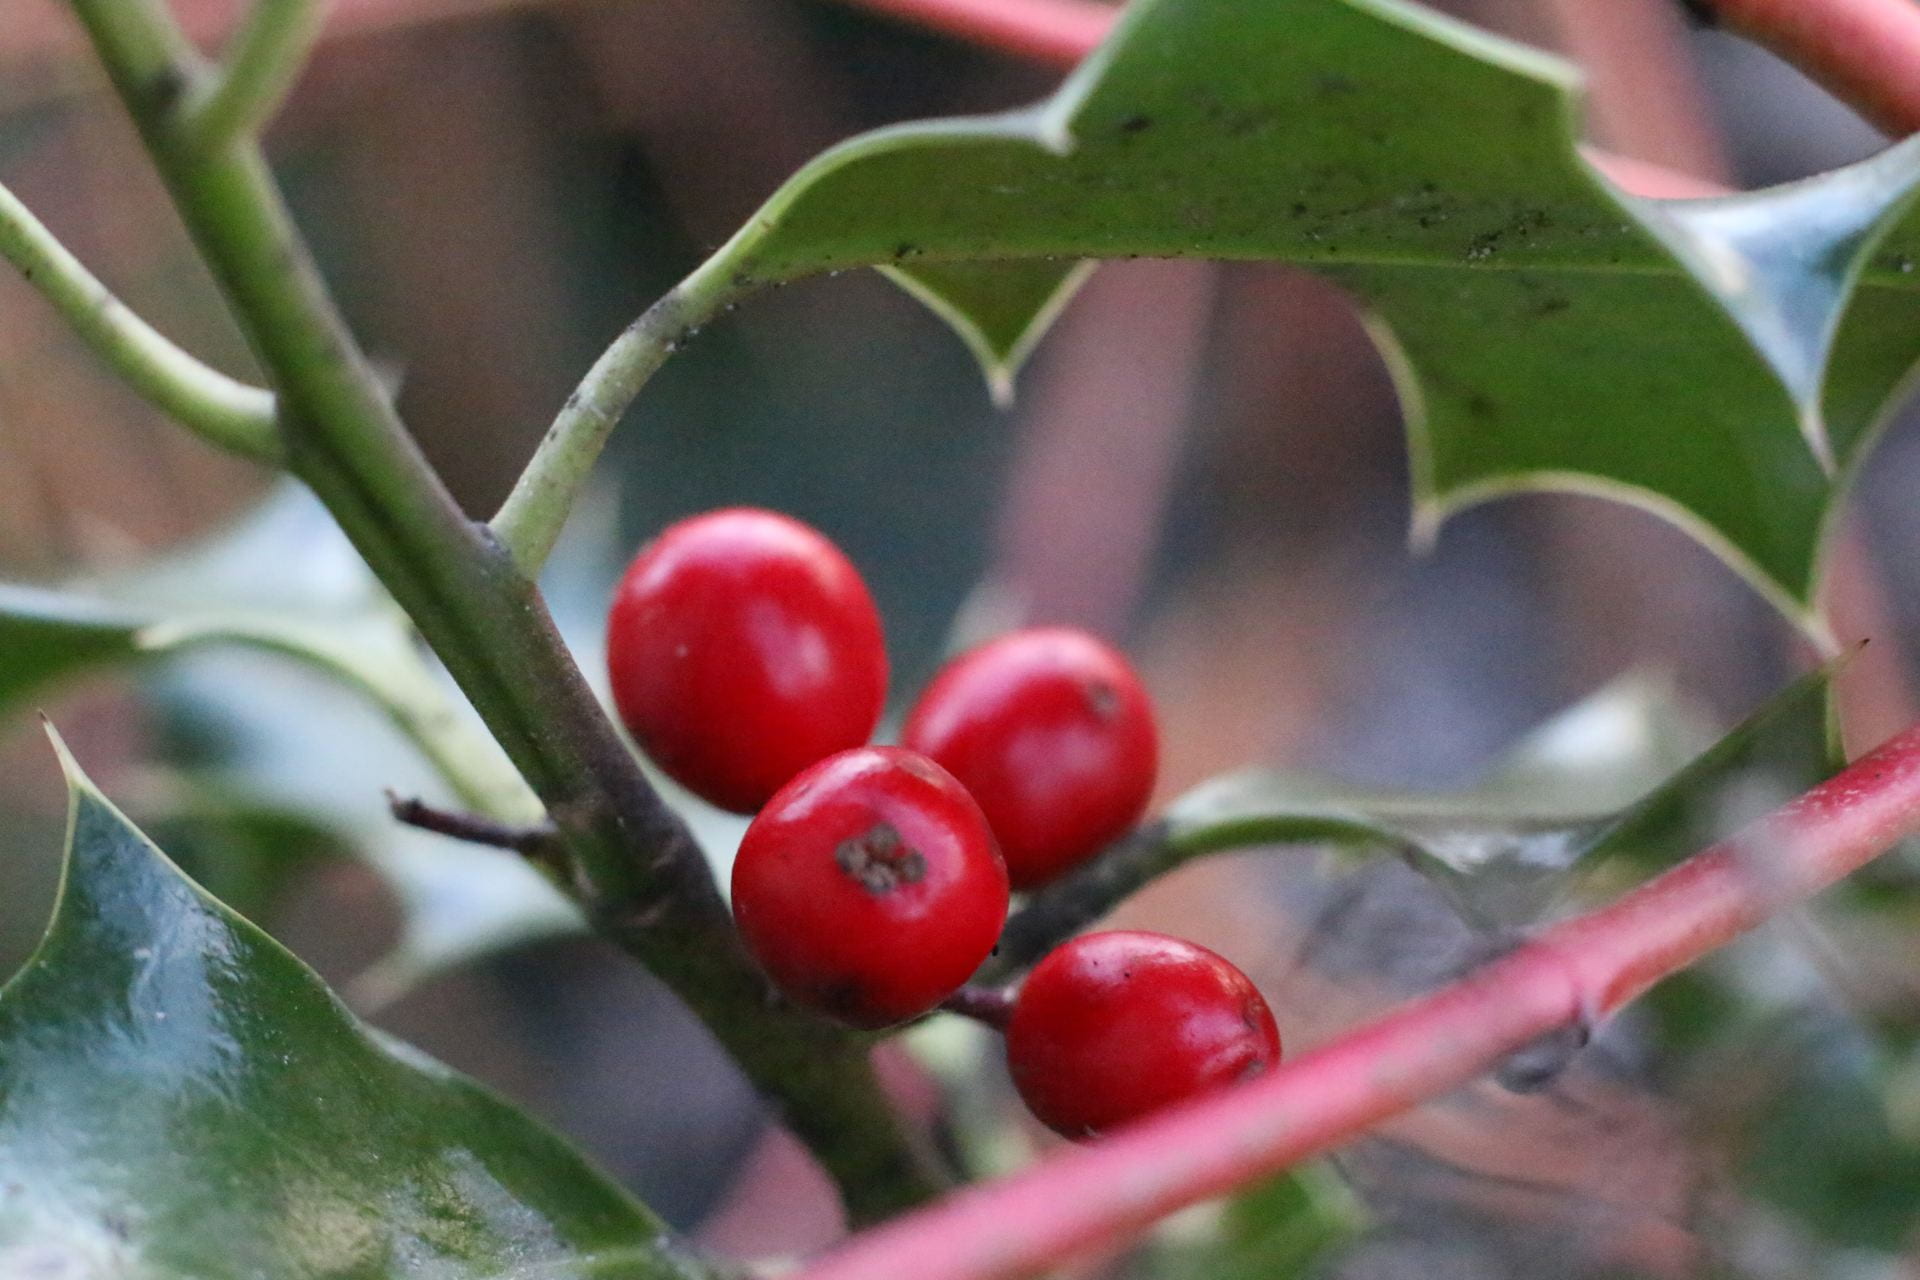
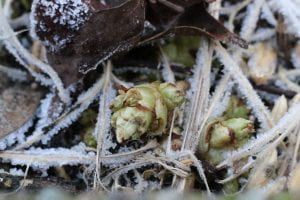
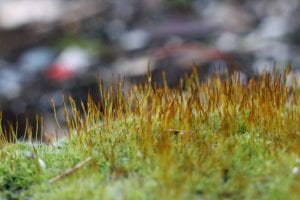
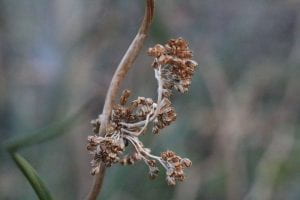
Finally, I’d had enough practice with taking photographs at home that I was able to take a few practice photos out in the field. I started off my practice collection by strolling through Inspiration Garden at Lafarge Lake and taking photos whenever I saw something that seemed unique or intriguing. For this session, my mentor wanted me to specifically focus on the story or mood I was conveying through my images, in addition to how different camera angles will result in a completely different image. Below, I will include a few of my favourite images from this session. 


How to Have a Beautiful Mind Questions: 

  • How to Agree

A lot of what the chapters from this post’s topic focus on finding the right amount of balance between being compliant and argumentative. One extreme or the other would incite feelings of irritation, anger, and even hurt, and certainly won’t make it easy for others to talk with you. If you only provide arguments and problems to everything that someone is talking to you about, then communicating with you will become quite difficult. On the other hand, completely agreeing with every single opinion that someone has will make the relationship very one-sided and unpleasant as well. 

For the How to Agree section of How to Have a Beautiful Mind, the main points the author states about agreeing more often include actively trying to find places where you agree with what another person is saying, figuring out where they’re coming from, and acknowledging the value of the person’s individual beliefs, experiences, and knowledge. For the three mentoring sessions I attended, I found lots of places to agree with my mentor. I always acknowledged their expertise and experience in the field, and even if I found a particular tip strange or hard to understand, I would try it out before openly disagreeing or turning the suggestion down. 

  • How to Disagree

Learning how to voice a different opinion or how to argue with someone is not only a skill that should be learned for this year’s In-Depth, but a skill that can and will apply to real life situations. Knowing how to state your points and advocate for what you need without being overtly hurtful to the other person is something that will help many people throughout their whole life. 

Some of How to Have a Beautiful Mind’s points and tips on how to disagree include not disagreeing just to pick out a problem or boost your ego, point out and mentally note any biases, stereotypes, or prejudices that either you or the person you’re disagreeing with might be using, and lastly to note the difference between outright disagreeing and having a different opinion with someone. In my case, for the third meeting with my mentor, we eventually decided on going to Inspiration Garden to take photos. I started to disagree before we left for Inspiration Garden, since I wanted to go to a more forested park, but my mentor used logic to point out that it was getting dark, and the more open space that Inspiration Garden might provide would promote better photographs. I saw my mentor’s point, and ended up having quite a successful first photography session. 

  • How to Differ

Finally, differing refers to two or more people having different opinions. There are scenarios where only one of the differing opinions is the correct one, and situations in which both opinions are equally correct. Differences can arise from a different base road or personal experience, or simply from forming individual preferences or personalities. When differences arise, it’s best to determine the nature of the nature presented by comparing and contrasting the different opinions, exploring the difference, and reconciling the difference. 

Returning to my previous example, when my mentor and I had a differing opinion on the location for my first photography session, the two sides likely stemmed from personal preferences and/or experiences. My mentor had more experience, so it seemed logical for them to pick an easier location for a beginner, and my difference was simply based on a preference, as well as the fact that I thought we wouldn’t be able to find anything too unique to photograph in Inspiration Garden since it is currently winter. Once both opinions were symbolically laid out through a discussion, I was able to see the logic that my mentor was presenting, and ended up agreeing with their opinion and complied to having the photo session at Inspiration Garden.

In-Depth Introduction Post 2021

For In-Depth this year, I will be learning more about the field of macro photography.  Macro photography is a kind of photography that usually focuses on small subjects such as moss or insects. However, the size of the subject appears to be a lot larger in the photo than it is in real life. A macro photograph, by definition, is a photo where the subject is life size or greater, but generally larger than life size. As someone who enjoys using various mediums of art as a form of personal expression, I would like to learn more about the technical aspects of photography and how it can be related to the creative/artistic aspects of the field. In addition, I’ve never tried using photography as a creative outlet before, so I’m excited to learn more about this particular style of art. Finally, I am generally curious about photography as a medium and this project is the perfect chance to further investigate my curiosities.

My specific goal for this project is to make three different collections of photography (and possibly one practice collection) that I will take and edit on my own.  I am also considering telling a story with the different collections, or giving each collection a certain theme, rather than leaving them as just a bunch of random photographs piled together. Overall, I’d like to enjoy the process of this project and hopefully pick photography up as a hobby. I plan to spend the first month or so learning how to take macro photographs, and then the rest of the time will be spent creating my collections.

As for my mentor, I have a few photographers in my family that could serve as possible mentors for me, but I will probably go with my dad, since it would be the most convenient (my other family members who have photography experience all live in a different time zone than I do). Having my dad as a mentor would also make regular meetings a lot more manageable. 

An example of a macro photograph.

Night of the Notables Learning Center: Maria Sibylla Merian

Hello and welcome to Night of the Notables! I am Maria Sibylla Merian, and I’m so excited to share my story with all of you!

Below, you will find the link to a presentation about me:

Maria sibylla merian

Also, here’s a little activity I’ve created for you!

Required supplies: 

  • Pencil 
  • Paper 

My work was well known for combining specimens with their food, habitat, life cycle, and even predators and prey. See if you can do the same with the images below.  It doesn’t have to be perfect – just get a feeling of my flow and thought process when illustrating a piece!  

Core Competency Activity: Personal Awareness and Responsibility


QUESTIONS:  

During Quarter 1, what went well for you? Explain. Examples: being back in the classroom, having only two courses, seeing my friends, keeping up with homework, playing volleyball, improving math, helping plan a virtual assembly, becoming more fit.

  • I was able to prioritize hobbies and rest due to only having two relatively easy courses to work on (Band and English)
  • It was easier to complete all of my homework
  • I was able to do more activities with my friends
  • I could improve my playing more in band since I had more time to focus on it

During Quarter 1, what did you find challenging or disappointing or stressful? Explain.

  • Although I was definitely able to complete all of my assignments, since we had so much time to work on them, I found that I was procrastinating more on my homework
  • I was generally less motivated to do school since I had so much time to complete everything

Think of ONE thing you really want to improve in Quarter 2 (and Q 3&4). Examples: a school subject, a sport, time spent on homework/studying, playing a musical instrument, leadership skills, a language, photography, a relationship, general fitness. 

I would like to improve my motivation more and work on procrastinating less

What are two specific actions that you can start doing every day to get closer to your goal? How long will you spend on this action each day? What part of the day?  

a) Keep a to-do list that I update regularly so I can see all upcoming deadlines and manage my time better

b) Turn off my phone and mute all notifications for social media apps until I’m finished all my homework for the day

 If you experience challenges, what might you do to work through them? Examples: ask help from a friend or parent; break the task into smaller chunks; “google” how other people may deal with similar problems. 

  • Ask a parent to hold onto my phone until I’m finished homework
  • Try downloading a productivity/focus app for my laptop or phone


Developing the Leaders Around You

Section 1

“Leadership is seeing the possibilities in a situation where others are seeing the limitations”

This principle is an especially important one.  While being a leader, you are no doubt going to have to steer your teammates through many ups and downs, and as much as having proper leadership techniques does make everything run smoothly, you’re bound to run into a problem every now and then.  That is why this principle is so important: if you’re guiding your group through a rough patch, you must have the ability to look for solutions and new possibilities.  If you’re constantly negative and aren’t willing to look for the solution to a challenge, then your group won’t be able to solve or push past anything.

This principle stood out to me, because recently I’ve been finding it a little hard to see the bright side or be positive, and I don’t want this to impact my ability to lead.  For this reason, I think that it’s really important that I learn to inspire others more and look for solutions to any problems my group might experience instead of dwelling on a setback or problem.

With everything that’s happened this year with the global pandemic, problem-solving and finding creative solutions to setbacks has been more important than ever.  Starting from March of last year, my class experienced a lot of cancellations of TALONS trips, and even at the beginning of this year there were still several setbacks that postponed/hindered the three day trips we went on (Burnaby Mountain, Burnaby Lake, canoe certification).  For that reason, I will apply this principle during the planning of future TALONS adventure trips and cultural events, where I probably will end up having to come up with creative solutions if more restrictions are applied.

Section 2

“Leadership is influence”

Leadership is influence means exactly what it says – leaders influence other people.  When leaders are in charge of a group of people, what they say and how they act will impact how the group performs – members of the group are bound to pick up on or replicate at least some of the leader’s behaviors and strategies.  It is almost human nature to mimic or match the traits of people they admire (for example, a lot of younger kids often share the same views as their parents because they might admire their parents and are therefore influenced by them).  Leaders can influence others either negatively or positively.  If group members notice a trait that they like in a leader, they will more than likely pick up on that trait.  Similarly, if group members see their leader doing something negative, they will be more willing to do something negative too since their leader is doing it.

I chose to cover this principle simply because I think it’s one of the most important principles throughout the entire book.  Your influence on your group members literally impacts the performance and success rate of your group.  Whenever I am given a leadership opportunity (volunteering, presenting a lesson, planning TALONS events), I always try my best to put my best self forward so that I have a good influence on others.

I could use this concept for any situation where I have to take on more of a mentoring style of leadership.  For me personally, this includes the tutoring sessions I’ll be volunteering for, and whenever I have to direct the group for upcoming adventure trips/cultural events.

Section 3

“It is easier to teach what is right than to do what is right”

Hypocrisy is common among many people, and this concept certainly touches on that.  Often times, leaders will preach perfection, and might even expect the people they lead to be great at everything, when they themselves aren’t at that level either.  For a personal example, I often tell others that if they’re struggling with completing a certain task then they should ask for help, when I struggle to ask for help myself.  This concept also ties into the principle from Section Two: if you aren’t demonstrating what you preach, then you aren’t really doing a good job of influencing your mentees to do the same.  This principle is not trying to say that you have to be perfect to preach perfection, but it does mean that leaders should be aware of and disclose their own personal struggles and do their best to model what being a good leader/team member looks like.

I chose to cover this concept, because as I mentioned above, I also need to work on actually doing some of the concepts that I teach.  Like I’ve said before, I am confident that most people also struggle with this.  As a developing leader, I want to make sure that I am consistent and that I’m always doing a good job of demonstrating the good work habits I preach.

A scenario in which I will be able to apply this teaching will definitely be the leadership lesson I’m teaching (Maps and Compasses).  Much of my group’s lesson talks about the importance of  bringing a map on a trip, making sure the map is accurate, and also keeping the map at an accessible location while travelling, so I should demonstrate what I teach during future adventure trips by having good habits with my map.

Section 4

“Self disclosure: willingness to share parts of one’s own journey when appropriate and the willingness to be honest”

As a leader, honesty is always the best policy.  This principle is instrumental in discussing the importance of being an honest leader, as well as being more personal with your group members.  If you’re constantly holding the people you’re working at arm’s length, how are they going to be able to trust you and open up to you if they have a problem?  If leaders open up more about their personal journey and are honest with their mentees, then they will more than likely find that their mentees are also going to open up more.  If one doesn’t open up about their own perfections, then there will be a possibility that their mentees will hold themselves to an impossibly high standard, which is possibly damaging for both the individual, as well as the group.

Personally, I occasionally put up an “all business” front whenever I’m working with a group, so I think that it is crucial for me to keep this principle in mind.  While getting everything done efficiently is always a top priority, if I don’t open up more personally to my group members, my group will never have any growth or development, and we won’t develop a very close bond.  By choosing to analyze this principle, I am also setting a goal for myself to have more self-disclosure while working in groups.

I can apply this concept during committee work when planning adventure trips.  If I am more open about my struggles, then my group will have a much clearer idea of our strengths and weaknesses, and we will also have a closer bond that will make the planning process a lot easier.


DL Remote Learning Reflection

I think that everyone can agree that it’s been an interesting school year!  When I walked into Gleneagle Secondary for the first time in the Fall, I certainly didn’t expect that I would only be spending half of the year at school.  Whether we liked it or not, we were forced to adapt to a learning environment without teachers, classrooms, or even our friends.  And well at the beginning of online school, it kind of fun to be able to learn in my pajamas, it wasn’t long before I was missing the way school used to be without the restrictions that came with a global pandemic.  I generally found it harder to stay motivated without physically going to school, and the time management skills I’d built at the beginning of the year were slowly slipping away.  Sure, school could be stressful and loud, but when we all went to school there was a strict, consistent routine that we had to follow, and friends and teachers that helped us keep motivated along the way.  As much as I tried to replicate a regular school days’ routine when online learning first started, I eventually ended up letting go and just feeling down and unmotivated most of the time.  However, it was nice to be able to do homework in my bed and have a quieter environment to learn in.  Throughout online learning, I found that technology often impeded my ability to be more active outside, as during school I had the option of going outside during lunch break, but at home I was constantly staring at a screen and at the end of the day I was still doing all of my homework on my laptop, with online learning limiting the mediums that I could work with (physical artwork was less convenient to submit than digital work).  Therefore, my Creative Thinking Core Competency helped me transition into online learning, since I had to think outside of the box to create memorable pieces of work despite restrictions.  For example, one of my assignments for English was to create a mind map.  Instead of just using some kind of digital program to complete the assignment, I decided to create my mind map on paper and then scan it onto my computer.  That way, I was more able to creatively express myself.  Finally, I feel like my Critical Thinking was improved the most through online learning because despite feeling less motivated I still had to maintain some of my work ethic.  To do this, I kept an online To-Do list to keep track of my deadlines.    


The mind map I completed for English.


An example of the To-Do list I’ve been using to keep track of my deadlines.