Since the last post I have kept the ball rolling and accomplished lots through the past couple weeks!
Since last post I have met (virtually) with my mentor once and I completed lots of work during said meeting. Once we got the call going, I checked through the pieces I had completed since last time (which was the 16 cube–looking squares) and ensured that we knew where everything was.
After going through the pieces I had sewn last meeting, we looked through the fabrics we had for the next group of pattern pieces. We looked through different prints and colour combinations and I picked a pallet of lighter cream/white fabrics for the outside triangles around the ce nter and a pallet of darker blues for the center diamonds. I was debating between doing the light outside dark inside or doing dark outside light inside, but I noticed that a lot of the dark fabrics we had were similar to the types of fabrics on the outside of the squares we sewed last meeting. Since the outsides of this pattern piece and the previously sewn cubes will be touching, I thought it would be best to do the light outsides.
Once I had selected the fabrics, I begun cutting out the center diamonds. I cut out 64 center diamonds (assuming there are 4 diamonds pieces around each square and there are 16 squares). After I had finished the centers, I began cutting the triangles (which begin as rectangles) that go around the diamonds to complete the diamond pieces.
We didn’t have quite enough of the patterned light fabric to go around every diamond, so I cut up all the patterned light fabrics which was about 64 ‘triangles’ (4 triangles per diamond and 16 diamond pieces completed). Once I had all of my light patterned fabrics cut into rectangles, I sewed them together still using the paper piecing method. To do this method we sew two triangles to the opposite sides of a center diamond (using the paper on the back as a marker where to sew), then we press down the seams by ironing, after pressing we cut the access fabric from the rectangle down so it becomes a triangle (using the paper on the back to make sure the triangles are the right angles). After the two sides are sewed, pressed, and trimmed we do the same to the two remaining sides of the diamond. In the end the diamond piece looks like the image below.

(I don’t have any pictures for this week so all of the pictures are the digital pattern)
After sewing all of the light patterned fabrics, I moved on to cutting the solid colour light fabrics. Assuming we needed 4 triangles per diamond and there were 48 diamonds left to do this means I had to sit and cut out 192 triangles. The patterned light fabrics were all in a size of fabric called a fat quarter (5×5 inches) and I got 4 triangles out of each fat quarter but since the fabrics were all the same size, I could cut multiple layers at once meaning cutting the 64 went quickly. But these solid fabrics came in ribbons where I could only cut one at a time. This means I had to sit there with my ruler and meticulously cut out 192 triangles one at a time. As you can tell that was my least favourite part of that session. It was Superbowl Sunday, so I listened and cut at the same time which made it tolerable.
You may be wondering why I continued to use ‘assuming’ in the calculations in the previous paragraph. This is because at the very end of our session (after I had cut everything out) we realized that these were not the correct calculations. When looking at a single block of this pattern it has one cube piece, four diamond pieces, and four small diamonds (pictured below). Since we are making a 4×4 block quilt we looked at the pattern like 16 of these blocks. The problem we made is that in the actual pattern some of the diamonds get shared between two cube pieces (pictured below). In the calculations we made there would be sections where there were two diamond pieces sewn together but in the actual pattern there is only ever one diamond piece in between each cube piece. This means that rather than needing 64 diamond pieces (64 center diamonds and 256 side triangles) we only needed 40 diamond pieces (40 center diamonds and 160 side triangles). This means I could have cut 24 less center diamonds and 96 less side triangles.
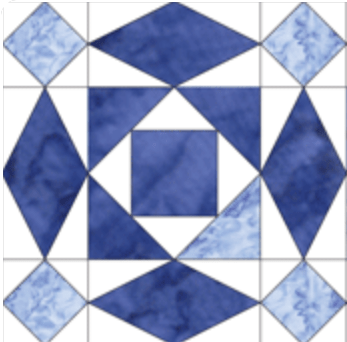

(single pattern block) (full pattern)
I had only sewn the diamond pieces that had the light patterned fabrics, so I didn’t have to unpick (cutting the thread holding fabric together) anything but it was still frustrating that I spent so much time cutting so much extra fabric when I didn’t need to. With all the spare I could even make a second smaller version of this quilt. It was a good reminder why you always need to check your full pattern multiple times during the quilting process.