Hello everyone! My name is Emma, and my In-Depth this year is cake decorating. Please feel free to look through the post, watch the video, and comment and questions you might have below! Thanks for visiting my blog!
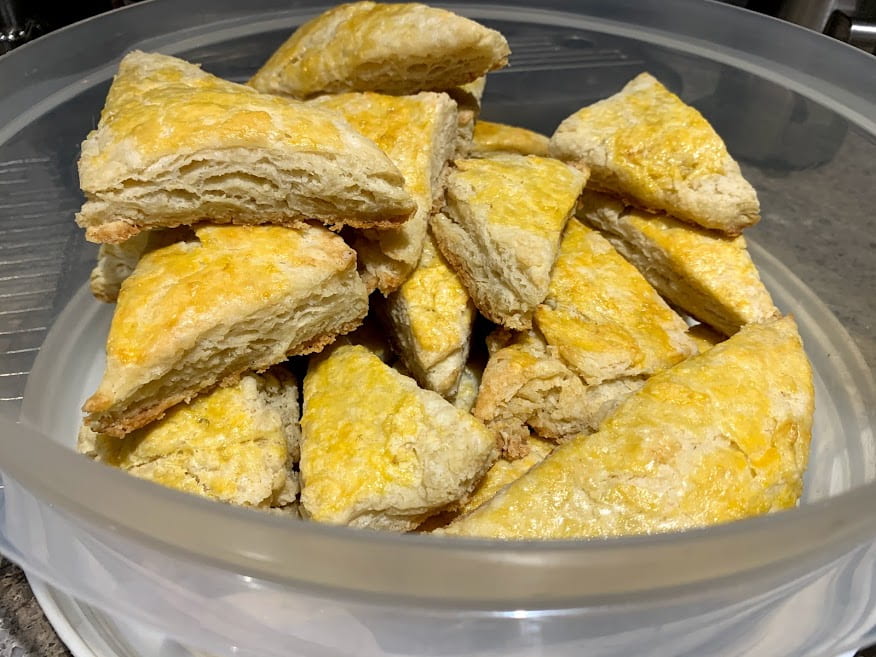
Throughout this year’s In-Depth, I have worked with my wonderful mentor, Cassandra, to make cakes, cupcakes, cake pops, cookies, and scones. I focused on icing techniques and perfecting various recipes. Below are a few of the baked goods I made throughout this project.
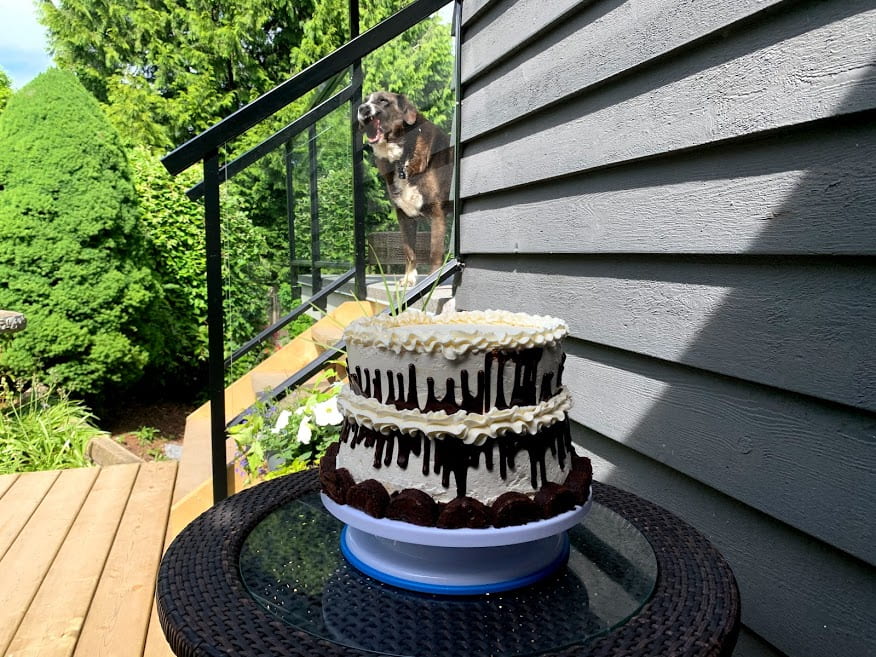
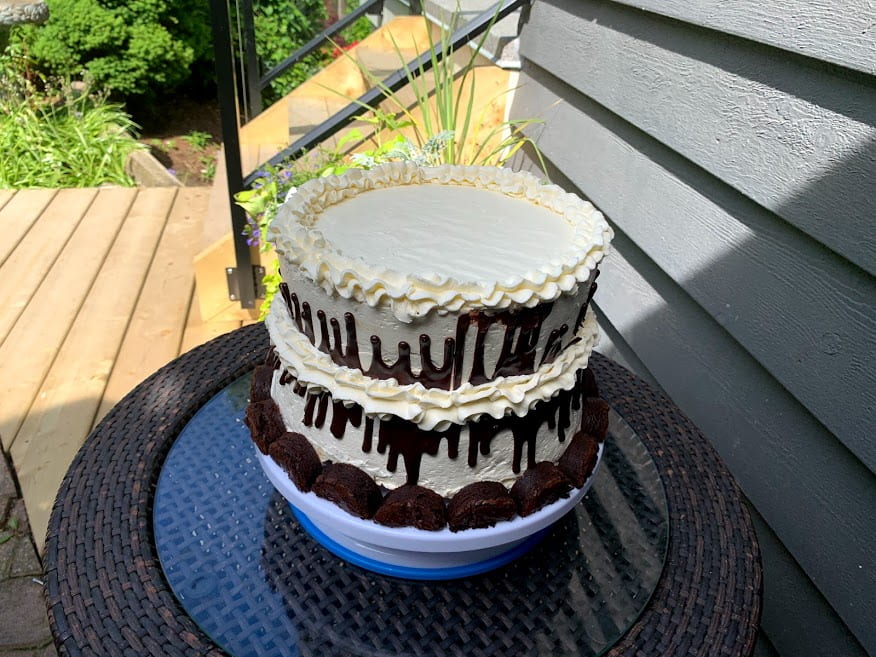
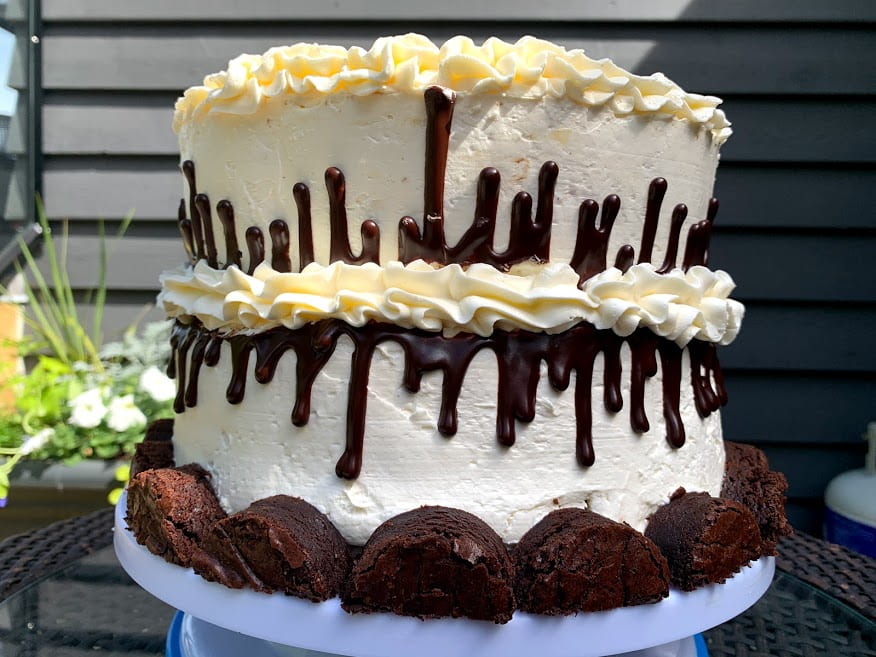
Here is my final In-Depth project! This short video shows the process I took to create my final cake!
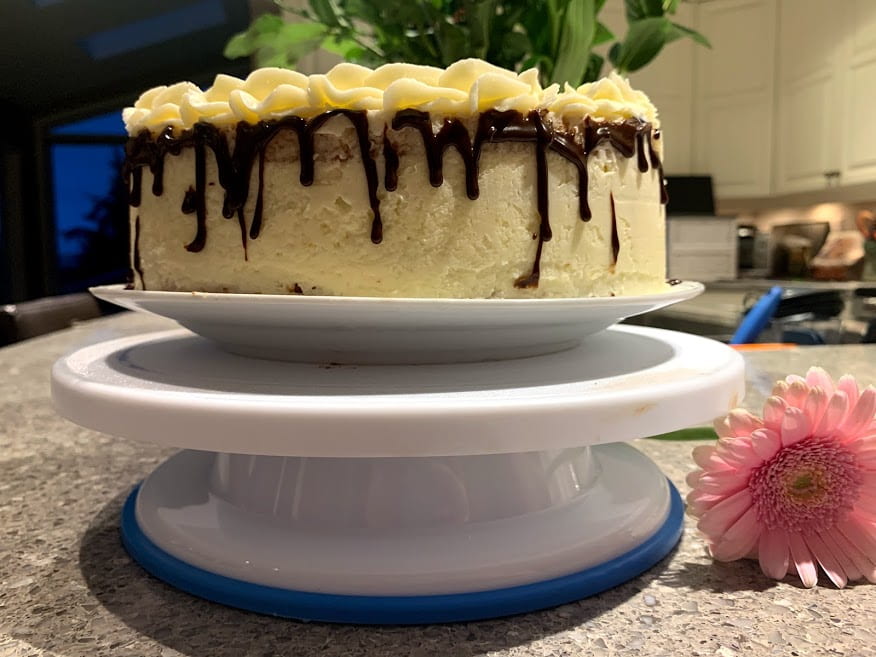
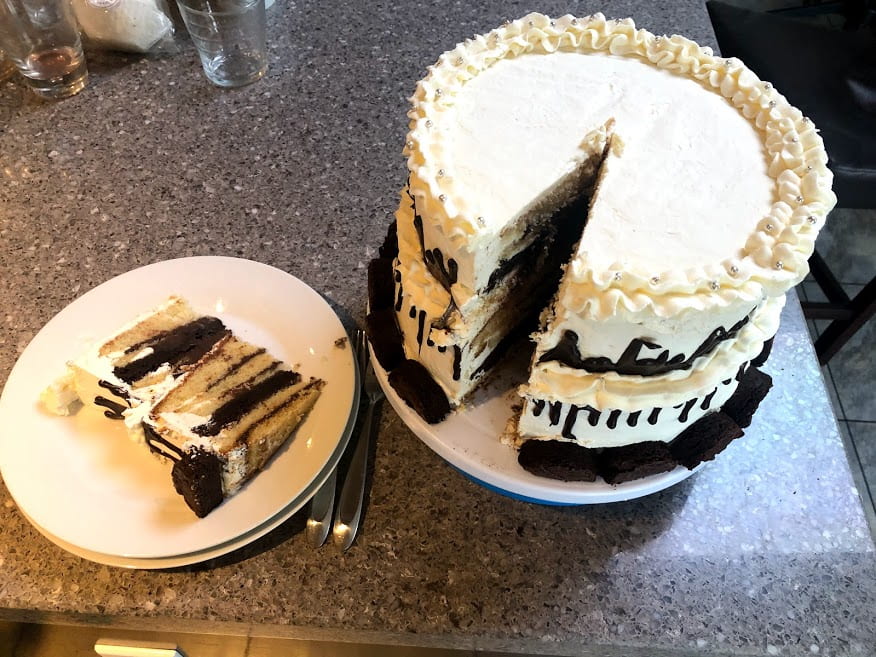
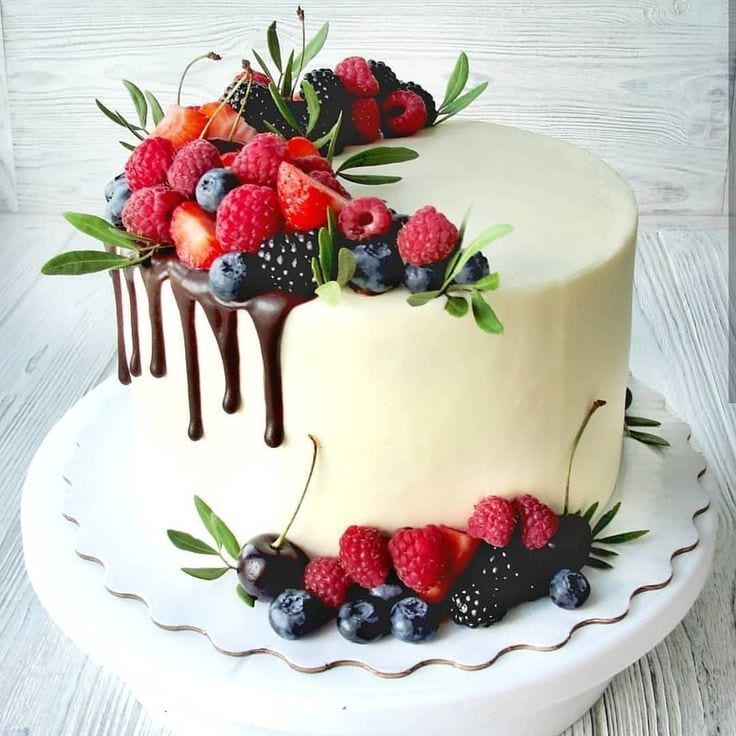
As well, here are some of the photos of my final cake for In-Depth 2021. You can really see the improvement from the cake I made at the start of the project compared to this cake 🙂
Thank you so so much to Cassandra for answering all my questions and sharing such amazing recipes and decorating tips with me throughout this year’s In-Depth, and for being a phenomenal mentor! And thank YOU for reading through my In-Depth Night blog post! Please comment below and I will respond ASAP!
Hi everyone! After several months, In-Depth is almost over. This is my second-last post! But I guarantee that even after the project is done, I will keep working on my cake decorating skill!
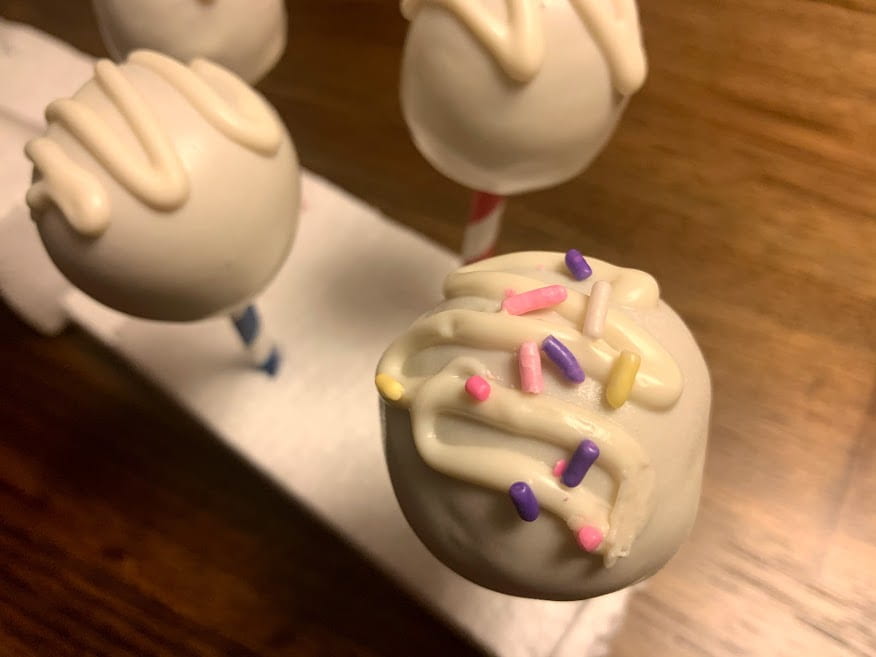
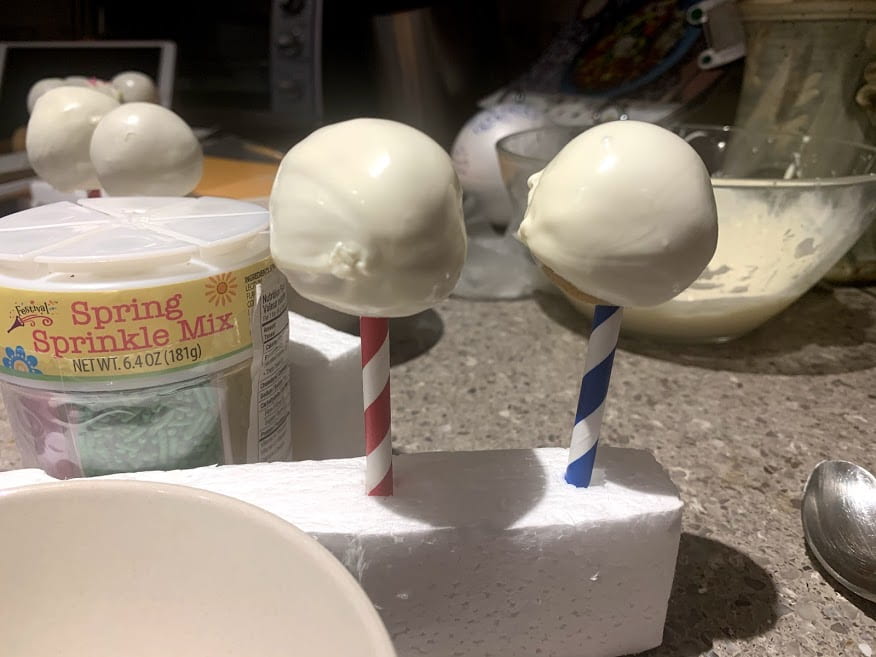
Since my last post, I have made cake pops and sugar cookies. I started with the cake pops. To decorate them, I melted white chocolate and grabbed some Styrofoam to use as a stand for the cake pops. Once the white chocolate was at a liquid consistency but was not too hot to the touch, I dunked the cake pops into the chocolate. After I finished one cake pop, I placed it into the Styrofoam so that the chocolate could dry.
After the chocolate coating on all the cake pops was dry, I put the leftover white chocolate in a piping bag and piped a drizzle onto the top. The idea was to then place sprinkles onto the still-wet chocolate drizzle. However, instead of placing the sprinkles on immediately, I waited until I had drizzled chocolate onto all of the cake pops. By then, the drizzle was dry, and the sprinkles did not stick. In the end, only one cake pop got any sprinkles, but I still think the others were pretty too!
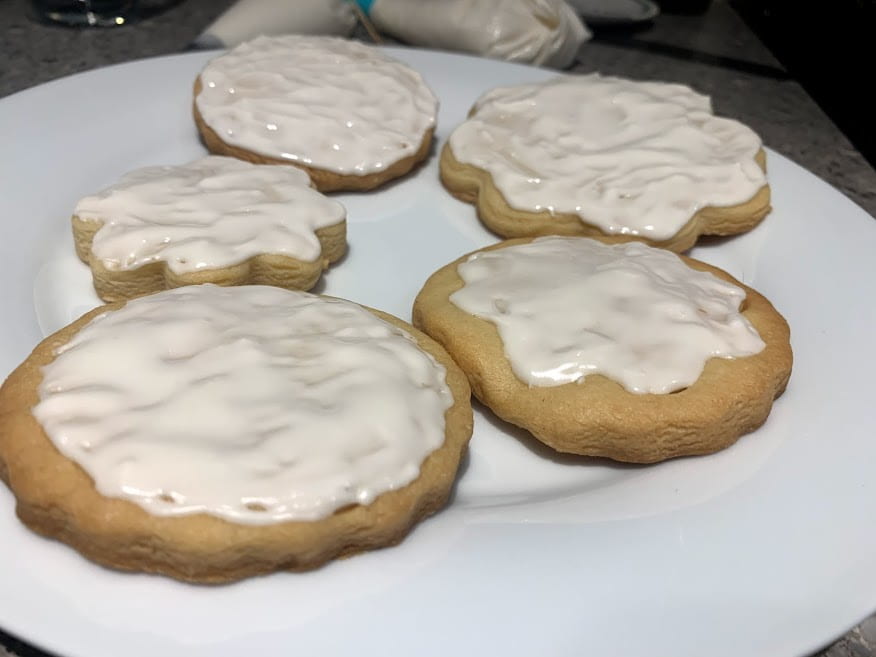
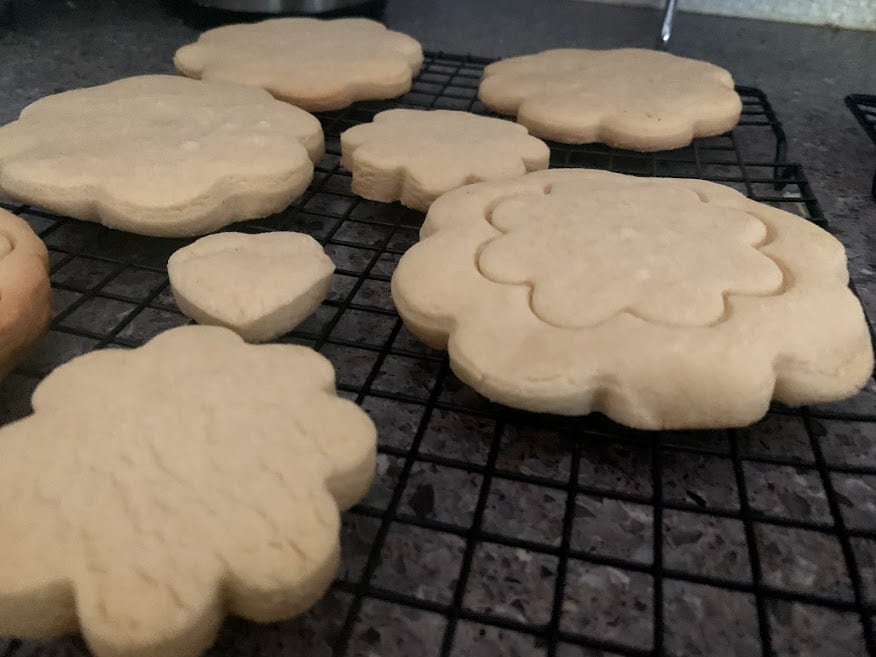
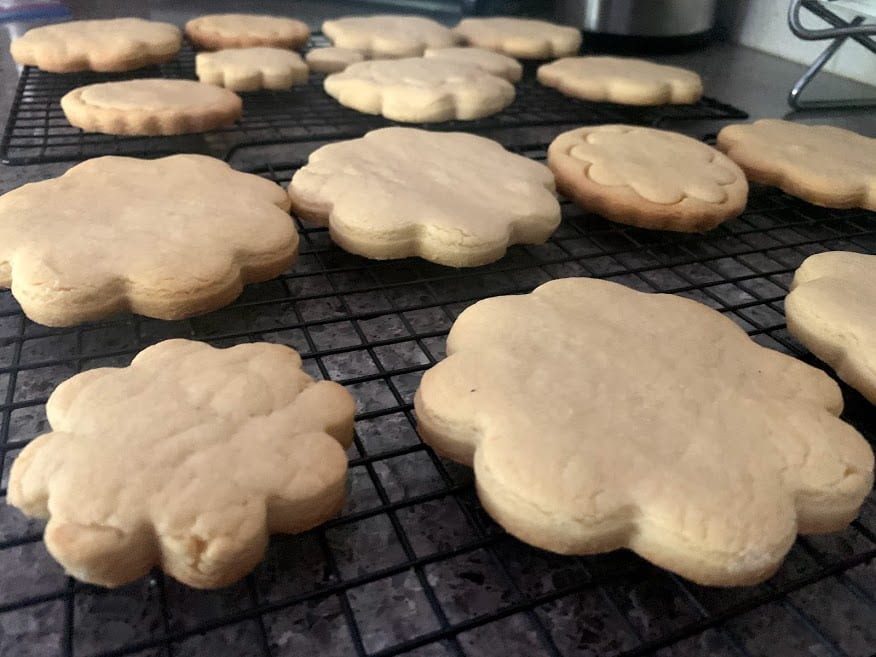
The next week, I made sugar cookies. This was a longer process than I thought it would be! First, I had to make the dough. This part was not too complicated. I then had to refrigerate the dough overnight. This is because I had to soften the butter before making the dough so that it would properly incorporate. However, to get the perfect layers in a sugar cookie, the butter needs to be very cold so that the cookies will not just melt and spread out in the oven. Therefore, to make sure the butter would be cold enough, I kept the dough in the fridge until the next day.
The following day, I took the dough out of the fridge and allowed it to soften to room temperature. I rolled the dough until it was around a centimeter thick, and then I used cookie cutters to punch out the sugar cookies. For a few of the cookies, I cut out a shape and then gently placed a smaller shape in the middle without pressing all the way down. This gave the cookie a bit more design!
I did not get a chance to decorate the sugar cookies this week, but that will be the first thing I do at my next meeting with Cassandra!
How to Have a Beautiful Mind:
This week, the two chapters covered from Edward de Bono’s How to Have a Beautiful Mind are Concepts and Alternatives.
Concepts are the general idea, or umbrella term, used to cover more specific items. For example, “food” is a concept, because there are specific types of food such as apples, fish, etc. As well, “meat” would be a concept, just a narrower one. There are several types of concepts, and several levels of specificity.
Alternatives are other ways of completing tasks. There are positive, negative, and many other types of alternatives. For example, if you are making a choice as to what to eat for dinner, there are many alternatives you can choose. Should you eat pasta or pizza? Those are alternatives.
When were concepts used during our most recent meetings?
An example of when a concept was used in a meeting was when Cassandra and I were making the sugar cookie dough. She was explaining to me why the butter in the dough needed to be cold before the cookies could be baked. She said, “with pastries, if the butter is not cold, the cookie or pie or whatever it is you’re making will melt and spread out.” The concept was “pastries.” The “cookie” and “pie” are practical ideas, which is what you call the more specific items under the concept.
Another time concepts were used in my meetings was when Cassandra and I were discussing the chocolate coating on the cake pops. She said, “the coating should be more cool than warm before dipping the cake pops in it. If the white chocolate is too warm, the cake pop will fall right off the stick.” In this scenario, the concept was the coating, and the white chocolate was the specific practical idea.
A final, more general, concept that I have used throughout the entire project is “desserts.” I have used this word as an umbrella concept for cookies, cake pops, cakes, and cupcakes. This generalization allows me to more widely recognize all the different types of desserts I am making without listing each type.
When were alternatives used during our most recent meetings?
An example of when alternatives were used during a meeting was when I was making the sugar cookie dough. Cassandra gave me the option of either making the full recipe or halving it. She said, “You can cut the recipe in half if you want.” I took the alternative of halving the recipe. I have been making so many desserts recently, and I decided that I did not need to make a full recipe since I already had so many desserts in my house!
Another time I was given alternatives during our meetings was when cutting out the shapes for the sugar cookies. Cassandra said, “you can use whatever cookies cutters you have, it’s up to you.” She also gave the alternative of using the edge of a mug to cut the cookies if I did not have any cookie cutters. I decided to make a few different shapes, such as flowers and simple circles.
A third example was when covering cake pops with the chocolate coating. Cassandra gave me two alternatives: dip the cake pop into the chocolate and allow them to drip-dry with the stick in the Styrofoam; or dip them into the chocolate and place them face down on the Styrofoam. I chose the first option.
A final example was when decorating the cake pops. Cassandra gave me several alternatives for this step. She said I could either drizzle chocolate on top, use sprinkles, or both. I chose to do both. However, as I detailed above, the sprinkles did not really work as the drizzle dried before I put the sprinkles on, and the sprinkles therefore did not stick.
What other alternatives might other mentors have given me?
Other mentors might have given me more alternatives around what desserts (cake, cupcakes, cookies, etc.) we would make each week. Cassandra is really good at planning lessons in advance, and she often presents an idea for our next meeting to me well in advance. I really like this method, since I feel that I do have input, but she also can provide lots of ideas. Other mentors, however, might give even more choice surrounding the types of desserts made.
My next post will be my learning centre! For that post, I will be making a video showing the steps used when making and decorating one large cake! I will be combining the techniques I learned throughout this entire project into one cake! The video will illustrate the steps of the process and give several tips that I have learned during this project. I hope that the audience will be able to learn a few new tips and tricks about making and decorating cakes. Viewers will be able to watch the engaging video and simultaneously learn about tips and my process through this project. I am super excited to make this final cake and to demonstrate my learning!
I want to thank Cassandra once again, because she is such an amazing mentor! I am learning so much during this project, and I always look forward to our mentoring meeting! As well, thank you so much for reading my post, and please feel free to leave and questions in the comments below!
These last two weeks, I have made cupcakes and cake pops. The first week, Cassandra, my mentor, and I made the cupcakes, plus the batter I later used for the cake pops.
First, I made the batter using the ‘creaming method’. This means that the first step was creaming the butter and sugar, and then I added the other ingredients later on. I found some pretty purple, yellow, and blue cupcake wrappers, so the next step was to line the tin with those. I then filled each wrapper with a quarter cup of batter.
Before baking, I set aside around two cups of batter into a cake pan. I baked this batter at the same time as my cupcakes, and I used it the second week to make cake pops, which I will talk about more later on.
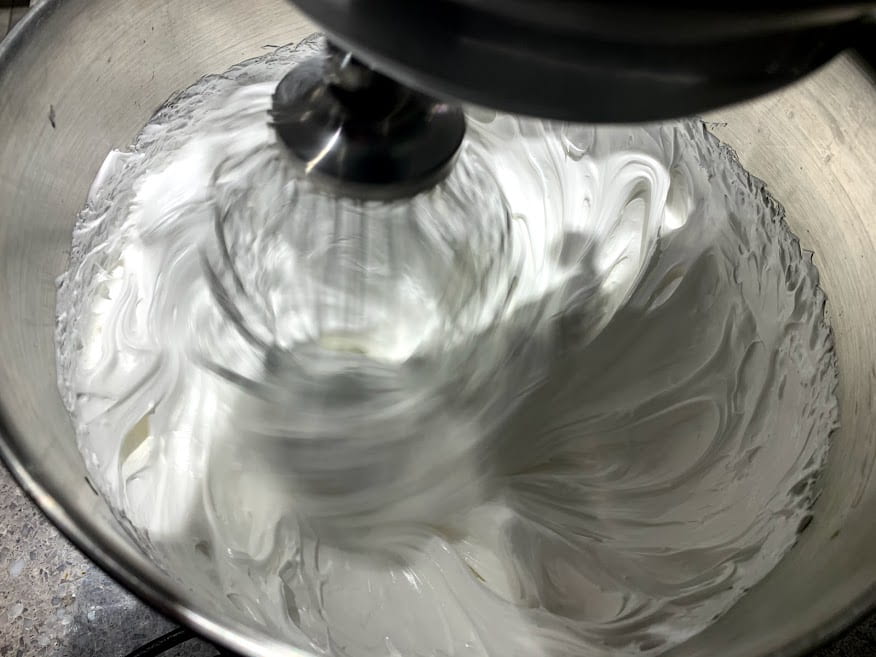
While the cupcakes were baking, I made buttercream. First, I whipped egg whites and sugar until it became a sort of meringue (at this stage it tasted delicious!) Then I added vanilla, a tiny bit of salt, and a whole lot of butter very gradually. After around twenty minutes of whipping, it thickened to the proper texture. And it was so tasty!
When I took the cupcakes out of the oven, I let them cool and put the buttercream into a piping bag. My first few attempts at the icing were not incredible, but Cassandra reminded me that that is why we practice: to get better! Slowly, I got a bit better at the icing process as I decorated more and more cupcakes.
Several weeks ago, when I first started practicing a bit of piping, created a whole bunch of random little flowers that I froze. Now, I pulled the icing out and decorated the cupcakes with the flowers to give them a bit of colour! In the end, I was really happy with how they turned out!
The second week, Cassandra helped me make cake pops. I started by thawing the extra cake I had made the week before. This next step was my favourite: I put the cake into the stand mixer and broke it into little pieces. It was weirdly satisfying to watch as the cake slowly crumbled.
Then I started adding little bits of leftover buttercream from the week before to the cake crumbs in the mixer. After a few minutes, it became a thick dough-like consistency. I then rolled that cakeandbuttercream mixture into golf ball sized balls.
My final step was to place a straw into the cake pops and freeze them. Later, I will decorate them with white chocolate, but I ran out of time to do that this week, so I’ll have to do that at our next meeting!
How to have a beautiful Mind: Parallel Thinking – The Six Thinking Hats
The next chapter is Edward de Bono’s How to Have a Beautiful Mind is “Parallel Thinking – The Six Thinking Hats.” In this chapter, de Bono discusses the importance on non-ego-driven conversation. When using parallel thinking, nobody feels the need to outshine another, which leads to a deeper conversation, where the subject is more thoroughly explored. The six different-coloured thinking hats allow members of a conversation to be all on the same page by ‘wearing’ the same thinking hat.
The first hat is the white hat. This hat centers around information. That information can be hard facts or just personal experiences and rumors. If pieces of information ever conflict, everyone evaluates what they know to figure out the correct info. People can ask themself questions such as What do we know? What do we need to know?
The red hat centres around feelings, emotions, and intuition. “The red hat allows emotion and feeling. The red hat legitimises emotions and gives them a formal place,” explains de Bono (94). When wearing the red hat, your emotions and thoughts never have to be explained. Some of the ways you can think while wearing the red hat are I don’t like this idea, my intuition is…, I feel it’s a waste of time.
The third hat is the black hat. This is the hat most often used in normal conversations: critical thinking. It keeps us cautious about proposed ideas and concepts. This hat points out dangers, faults, and problems. Some ways of thinking while wearing this hat are Does this fit my values? Does this fit our objectives? Does this fit…?
The next hat is theyellow hat. This hat explores why something should work. While wearing this hat, you look at ideas with the intention of finding the value of that idea. It’s a more positive way of thinking, where everyone contributes the positive aspects of an idea, and consequently, more ideas can be generated with those positive aspects in mind.
The green hat is next. This hat is for productivity and creativity. With this hat, you can propose ideas, alternatives, possibilities, and designs. These ideas should include the obvious, but also the less obvious as well.
The final hat is theblue hat. This hat controls conversations; it is the process control. At the beginning of conversations, it defines the purpose and focus. At the end, this hat can summarize what was accomplished. If nothing was accomplished, you can then provide reasons for this. Some questions to consider while wearing this hat are What are we here for? What is the end goal?
Cassandra started off our meeting by informing me of what we would be doing during that meeting. She said, “what we’re going to do today is I’m going to show you how doing a different method for the same recipe really can change up the outcome.”
She continued, “[When we made the cake] we used an oil-based recipe, and what we’re going to do is swap out the oil for melted butter. Have you heard of the creaming method?”
I told her, “I’m not sure if I’ve heard it called that, but it sounds familiar, so I think so.”
She continued, “the first thing is I’m going to explain the recipe, and then we can chat as needed as we go.”
“Awesome, sounds great!”
In this part of the conversation, Cassandra was wearing her blue hat. She was explaining the sequence of events for our meeting. As well, she touched on key questions that are addressed under the blue hat such as What is the end goal?
When Cassandra is part way through explaining the steps, she tells me, “you’re going to pour the melted butter into the egg mixture, and what going to happen is that the egg will curdle in the bowl.”
She then told me, “[The batter] will harden a bit.” She finishes explaining how I should go about completing the recipe. She finishes be saying that at the end, “It will be this really fluffy batter.”
In this next section of the conversation, Cassandra is stating facts about the batter, and therefore she is using the white hat. She gives me information about what the texture of the batter should be, and providing information falls under the white hat.
A bit later on, when I was almost done the batter, Cassandra asked,” do you have cupcake liners?”
“I probably can find some, yes.”
She reassured, “if you don’t, it’s okay. But if you do, it’s better, it’s less cleanup for you.”
“That would definitely be nice. That’s a good reason for me to find some cupcake liners.”
In this part of the conversation, both Cassandra and I were using our red hats. When Cassandra said “it’s better” if I have cupcake liners, that was her opinion, and it did not need to be backed up by facts. Then, when I said “that would definitely be nice,” I was also providing an opinion without any facts to back it up.
After the batter was complete, Cassandra asked me, “what does the batter look like?”
I replied, “It looks thick, sort of. A beige colour, like a pale yellow. Is that how it’s supposed to look?”
“Perfect! Yes, that’s perfect.”
In this section of conversation, we used our black hats. We were checking to see if the information we had fits the way it should. We were thinking critically about the batter, asking questions similar to the standard does this fit…?question.
“I had an idea for our future meetings. Today, we’re going to use half the batter to make the cupcakes, and with the rest, we’ll make a cake, and then I’m going to show you how to make cake pops.”
“Oh, fun!”
The next hat that we used in our conversation was the green hat. Here, Cassandra was proposing ideas about what she thinks we should do next. As the green hat is described as “[asking] for ideas, alternatives, possibilities and designs,” this part of the conversation fits perfectly under this hat (99).
Next, Cassandra explains, “cake pops are what I make when I have extra cake and extra icing. I try my best not to cut off too much of my cakes, because it’s just a waste. But if I need to, I’ll make cake pops. Because I always have extra cake lying around, I can make cake pops.”
And I said, “Oh, now I’m really excited!”
Finally, we have the yellow hat.When wearing this hat, you try to find the positives of an idea. In this case, Cassandra was finding the positive side of having leftover cake from when she has to cut off some of the cake when decorating. As well, I looked at this idea with the intention of finding the value, and I became really excited for the following week when we would get to make cake pops!
Thanks so much for reading my blog post! Please leave any comments or questions you have in the comments! Thank you to Cassandra for helping me so much!
These past two weeks, I met twice with my mentor Cassandra, and I have finally finished my ongoing cake! Thefirst step was to fill the cakes with the buttercream and ganache that I had made in previous weeks. First, I cut my two cakes in half, creating four layers. Around each lay, I piped a rim of buttercream, and then filled the layer with the ganache, and finally stacked the layers on top of each other.
The next step was to ice the cake. I used a metal spatula and placed large globs of the buttercream onto the outside of the cake. Then I smoothed out the buttercream with the spatula. This first layer is called the ‘crumb coat’. I chilled the cake with only the first coat of icing overnight in the fridge.
Once i took the cake out of the fridge the following day, I decorated the cake with the leftover ganache and piped a rim of buttercream around the top of the cake. This final step was the most fun; I created a huge mess, and I got to see the whole cake come together. When piping the buttercream and doing the drips around the cake with the ganache, I only had one chance to get it right, so I tried really hard to make it as perfect as possible. I’m really happy with the result, especially since it’s my first cake! And it tasted delicious!
How to have a Beautiful Mind
The next two chapter of How to Have a Beautiful Mind are “How to Listen,” and “Questions.” The first of these chapters covers topics such as finding value in conversations by listening and learning. Some of the strategies De Bono presents are repeating back what a speaker has said to clarify, summarizing by condensing and repeating back, and asking more details surrounding points that interest you. One quote that stood out to me was this: “There are few things uglier than a listener who does not want to listen and is only waiting for the moment that he or she can speak” (67). Another good quote was “Talking only rarely gives you something new” (67).
The next of the two chapters covers how to ask the best questions and why we ask them. This chapter discusses the uses of both fishing and shooting questions, as well as multiple choice questions and asking more modifications. One quote that explains nicely why we ask questions is this: “We use questions to get someone to direct his or her attention to something we want or want to know” (78).
What new information am I getting and what questions did I ask to probe further into the topic?
During these past two weeks, I have gotten a lot of new information from my mentor as I filled and decorated my cake. One example of when I received information that I probed further into was when learning how to pipe the rim of buttercream around the edge of the cake. Cassandra, my mentor, was explaining how to pipe little “shells” on the cake, and I asked several questions to clarify and confirm that I was executing the skill correctly. Before even beginning to pipe, I had to fill the piping bag with buttercream, choose a piping tip, and cut a hole in the piping bag for the piping tip to fit in. One example of a questions I asked to confirm that I was completing each of these steps correctly was this:
“Is there a certain amount I should cut off the tip of the piping bag?”
I also asked questions such as “How should I hold the piping bag?” and “Which piping tips should I use for this skill?”
All of these probing questions helped me decorate the cake as perfectly as possible.
Discuss any new points of view I developed while in conversation with my mentor.
While I was decorating the cakes, I made quite a mess, because the liquid ganache was getting everywhere, and I had so many dirty dishes. As I went, I was washing my dishes so that I could clear space and feel a bit tidier.
“I usually just put them in the dishwasher while baking, and if they can’t go in the dishwasher, I just wash them before continuing baking,” I explained during our meeting.
Cassandra, on the other hand, mentioned that she neatly puts all her dishes to the side while baking, and then cleans them all at once at the end. To me, this showed how well-organized Cassandra must be to keep her station clean and still only need to wash dishes at the end. This was a new point of view I developed, and I will now strive to keep my kitchen more organized while I bake so that I do not have to be constantly doing dishes and cleaning up.
What were some of the alternative perceptions that are new to me?
As I discussed in the previous header, one of the alternate perceptions I gained while meeting with my mentor was keeping my station neat and tidy while baking. This was a challenge for me because I am used to making a mess and then just cleaning up as I go. This strategy, however, wastes a lot of time cleaning up when I could be baking. So now, I put extra effort into keeping my kitchen clean as I work, so that I complete the task faster and more efficiently.
How do my mentor’s values differ from my own?
While baking and meeting with Cassandra, I have learned that she values a very clean and organized kitchen when she works. She always has everything neatly placed and teaches me lots of strategies to keep more organized. So far, I have had to be more worried about the skills that being organized, and while I know keeping my station clean is important, I am usually alright if it’s a bit messy. On this point, Cassandra and I have differing values; she values a clean kitchen, while I am not so organized when I bake. I am going to continue to work on being more organized during out meetings so that I can learn to adopt that same value.
What questions did I ask to check on facts and details? Elaborate.
In previous posts, I have mentioned how my buttercream was a bit grainy from when I did not allow the butter to fully soften before whipping it. In our meeting before I started to fill the cakes, I asked Cassandra how I could possible fix this.
She replied, “Put the buttercream in the microwave for a minute, then whip it with a hand mixer on high. Also, if it’s still separating, you can add a bit more butter.”
“Why is it that that works? Putting it in the microwave, I mean,” I asked to follow up.
She answered, “It will rewarm the butter, and it should hopefully work.”
Through this exchange, I gained new knowledge, and in the end the buttercream looked perfect! As well, if I encounter the same problem in the future, I will know how to deal with it properly because of the information I now know.
Ask questions. Record them. Why did I ask these questions?
During our meetings, I ask several questions, whether it’s to clarify a skill or to ask what to do next. The following are several of the questions I asked:
“So, my buttercream is a bit grainy. I think it’s probably because the butter was not softened enough before I whipped it. Is there anything I can do, or someway I can fix it?” As I discussed in the previous header, my buttercream was not the right consistency. So, I asked Cassandra what I could do to fix this. Because I asked this question, I was able to fix the buttercream, and it turned out really fluffy and delicious!
“How long should I whip the buttercream for it to reach the proper consistency?” After asking how I could fix the buttercream, I asked a clarifying question about how long I should whip it for. Her answer helped me confirm that I was doing everything correctly.
“There’s one little part in the side of the cake that has a bit of a bump where there’s an indent in the icing. Can I just fill that with the buttercream?”
Her reply: “Yes you can, absolutely.”
After I had filled the cakes and had covered it in its first layer of buttercream, I had to chill the cake in the fridge for a day. When I took it out, I realized that on one side of the cake had bumped into something in the fridge, and there was a bit of a hole in the outside of the cake. By asking this question, I was able to fill the whole with leftover buttercream, and after some work, I couldn’t even tell that there had ever been an indent!
When learning how to pipe the border around the cake with buttercream, a had to go through a step by step process to successfully decorate the cake. I asked several questions during this process, and the following is one of them: “So, for the buttercream, which do I do first: cut off the end of the piping bag, or place the piping tip in the bag?”
“Place the piping tip in the bag first so that we can measure where to cut the piping bag,” was her response.
I than asked, “Is there a certain amount I should cut off the tip of the piping bag?”
Cassandra explained, “You can measure where the piping tip opening ends, and then you can cut the piping bag there, so that about half of the tip will be able to come out of the bag.”
Because I asked all these questions, I was able to complete this part of the process with precision that I would not have had if I had not asked these clarifying questions.
“With the piping bag with the liquid ganache, how do I make it not spew everywhere?” When I put the ganache into a piping bag so that I could put the drips around the cake, the ganache was, of course, a liquid. So, when I cut a hole in the piping bag, the ganache immediately began to spew everywhere. I asked this question to see how I could make less of a mess. Cassandra’s answer was this:
“I’d just place the piping bag in a Tupperware for now.”
Ask for an explanation for a certain skill I are learning. Discuss what happened.
After I had filled the cakes, I had to them ice them with the buttercream. Cassandra explained that we would put two layer of buttercream on the cake: a ‘crumb coat’ and a final coat. I asked why we used two layers instead of just one thicker layer. Cassandra explained that the first layer was just to keep the cake crumbs out of the final layer of icing. Once you put the first layer of buttercream on, you can chill it in the fridge overnight, and then when you put on the second coat, none of the crumbs will get into the outer layer since they are all trapped in the ‘crumb coat.’ This leads to a more prettier looking finished cake.
Ask a multiple-choice question. Was this useful? Explain.
When I was beginning to pipe the buttercream around the edge of the cake, I asked a multiple-choice question to help me understand the process. I asked, “So, for the buttercream, which do I do first: cut off the end of the piping bag, or place the piping tip in the bag?”
This question was very helpful as it helped narrow down the options, so the answer was quick, and I could continue what I was doing without much delay.
Ask the speaker to clarify her underlying values for doing, thinking and feeling the way they do.
When talking with Cassandra during our meeting, I found that she was constantly busy. During the meeting when I was decorating the cake, I asked her what she was doing this week. She replied, “I have a lot going on this week apparently. I have a photo shoot, which is a big cake and a bunch of little desserts that I have to make look really nice, and then I have massive cake for a birthday I’m working on.”
By asking this question, I was able to understand just how busy Cassandra is, between running her own baking business and everything else she has to do, including out mentoring meetings. This made me even more appreciative that she spends the time every week to teach me cake decorating.
Thanks again to Cassandra for helping me so much! And thank YOU for reading my post! Please feel free to comment any questions you have!
Hello again everyone! This is my third blog post for my In-Depth 2021: cake decorating!
Progress report
For these last two weeks, I have continued working on the cake I discussed in my previous post, as well as a few other skills. Because we are nearing Valentine’s Day, my mentor Cassandra has been super busy with her own baking business, so I was only able to meet with her once these past weeks, but I tried a few skills on my own when we were not meeting.
For my ongoing cake, I made swiss meringue buttercream that will be used to fill the layers of the cake. This buttercream only used five ingredients: eggs, sugar, vanilla, salt, and a LOT of butter. For reference, one and a half cups of butterwere added to the buttercream, while 400 grams of sugar was used. Making the buttercream took much longer than I thought it would, mostly because there were so many steps that had to be completed with precision, or else the recipe would not work.
To start, I had to separate the seven egg whites from the yolks, something I had never done before. This took some practice – and quite a few mistakes – to get right. From there I made a meringue by mixing the eggs with sugar and beating it for much longer than I thought would be necessary. At this stage, the icing had formed stiff peaks and was a bit glossy (and I might have tried some, and it was delicious 😊)
The meringue stage of the swiss buttercream. It was so glossy and pretty looking!
The second stage of making the icing included adding the butter to the icing in small increments so that the meringue could absorb the butter and because a smoother consistency. Unfortunately, I had not allowed the butter to soften enough, and the buttercream had a bit of a grainy texture – although it still tasted incredible! After a lot more beating, the butter broke into smaller pieces, and while it was still not the perfect consistency, it was much closer, and it really did taste amazing!
The swiss buttercream once it was complete. It looked just like snow!
Some of my random icing attempts using a variety of piping tips.Some more icing attempts with different piping tips.
The following week, Cassandra and I were not able to meet up, so I decided to start just playing around with different icing techniques. I used a recipe that I found online (Vanilla Buttercream Frosting Recipe – BettyCrocker.com), and it turned out pretty tasty! Once the frosting was made, I started just trying out the different piping tips I had. I had a lot of fun – and made a huge mess! – just piping different designs with the icing.
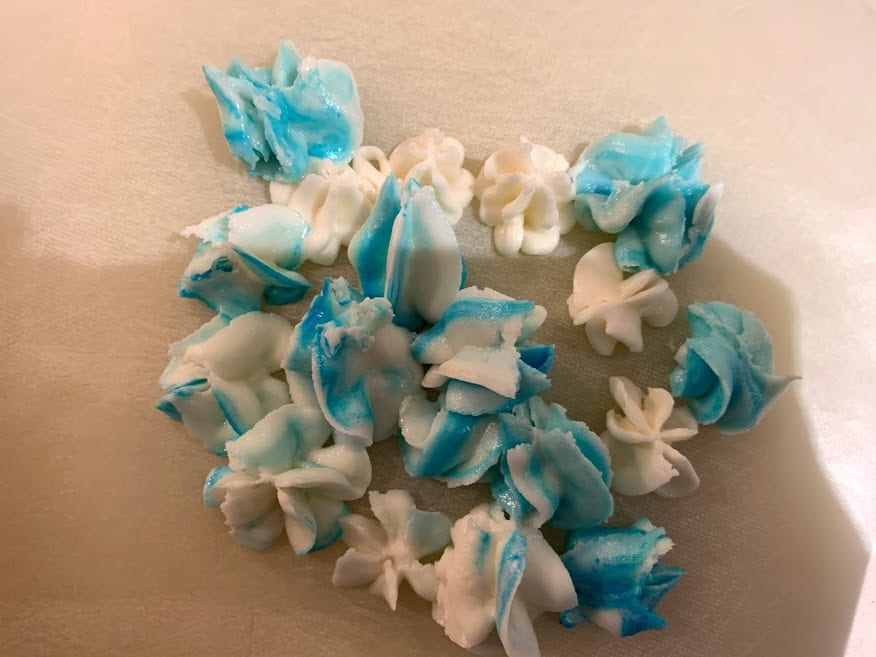
Once I had tried a few piping tips, I decided to use food colouring to make different colours. I chose one tip that I really liked and started piping a bunch of flowers on parchment paper.
At first I just used blue and white icing to make little flowers
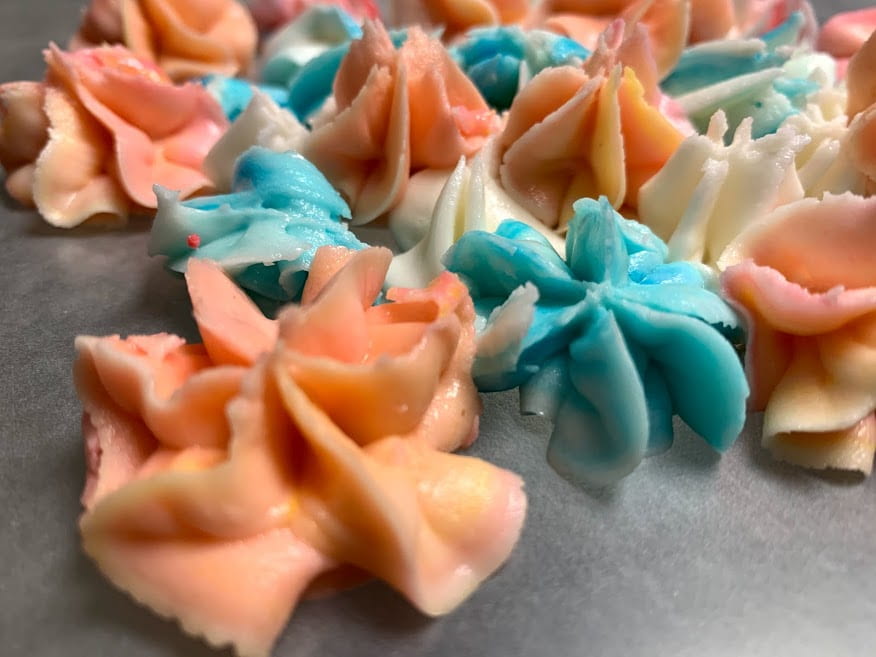
To make flowers that were multi-coloured, I placed a bit of icing of one colour, and bit of another, into the same piping bag. I was scared at first that the colours would combine to create a murky, brown colour, but it worked out better than I thought! I feel like this was a really fun and helpful way to begin learning some piping techniques!
The multi-coloured piped flowersMore multi-coloured piped flowers!
How to Have a Beautiful Mind
During these past two weeks, I read and applied two more chapters of “How to Have a Beautiful Mind” into our conversations. This time, the chapters were “How to be interesting” and “How to respond.”
First of all, “How to be interesting.” In this chapter, de Bono explained several ways to keep conversations interesting: using “what if” statements, suggesting alternate possibilities, speculating, putting new ideas forward, and using the phrase “Well that’s interesting.” A quote that really stood out to me was this: “Being interested and interesting go together” (50). To me, this means that to fully engage in a conversation, you first need to be interested in it. Once you are fully immersed in a conversation, you can then make the conversation really interesting.
During meeting with my mentor, I did the following:
Found and made connections that link matters together and generate interest
When I was melting some chocolate in the microwave, I placed all the chocolate into a bowl. Cassandra explained that since the bowl I was using was glass, the chocolate would melt faster than if the bowl was made of another material. We connected this to the fact that glass conducts heat easier. From there, we were able to discussquestions like “how much faster will it melt in a glass bowl rather to a metal one?” This generated more interest in the topic and the conversation as a whole.
Explored, elaborated, and pulled interest out of the matter
When making the swiss buttercream, is was, at first, rather grainy. This was odd, and I was trying to figure out what I had done wrong in the recipe. Had I used the wrong amount of one of the ingredients? Had I missed a step? With some conversation, I realized that I had not allowed the butter to soften enough, and this was likely the cause of the bizarre texture. Through exploring the matter, I was able to solve the problem and attempt to fix it.
Used “what if” statements to get to now lines of thought
For the buttercream, seven egg whites were required. I asked, “what if I don’t have egg whites,” and Cassandra explained that I would then have to separate the egg whites from the yolks by hand. By using “what if” statements, I was able to learn a new skill and reach a new line of thought.
This week’s second chapter was “How to respond.” In this chapter, Edward de Bono gives some tips for responding to statements and questions during conversations. He says to always ask for clarification before responding, to ensure that you are not arguing against a different point that the other person was making. You can also support other’s ideas by relating them to a way you act or feel, or to something you have experienced. A few other tips discussed were to avoid “case making” arguments (where you only consider the point of view of one side), providing stories as possibilities but not guarantees, extending ideas, carrying forward ideas by looking at it from all angles, and also modifying any ideas to made then more agreeable to you. A quote to sum up the chapter: “support goes beyond agreement. You can support a point that has been made from statistics, from your own experience, from a shared set of values and so on” (64).
During my meetings with Cassandra, I did this following:
Asked for clarification when I was in doubt about something
When mixing all my ingredients together while baking, I was unsure about the consistency of the icing. Because I was uncertain, I showed her and asked if seemed the right consistency. From her feedback, I was able to reach a more accurate consistency.
Supported a point my mentor made
When measuring out ingredients, Cassandra said you can put the cup that has been in the sugar into the flour, but not the other way around. To support this point, I said, “because the flour sticks to the measuring cup,” and she added that this would cause contamination of the ingredients.
Shared a personal story that illustrates the conversation topic
When talking about different ways to package and freeze cakes, Cassandra said “My method, so that I don’t have to bake ten thousand cakes in a day, is I wrap them in a special way when they come out of the oven, and then I freeze them, so that the moisture stays inside.” By sharing a story to illustrate the situation, I could see how this could be applied to real life situations. Then, I was able to add that this strategy would be very helpful for this project because I am then able to work on cakes over a span of a few weeks. This is especially helpful for when I am just starting to learn the skills and techniques.
Modified an idea to make it more acceptable, stronger, or practical
When cracking eggs for the buttercream, Cassandra told me to always crack them into a separate bowl first so that if I accidentally get some yolk into the egg whites, it will only be one egg wasted, not all of them. Instead of cracking it into a clean bowl, I modified the idea and asked if it was alright if I instead cracked it into a measuring cup that I had already used. Because the measuring cups had been used to measure the sugar, and I was about to combine the eggs with the sugar anyways, cracking eggs into the measuring cup instead was a good way of not dirtying an extra bowl.
I am really looking forward to spending even more time working on different cake decorating techniques and learning even more from my amazing mentor! As always, thank you for reading my post, and please leave a comment if you have any questions!
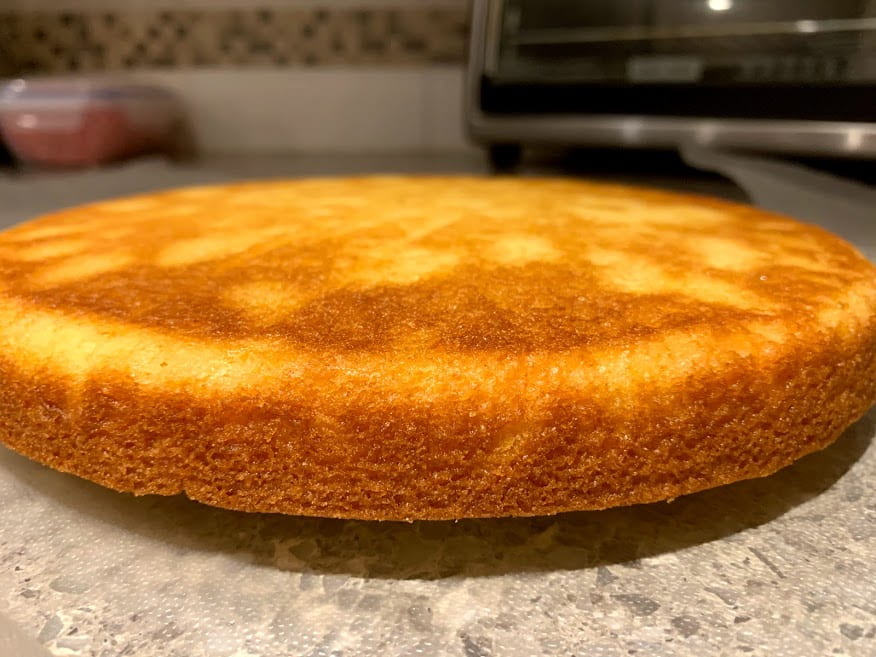
This yearmy In-Depth is cake decorating, and I have an amazing mentor, Cassandra! So far, we have had three meetings. The first meeting, Cassandra and I discussed a general overview for the project, as well as just talking to get to know one another. During our next meeting, we dove right into bakingpound cakes, which I froze after the first meeting so that I could ice them the following week. While I baked, Cassandra gave me tips, instructions, and feedback. I learned a lot of new facts about baking that I did not know before. As an example, when I was cracking the eggs for the cake, Cassandra explained that they should be cracked on a flat surface, not the edge of a bowl. This is because when the eggshell hits a thin surface, like the rim of a mixing bowl, the shell will break into the yolk. On the other hand, when it cracks on a flat surface, like a counter, the shell will notcrack inwards, and there is a smaller chance of getting shell in the egg.
My cakes before baking
One of my cakes after baking
During our third meeting, I made the ganache that is used to fill the pound cakes. As well, since making the ganache did not take too long, I started preparing the decoration for the cake: hot chocolate balls! I did this by melting white chocolate and brushing a thin layer of it on the chocolate molds. The molds were then frozen, and later I applied a second coat of chocolate to the molds. During our next meeting, we will assemble and decorate my first cake!
The white chocolate in molds for the hot chocolate bombs
“How to Have A Beautiful Mind”
Throughout this project, we are reading “How to Have A Beautiful Mind” by Edward de Bono. This book discusses ways to become a more interesting person byhaving more interesting conversations with others. The first three chapters of “How to Have A Beautiful Mind” cover agreeing, disagreeing, and differing.
Agreeing
When meeting online with Cassandra, I found it all too easy to agree with everything she said. Cassandra obviously knows way more about baking and cake decorating than I do, so I had to work to not over agree. “How to Have A Beautiful Mind” explains that when you agree at all times, you will rarely learn new ways of thinking. Edward de Bono writes, “when you lose an argument you may as well have gained a new point of view,” and that quote really stuck with me during my conversations with Cassandra.
A good example of when I applied the concepts in the first chapter was during our first meeting. I had a vague plan for the project (which I addressed in my last post), and Cassandra also had a few ideas. She suggested that she could teach me the steps for decorating a cake in stages, with one new step each week. For example, the first week we would make the cake, the next we would ice it, the following week we could decorate it, etc. I thought that this was a really great way to slowly introduce the skills in a memorable fashion, so I told Cassandra that I fully agreed with her idea. Once we had agreed on that broad plan, we could focus a bit more on the specific details of the project. Because I was able to see the value of her ideas, we created a plan that I am really excited about! So, while the final timeline we created was not what I had originally expected, by agreeing with Cassandra I gained a new point of view, and I believe that I will learn so much more because of our agreement.
Disagreeing
The next chapter discusses how to disagree. This chapter gives necessary advice such as not disagreeing just for the sake of disagreeing, as well as always giving a reason behind your different views.
Luckily, Cassandra and I have not had much to disagree on so far; however, there were lots of times when I applied the concepts from this chapter in our conversations. One of the key points when disagreeing is politeness. If you are rude, others are less likely to attempt to understand your opinion, and having a conversation becomes extremely difficult. At the start of this project, I asked Cassandra to complete a criminal record check for the school. When the deadline started approaching, I considered how to best address the topic in a way that would not seem too harsh. In the end, I made sure to be polite and explained why getting the crim check done was important. Because I was able to apply the concepts from this chapter during this discussion, Cassandra was able to understand why this was important to me. As well, I was able to consider her side. I knew that Cassandra is super busy, andher taking the time to mentor me is extremely generous. She agreed to go complete the crim check in a few days’ time, which was a compromise since she was able to work around her schedule, while also completing the important task for the project.
Differing
Finally, the thirdchapter is about how to differ. The main point I took away from this chapter is that different points of view and life situations will create varying opinions, and often the best way to handle a situation is to try to find a middle ground.
One of the first conversations Cassandra and I had was aboutscheduling our weekly meetings. I have a fairly busy schedule because of the amount of extracurriculars I take outside of school, so finding a day and time that worked for both of us was a challenge. While Cassandra had more available time near the start of the week, Mondays and Tuesdays are two of my busiest days. To find a middle ground, we applied one of the concepts from this chapter, which was to clearly state what each differing opinion was. Once we both understood what the other was thinking, we were able to compromise on Wednesday, since it is still fairly near the start of the week, and I was able to find a time that did not interfere with my extracurricular activities.
In-Depth 2021 is starting out really well, and I am super excited for the rest of the project! As always, thank you for reading my blog post, and if you have any questions, please put them in the comments below 🙂
Hello! My name is Emma, and this is my first blog post for In-depth 2021!
What is In-Depth?
In-depth is a TALONS project spread over several months, where we, the students, choose a skill we wish to learn more about. We then find a mentor in the community who is an expert in the field we plan to study who guides our learning throughout In-Depth.
What skill will I be learning this year?
This year, I have chosen cake decorating as my skill. Over the next few months, I will learn different cake decorating techniques, using a variety of materials such as different types of icing and fondant. My goal is to learn at least ten different techniques during In-Depth 2021. By the end of my project, I hope to be able to combine all the techniques I will have learned to create one large cake design. With the help of my mentor, I will design my final cake, and this final piece will showcase all of my learning. Therefore, not only will I learn how to recreate each technique when working with different baked goods, I will also spend time learning how to make a design aesthetic and interesting to look at. Using a combination of these skills, I will create a final cake that is thought-provoking and aesthetic.
Currently, I know very little about cake decorating. I will still need to buy the supplies required for this year’s In-Depth, such as piping bags and piping tips, as well as the ingredients required to make the cakes and designs.
Who will help me out during In-Depth?
My mentor this year is Cassandra, the owner and artist at Cassandra Cake Co. I am so thankful that she has volunteered her time to help me learn this incredible form of art for this year’s In-Depth!
Of course, I would welcome any and all advice, feedback, or helpful comments that anyone has that could help me during this journey! Please feel free to comment any thoughts you have at the bottom of this post!
How will I be learning my skill throughout these next few months?
My goal is to learn at least ten(!) different cake decorating techniques for this year’s project. As well, I wish to learn how to design simple and more complex designs that I can then create. This will require a lot of time spent practicing the techniques, as well as time to learn these skills. I have created a rough timeline of when I will learn each skill, accompanied by a series of recourses to use throughout this journey.
My mentor Cassandra and I will have weekly meetings to learn these skills. Between meetings I will practice all the skills I have learned to ensure that I can execute each technique as perfectly as possible. Creating both simple and complex designs, I will gradually gain more and more knowledge that will eventually help me create my final cake design.
Here are a few recourses showing some cake decorating techniques:
Due to COVID-19, Cassandra and I are unable to meeting in person; therefore, we will be meeting weekly over video calls. I am lucky to have a moderately large kitchen where I will be able to make and decorate baked goods.
When will I be learning all this?
In-Depth 2021 ranges from now (January) until late May, and I will be meeting weekly with my mentor, Cassandra. For the first week, I will focus on getting to know Cassandra so that we may work well together, and I will feel comfortable asking questions and learning as much as possible. For the next few weeks, I will focus on learning the various cake decorating techniques. Every couple weeks I will take time to review the skills I learned in previous meetings with Cassandra. In April and May, I will begin learning how to design the cakes, as well as how to combine multiple techniques into one design to prepare for my final cake.
Why did I choose to learn cake decorating?
Cake decorating is such an awe-inspiring form of art. That people can create beautiful and thought-provoking masterpieces using only edible materials is truly incredible. I’ve often wondered if I could ever create pieces of art that intriguing, and now is my chance to try. And, just like any other form of art, I believe that beautifully decorated cakes can bring a sense of joy to anyone.
And we all need a bit of joy in these challenging times.
Thank you again to Cassandra for helping me throughout these next few months! I am super excited for In-Depth 2021!
Hello! My name is Emma, and I chose to learn American Sign Language for my In-depth this year. I feel that communication is a large part of my day-to-day life. I found it so incredible that people who cannot speak have such an amazing way to communicate, and I knew I had to take this opportunity to learn ASL!
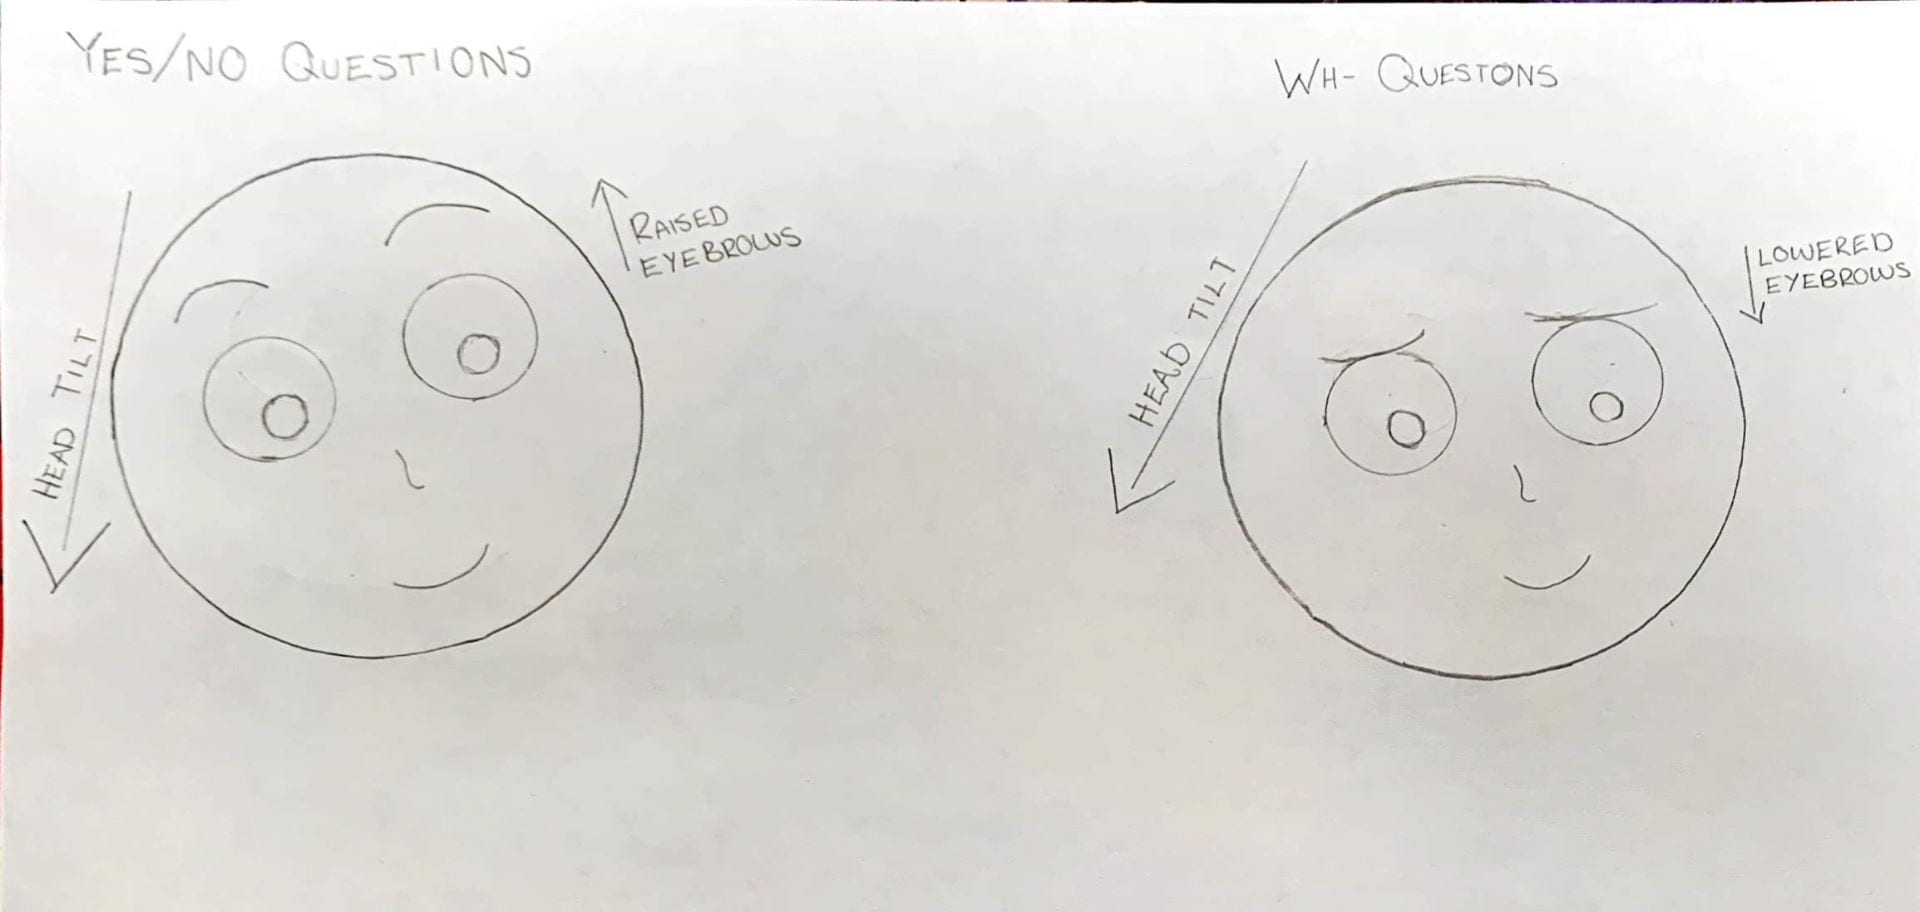
I have spent the last few months learning ASL with my mentor Sandra. The following video shows a few of the signs I have learned and outlines some very basic ASL grammar used when asking questions:
When watching the “How to sign questions” section of the video, you might notice that for certain questions my eyebrows are raised, and for others, my eyebrows are lowered. This is very important for asking questions in ASL. When you are signing yes or no questions, you should raise your eyebrows, and when signing wh- questions (who, what, where, when, why), you should lower your eyebrows. These facial expressions clarify what type of question you are asking.
If you have any questions or comments, please leave a comment on this post and I will respond as quickly as possible!
Thank you, Sandra, for teaching me ASL over the last five months! You taught me so much, even though half the time we couldn’t meet in person due to the pandemic. I could never have learned this much without you!
And thank you for visiting my blog for In-depth night!
Since my last blog post, I have been meeting with Sandra, my mentor, regularly, using Zoom, andI have been learning more signs and ASL grammar. I have learned a few more activity signs by watching these videos recommended by Sandra:
In one of our meetings, Sandra taught me how to sign different chores and errands. I struggled a bit with remembering to use facial expressions and grammar, such as raising my eyebrows when signing the subject of the sentence and lowering my eyebrows when asking questions. I also learned how to ask questions about days of the week and activities, such as “what are you doing tomorrow”, and how to respond with proper grammar. The sentence structure for English and ASL is very different; in English you might say “I am going grocery shopping tomorrow”, but in ASL you would sign “tomorrow I am going to shop food at food store”. When asking “what are you doing tomorrow?” in English, you would sign “tomorrow you do what?” in ASL. When asking “do you vacuum every day?” in English, you would sign “you floor vacuumevery day?” in ASL. They are small changes sometimes, yet they make a large difference in what you are signing.
I have also been practicing recognizing signs and signing more quickly, something I still need a lot of practice with. I have been using ‘THE ASL APP’ to practice signing numbers and ages, and I have been going through some of the old worksheet Sandra gave me to review some of the concepts.
Here is a video where I show how to sing ages up to ten years old:
On In-depth night, I plan on showing several videos in which I sign various topics. For example, I will have an activity video, where I will sign certain activities, and I will also have an ‘about me’ video, where I will sing a bit aboutmyself in ASL. I will also explain how to use some basic ASL grammar while signing, which you will be able to see in the video as well as by reading some information in the blog post. I hope that everyone will be able to learn a bit of ASL by watching some of the videos and enjoy learning a bit about ASL grammar!
It has been really strange learning ASL through Zoom with Sandra, but not strange in a bad way. It was weird at first, not being able to see Sandra in person, but we adapted well, and I feel that I have learned so much in these few months. I will keep learning all the way up to In-depth night with Sandra, and maybe even after on my own. There are so many videos out there where you can learn ASL! Using the videos Sandra has recommended (‘ASL That’videos are really good for learning signs) I hope to continue studying ASL.
I have met with my mentor, Sandra, twice now using Zoom, since we are not able to meet in person. I have had to adjust my project slightly, but since I am still able to meet with my mentor online to learn ASL, I can continue learning from Sandra. There have still been certain aspects of my project that have had to change. Luckily, there are several videos and sources online that I can refer to that teach ASL signs and grammar. Before each meeting, Sandra sends me a few online resources that I can watch or read that give an overview of what we are going to learn in the following meeting. Meeting using Zoom online is very useful, as Sandra and I are still able to communicate and there is a ‘chat’ function where we can type to communicate as well.
In the past few weeks, I have learned quite a bit. We spent time reviewing some of the signs I have learned, and then Sandra taught me family signs. She showed me how to sign all the family signs, as well as how to explain the ‘ranking’ of siblings (who is oldest, youngest, genders, etc.). I am super grateful that Sandra is still willing to meet with me and teach me American Sign Language!
What kinds of learning opportunities does my mentor provide to expose me to new learning?
Since Sandra teaches ASL as her job, she has access to worksheets that help show the signs I am learning and explain the facial expression and grammar that must be used when signing certain phrases. Since she is no longer able to give me these worksheets in person, Sandra emails me the PDFs of the worksheets before each meeting, and I print them so that I am able to refer to them during the meetings. She also knows of some very helpful videos and online recourses that help learn ASL signs.
What kinds of learning opportunities exist to reinforce new learning?
One of the learning opportunities that exists to reinforce new learning are YouTube videos and other online recourses. Before meetings, Sandra will send me videos teaching what we are going to learn the next meeting, which means we can go more in-depth into the learning each week since I already had a brief overview of some of the signs and grammar. Here are some of the YouTube videos Sandra has recommended for me to watch:
What kinds of opportunities exist that might accelerate learning?
Some of the learning opportunities that might accelerate learning are online recourses such as YouTube videos and ASL apps. There are a lot of videos that teach ASL signs, but I am still looking for a few videos that will teach some new ASL grammar. I have also downloaded ‘The ASL App’ and ‘Sign Me ABCs’ on my phone, where I can practice signing some basic signs such as animals and numbers, and I can also practice recognizing finger spelled words rapidly.
When we get together what do we talk about?
When Sandra and I meet, we only communicate using ASL, which makes communicating challenging. We often will discuss what it is I am learning. For example, when Sandra was teaching me how to sign leisure activities, we learned what each of us enjoyed doing in our spare time. When I was learning how to sign family signs, we talked about our family and our siblings and our pets. We also occasionally talk about her work as an ASL teacher, as she must also adjust to teacher her classes online. Although it is challenging to communicate with Sandra when we are not talking, it encourages me to pay closer attention to the signs and I feel I learn faster.
What is going particularly well in my mentoring relationship right now?
One thing that is going particularly well in our mentoring relationship right now is that I am getting to know Sandra by asking her questions during the meeting about the topics I am learning. In our last meeting, we discussed our family. I learned a bit about her siblings and her pets. Another thing that is working well is that we are both flexible. Trying to find times to meet when both Sandra and I have busy schedules, especially now that Sandra has to work from home, and we are doing ‘online learning’ for school, so we are both flexible for when we will meet. Sometimes we will decide a day to meet and them realize that we are actually unable to meet at that time, and we work together to schedule another time where we are both free.
What are we learning about one another?
One of the things I am learning about Sandra is what she likes to do in her spare time and a bit about her family. Because I learned how to sign leisure activities, we asked each other what activities we liked doing in our spare time. From that, I got to know that Sandra likes cooking and sewing, and that both Sandra and I enjoy knitting. When I was learning family signs, we would tell each other a bit about our family and our siblings. I learned that Sandra has many siblings and that she is the second youngest, and that she has a cat.
I am super excited that I get to continue meeting Sandra using Zoom online and learning ASL!