

WELCOME TO MY 2021 IN-DEPTH PROJECT!
This year my goal for In-Depth was to learn the ins and outs of architectural rendering as well as acquire a basic understanding of constructive components. My mentor, Murray MacKinnon has kindly taken time to guide me through this project and I am extremely grateful for his technical insights and help.
My project is centred around designing, drawing, and rendering an original two story family home inspired by ‘green building’. Below, I will take you through the process step by step to demonstrate my learning…. ENJOY!
p.s. if you have any questions/comments please put them down below! I’d love to answer some!
Step 1: Bubble Diagram
A process that uses circles to map out general floor layouts

Step 2: Refining (“boxing”)
Turning the circles into squared out shapes


Step 3: Refining (adjustments)
Expanding the entrance and breakfast nook


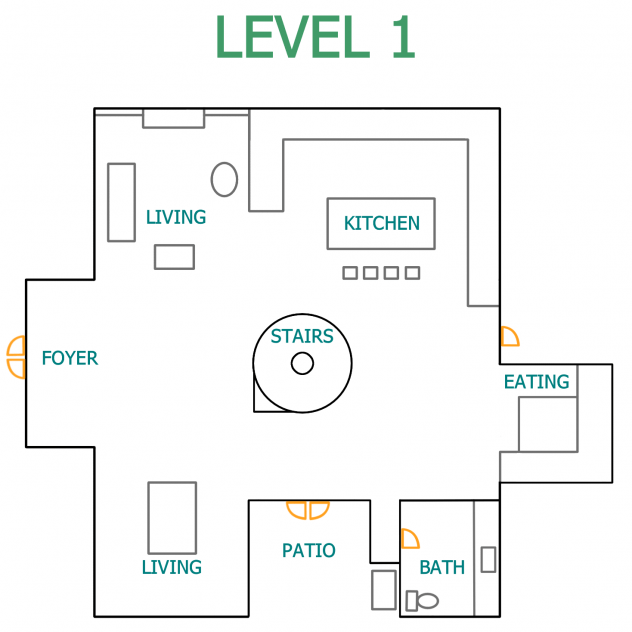
Step 4: Refining (digitally)
Transferring my plans onto a digital medium


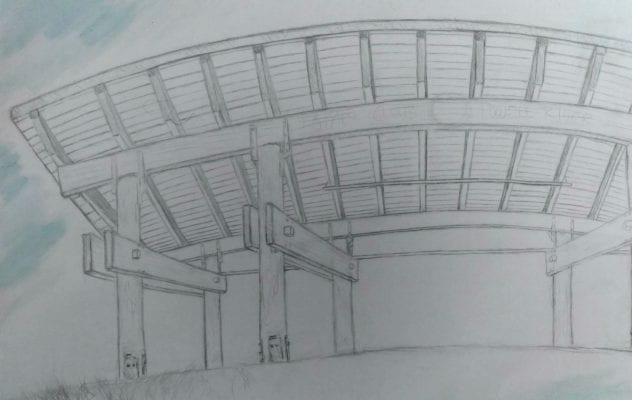
Step 5: Perspective Practice (highlights)
Practising my use of perspective in drawings involving buildings/structures

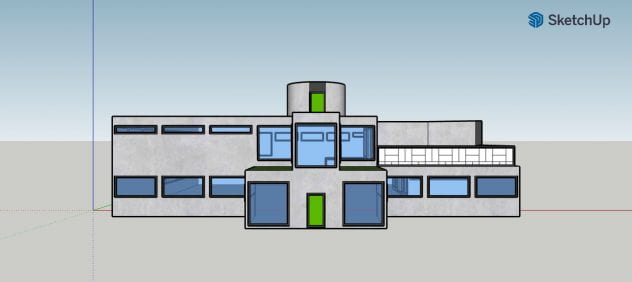
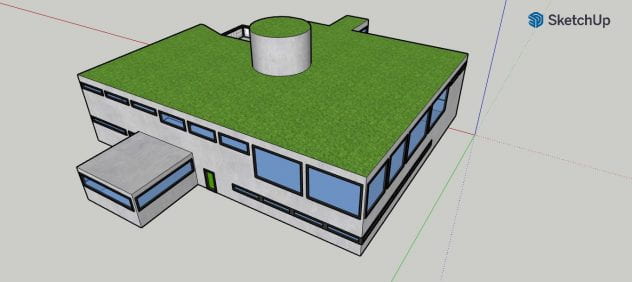
Step 6: Rendering!
Using the dimensions of my plans to render a house (w/garden roof)


THANK YOU!
Wow absolutely amazing Mel! So impressive 🙂
Awesome, Mel! A really clear lay out of your learning and design progression. I really love the idea of designing with bubbles first in order to get the meta ideas down and then refining as you move forward. I noticed there was a lot of changes between your bubble stage and the squared off shapes..what informed these changes? Thanks!
Thanks Mel! Such a clear layout of your learning and process. I am really intrigued by the idea of designing using bubbles initially and then refining as you move forward. I noticed there was a lot of change between your layout at the bubble stage and when you moved into squared off shapes..what informed these changes? Awesome!
Well done Mel! It’s so satisfying to watch this idea come to life as I continue to scroll down; the final product looks amazing! Now how much do we need to pay to get this house built? Let’s make a TALONS suite.
Wow good job Mel! I really like how you showed the different steps that you took to design the house. I can tell you’ve spent a lot of time working on the fine details of your project. Are you planning on doing something related to architecture in the future?
Hey Mel. Loved seeing your work develop. You should ask Colby about how his sister Haley was inspired to pursue architecture and is going to UBC to their SALA program starting in September. If it interests you at all, it’s an extremely competitive program but it’s worth looking into now. They also have some courses you can take to see if you enjoy it. (From Angie, Colby’s Mom!)
Super cool Mel!! All the 3D drawing is falling into place for me now. Really neat!
thank you mr. sals! after this in-depth project I’m admittedly rethinking my decision not to sign up for geometry (maybe in grade 12 though)
This is a beautiful home. I can see plenty of spaces to have friends (and hopefully family) over. I am just missing the cattery. Where can that be added?
Most important question: Did you have fun while working on this project?
dankie mama! en die huis IS die cattery
Wow Mel this is great! I had no idea designing a house was done the way you explained with your pictures. I wish I had a house like the one you designed. Are you interested in going into architecture or design as a profession when your older or is this just a hobby that you were interest in?
gracias! there are admittedly various ways to go about designing a house, this is just one of many
as for if I’ll pursue architecture in the future, that door is still open, but it’s not by any means set in stone
I really enjoyed seeing the process of your design and the different stages. I know my Dad enjoyed the many conversations and tutoring he was able to share. It will be fascinating to see where your artistic talents land you in life. Great job Mel!
thank you so much! I too enjoyed our conversations and I’m so happy that he could mentor me! I had so much fun during this process thanks to Murray
This is really cool! The different stages and “evolutions” of the plan are really interesting to look at. The render of the building looks really cool as well! How long did it take you to make that render?
thanks man!
the rendering process probably took me about 18 hours (but that’s mostly because I’m not overly familiar with sketchup)
Mel, your drawings are amazing! I loved seeing the cute little bubbles develop into the beautiful final rendering! The perspective practice was so cool to see too!
In your introduction, you mentioned that the design was inspired by “green building.” What are the main differences between this and traditional building?
aw, thank you grace!
there’s quite a few things that differ between traditional and green buildings.
some aspects include:
-using locally resourced materials
-heat efficiency
-electric efficiency
-water efficiency
-using sustainable/non-toxic materials
-choosing a land plot that doesn’t disturb the environment
-minimal elevation altering
-reduced waste/pollution
This is a really cool project Mel! What was the most rewarding part of the project?
finishing it 🙂
Incredible watching all of the different steps refine your drawings. The final renders look super cool, can I live there, please?
sure! we can find one more person and all be roommates!
I really liked how you showed multiple perspectives on SketchUp. Cool Design!
ty!
Good job Mel! I love how you showed your growth throughout the project. It’s really cool to see the building grow in complexity throughout the different used mediums!
Thanks j! I certainly wasn’t expecting to jump all over the place with different mediums but that’s where it ended up I guess
Wow! Your building plans and final product alike look spectacular! Through so many different steps taken, it’s very impressive to see the growth of your project! Which portion of the process did you enjoy the most and why?
that means a lot, thanks! my favourite component is probably just the experience of playing around with layouts and being in control of what it actually will end up looking like
It was amazing to the see the progression from concepts in bubbles to final renderings. Are you looking to study architecture at university?
thank you so much! I am entertaining the idea of studying architecture… only the future will tell.
Looks really cool! You used SketchUp really well, and I like the design of your house. What’s your favorite part of your design?
aww, thanks! my favourite part would probably be the breakfast nook 🙂 they’re so quaint
Whoa, this looks so cool, Mel! What an awesome project concept! Why’d you chose it?
I appreciate the compliment! I chose this topic because I’ve been meaning to combine my love of art with something more “technical”, and it led me here
Oh my gosh Mel your building designs are phenomenal!! I love how you can really see the progress from the first few drawing to the final designs on SketchUp 🙂 But really, so so amazing!!
that’s really nice, thank you!
Your project looks great! The perspective pieces are really well done.
thank you hailey!
Your progression of images shares your design process effectively. What was the most challenging part of this process? What led you to this particular design, in particular the orientation and arrangements of bubbles at the start?
thank you!
the most challenging part of the process would most likely be the ‘rendering’ aspect. Rendering consists of both technical and artistic skills which makes it somewhat more difficult than a simple perspective drawing. My final design emerged after countless attempts and redraws of my plans, there wasn’t any one thing that led me to my final copy, but a number of small changes here and there.